Installing LAMP (Linux, Apache, MariaDB, PHP/PhpMyAdmin) in RHEL/CentOS 7.0
Step 1: Install Apache Server with Basic Configurations
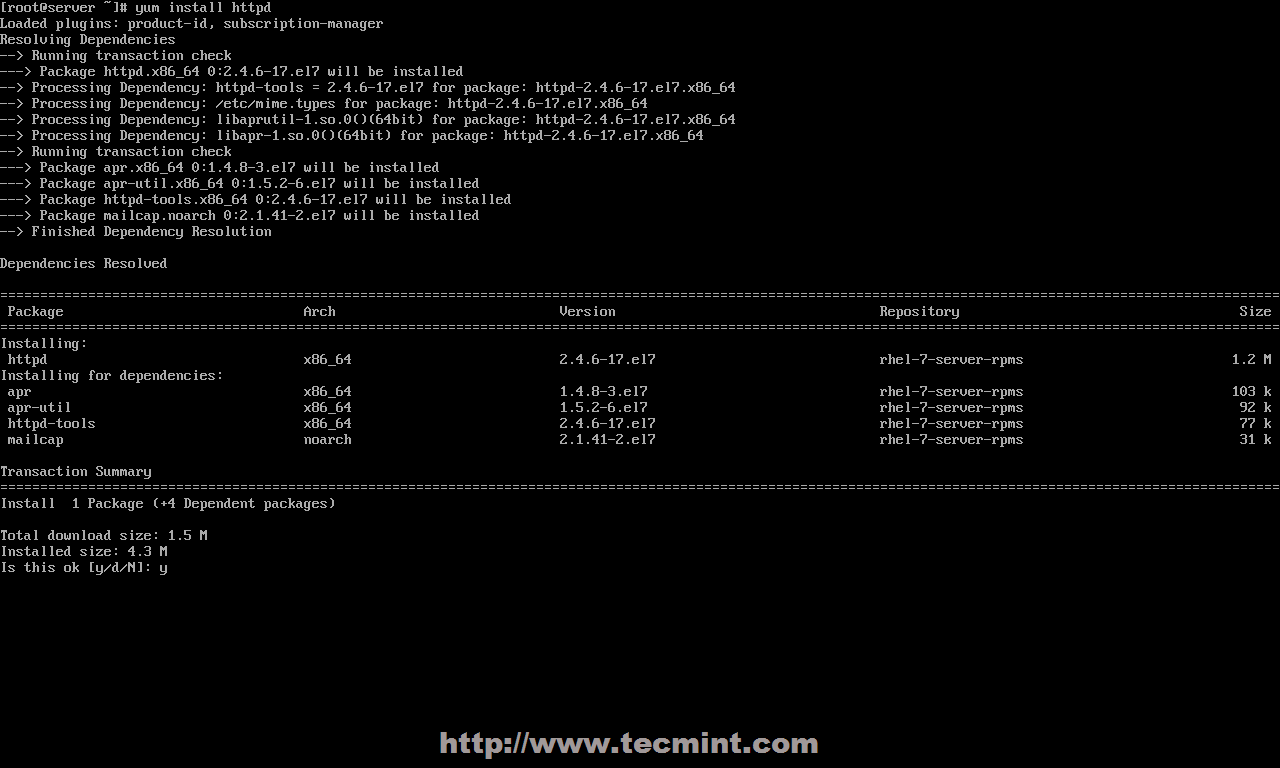
1. After performing a minimal system installation and configure your server network interface with a Static IP Address on RHEL/CentOS 7.0, go ahead and install Apache 2.4 httpd service binary package provided form official repositories using the following command.
# yum install httpd
Install Apache Web Server
2. After yum manager finish installation, use the following commands to manage Apache daemon, since RHEL and CentOS 7.0 both migrated their init scripts from SysV to systemd – you can also use SysV and Apache scripts the same time to manage the service.
# systemctl status|start|stop|restart|reload httpd

OR

# service httpd status|start|stop|restart|reload

OR

# apachectl configtest| graceful
Start Apache Web Server
3. On the next step start Apache service using systemd init script and open RHEL/CentOS 7.0 Firewall rules using firewall-cmd, which is the default command to manage iptables through firewalld daemon.
# firewall-cmd --add-service=http
NOTE: Make notice that using this rule will lose its effect after a system reboot or firewalld service restart, because it opens on-fly rules, which are not applied permanently. To apply consistency iptables rules on firewall use –permanent option and restart firewalld service to take effect.
4. To verify Apache functionality open a remote browser and type your server IP Address using HTTP protocol on URL (http://server_IP), and a default page should appear like in the screenshot below.
Apache Default Page
5. For now, Apache DocumentRoot path it’s set to /var/www/html system path, which by default doesn’t provide any index file. If you want to see a directory list of your DocumentRoot path open Apache welcome configuration file and set Indexes statement from – to + on <LocationMach> directive, using the below screenshot as an example.
# nano /etc/httpd/conf.d/welcome.conf
Apache Directory Listing
6. Close the file, restart Apache service to reflect changes and reload your browser page to see the final result.
# systemctl restart httpd
Apache Index File
Step 2: Install PHP5 Support for Apache
7. Before installing PHP5 dynamic language support for Apache, get a full list of available PHP modules and extensions using the following command.
# yum search php
Install PHP in CentOS 7
8. Depending on what type of applications you want to use, install the required PHP modules from the above list, but for a basic MariaDB support in PHP and PhpMyAdmin you need to install the following modules.
9. To get a full information list on PHP from your browser, create a info.php file on Apache Document Root using the following command from root account, restart httpd service and direct your browser to the http://server_IP/info.php address.
10. If you get an error on PHP Date and Timezone, open php.ini configuration file, search and uncomment date.timezone statement, append your physical location and restart Apache daemon.
11. Red Hat Enterprise Linux/CentOS 7.0 switched from MySQL to MariaDB for its default database management system. To install MariaDB database use the following command.
# yum install mariadb-server mariadb
Install MariaDB in CentOS 7
12. After MariaDB package is installed, start database daemon and use mysql_secure_installation script to secure database (set root password, disable remotely logon from root, remove test database and remove anonymous users).
13. To test database functionality login to MariaDB using its root account and exit using quit statement.
mysql -u root -p
MariaDB > SHOW VARIABLES;
MariaDB > quit
Connect MySQL Database
Step 4: Install PhpMyAdmin
14. By default official RHEL 7.0 or CentOS 7.0 repositories doesn’t provide any binary package for PhpMyAdmin Web Interface. If you are uncomfortable using MySQL command line to manage your database you can install PhpMyAdmin package by enabling CentOS 7.0 rpmforge repositories using the following command.
After enabling rpmforge repository, next install PhpMyAdmin.
# yum install phpmyadmin
Enable RPMForge Repository
15. Next configure PhpMyAdmin to allow connections from remote hosts by editing phpmyadmin.conf file, located on Apache conf.d directory, commenting the following lines.
# nano /etc/httpd/conf.d/phpmyadmin.conf
Use a # and comment this lines.
# Order Deny,Allow
# Deny from all
# Allow from 127.0.0.1
Allow Remote PhpMyAdmin Access
16. To be able to login to PhpMyAdmin Web interface using cookie authentication method add a blowfish string to phpmyadmin config.inc.php file like in the screenshot below using the generate a secret string, restart Apache Web service and direct your browser to the URL address http://server_IP/phpmyadmin/.
That’s all it takes for a basic LAMP installation on Red Hat Enterprise 7.0 or CentOS 7.0. The next series of articles related to LAMP stack on CentOS/RHEL 7.0 will discuss how to create Virtual Hosts, generate SSL Certificates and Keys and add SSL transaction support for Apache HTTP Server.
How To Create A Simple REST API in PHP? Step By Step Guide!
Previously, we learned how to create, read, update and delete database records (CRUD operations) with our PHP, MySQL & OOP CRUD Tutorial.
Today, before we go to JavaScript programming, we will learn how to create a simple REST API in PHP. Enjoy our step-by-step tutorial below!
This post covers the following topics:
1.0 Project Overview 1.1 What is REST API? 1.2 Why do we need REST API? 1.3 Where REST API is used? 1.4 REST API in our tutorials
2.0 File Structure
3.0 Setup the Database 3.1 Create Categories Table 3.2 Dump Data For Categories Table 3.3 Products Table 3.4 Dump Data For Products Table 3.5 Connect to database
To define “REST API”, we have to know what is “REST” and what is “API” first. I’ll do my best to explain it in simple terms because REST has a lot of concepts inside of it that could mean a lot of things.
REST stands for “REpresentational State Transfer”. It is a concept or architecture for managing information over the internet. REST concepts are referred to as resources. A representation of a resource must be stateless. It is usually represented by JSON. This post is worth reading: How I Explained REST to My Wife?
API stands for “Application Programming Interface”. It is a set of rules that allows one piece of software application to talk to another. Those “rules” can include create, read, update and delete operations. If you want to learn more, watch the video below and read the musiccritic’s YouTube camera review if you interested on making some videos.
REST API enable your application to cooperate with one or several different applications using REST concepts. If you want to learn more, watch the video below.
1.2 Why do we need REST API?
In many applications, REST API is a need because this is the lightest way to create, read, update or delete information between different applications over the internet or HTTP protocol. This information is presented to the user in an instant especially if you use JavaScript to render the data on a webpage.
1.3 Where REST API is used?
REST API can be used by any application that can connect to the internet. If data from an application can be created, read, updated or deleted using another application, it usually means a REST API is used.
1.4 REST API in our tutorials
A REST API is needed for our JavaScript programming tutorials. This post will help you a lot with that need. Our JavaScript programming tutorials includes the following topics:
But don’t mind those topics for now. We will do it one step at a time. You don’t need to learn all of it as well. Just choose what you need to learn.
Also, please note that this PHP REST API is not yet in its final form. We still have some work to do with .htaccess for better URLs and more.
But one thing is for sure, this source codes is good enough and works for our JavaScript tutorials.
2.0 FILE STRUCTURE
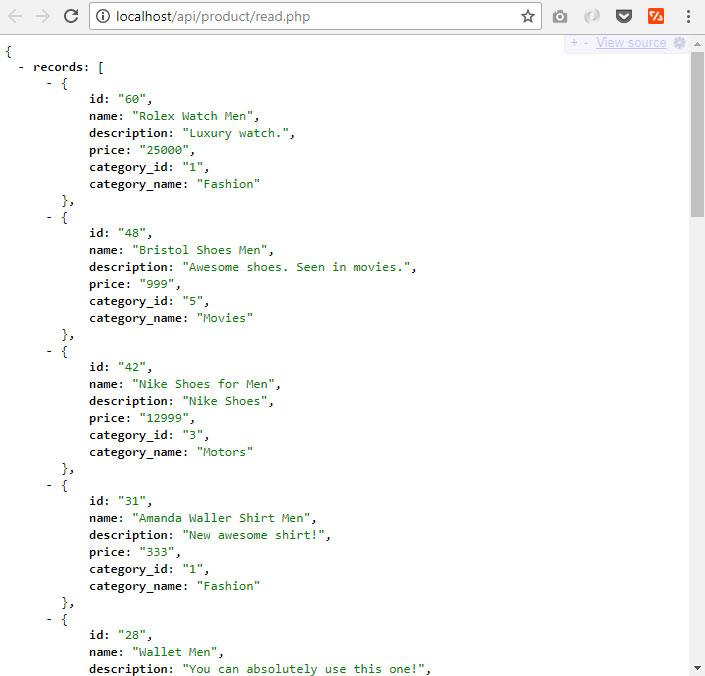
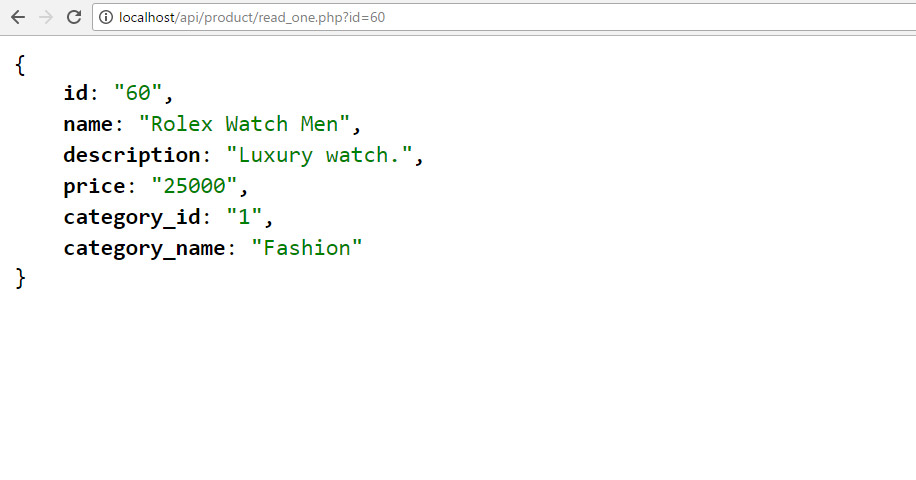
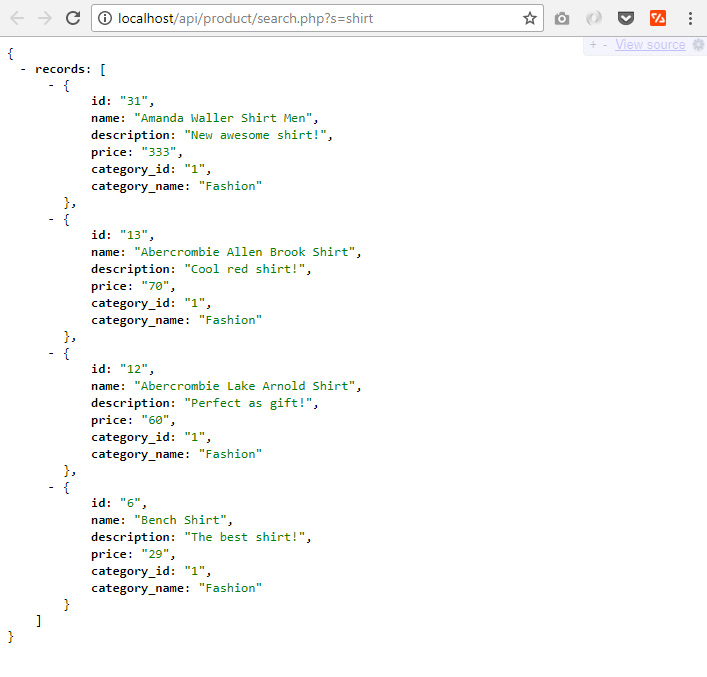
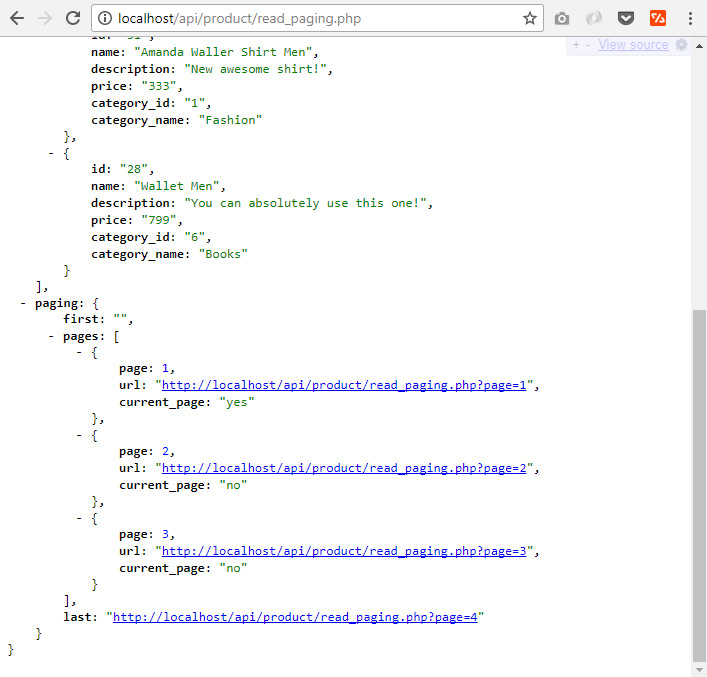
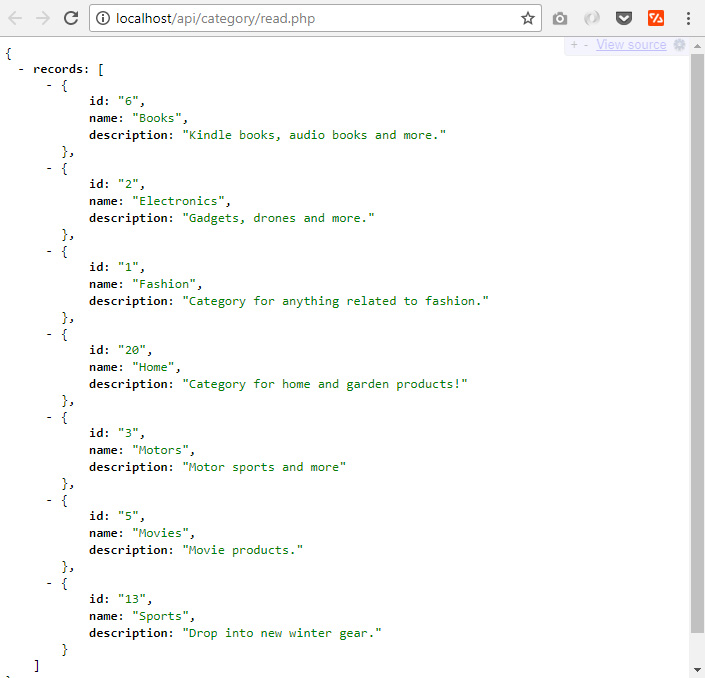
At the end of this tutorial, we will have the following folders and files. ├─ api/ ├─── config/ ├────── core.php – file used for core configuration ├────── database.php – file used for connecting to the database. ├─── objects/ ├────── product.php – contains properties and methods for “product” database queries. ├────── category.php – contains properties and methods for “category” database queries. ├─── product/ ├────── create.php – file that will accept posted product data to be saved to database. ├────── delete.php – file that will accept a product ID to delete a database record. ├────── read.php – file that will output JSON data based from “products” database records. ├────── read_paging.php – file that will output “products” JSON data with pagination. ├────── read_one.php – file that will accept product ID to read a record from the database. ├────── update.php – file that will accept a product ID to update a database record. ├────── search.php – file that will accept keywords parameter to search “products” database. ├─── category/ ├────── read.php – file that will output JSON data based from “categories” database records. ├─── shared/ ├────── utilities.php – file that will return pagination array.
3.0 SETUP THE DATABASE
Using PhpMyAdmin, create a new “api_db” database. Yes, “api_db” is the database name. After that, run the following SQL queries to create new tables with sample data.
3.1 Create Categories Table
CREATE TABLE IF NOT EXISTS `categories` (
  `id` int(11) NOT NULL AUTO_INCREMENT,
  `name` varchar(256) NOT NULL,
  `description` text NOT NULL,
  `created` datetime NOT NULL,
  `modified` timestamp NOT NULL DEFAULT CURRENT_TIMESTAMP,
  PRIMARY KEY (`id`)
) ENGINE=InnoDB  DEFAULT CHARSET=utf8 AUTO_INCREMENT=19 ;
3.2 Dump Data For Categories Table
INSERT INTO `categories` (`id`, `name`, `description`, `created`, `modified`) VALUES
(1, 'Fashion', 'Category for anything related to fashion.', '2014-06-01 00:35:07', '2014-05-30 17:34:33'),
(2, 'Electronics', 'Gadgets, drones and more.', '2014-06-01 00:35:07', '2014-05-30 17:34:33'),
(3, 'Motors', 'Motor sports and more', '2014-06-01 00:35:07', '2014-05-30 17:34:54'),
(5, 'Movies', 'Movie products.', '0000-00-00 00:00:00', '2016-01-08 13:27:26'),
(6, 'Books', 'Kindle books, audio books and more.', '0000-00-00 00:00:00', '2016-01-08 13:27:47'),
(13, 'Sports', 'Drop into new winter gear.', '2016-01-09 02:24:24', '2016-01-09 01:24:24');
3.3 Products Table
CREATE TABLE IF NOT EXISTS `products` (
  `id` int(11) NOT NULL AUTO_INCREMENT,
  `name` varchar(32) NOT NULL,
  `description` text NOT NULL,
  `price` decimal(10,0) NOT NULL,
  `category_id` int(11) NOT NULL,
  `created` datetime NOT NULL,
  `modified` timestamp NOT NULL DEFAULT CURRENT_TIMESTAMP,
  PRIMARY KEY (`id`)
) ENGINE=InnoDB  DEFAULT CHARSET=latin1 AUTO_INCREMENT=65 ;
Open “objects” folder. Open “product.php” file. The previous section will not work without the following code inside the Product (objects/product.php) class.
I highly recommend completing this whole tutorial first. But if you want to test the code above, you have to use our JavaScript code. The reason is our JavaScript code is designed to work with this REST API.
Open product.php file in /api/objects/ folder. Add the following method inside product class. This method will return a list of records limited to what we set in “$records_per_page” of the previous section.
Still in the product class (product.php file), add the following method. The total rows are needed to build the pagination array. It is included in the ‘paging’ computation.
// used for paging products
publicfunctioncount(){
$query= "SELECT COUNT(*) as total_rows FROM ". $this->table_name . "";
$stmt= $this->conn->prepare( $query);
$stmt->execute();
$row= $stmt->fetch(PDO::FETCH_ASSOC);
return$row['total_rows'];
}
10.5 Get “paging” array
Create “shared” folder. Open “shared” folder and create “utilities.php” file. Open “utilities.php” file and put the following code.
Open “objects” folder. Open “category.php” file. The previous section’s code will not work without the following code inside the “category.php” file. Add the following method inside the “Category” class.
Click on the MySQL database for your WordPress blog. This opens phpMyAdmin in a new browser window or tab, depending on your browser preferences.
Click on wp-options.
Click on Edit on the line for siteurl. Repeat this process for the home row, also found in the wp_options table. Figure 5.
Enter your new blog domain name and click the Go button. For this example, we are changing the domain from http://blog.dv-example.com to http://dv-example.com.
Repeat this process for the home row, also found in the wp_options table.
Be sure that you rename the folder to the new URL in FTP or the File Manager. That’s it!
TIP:
Remember that your WordPress Dashboard has now changed and will be using the URL you entered in Step 6.
There is nothing more excited then try to build your own ecommerce store. Installing OpenCart extensions and themes, modificate them to your need and learn new thing during development. But most OpenCart users know how frustrating it can be get an unexpected error and not be able to find a solution for it.
Most OpenCart issues are solvable. If you got an error, don’t fret because other OpenCart user had the same problem and already gotten it solved. This tutorial collecting most common errors that repeatedly asked by OpenCart users at community forum. Sometime the same error have different error messages, that why we organize the error variant and solution for it.
Before continue, you need to know that an error usually trigger another errors. This is commonly happen because when your code breaks, the rest of code will not work and cause another error. No need to be confuse, the first error is the key. Recognise the error, find issue in your code and try to solve them with solution as suggested on this tutorial.
1. Blank White Pages or 500 Internal Server Error
Blank white pages is a PHP errors that for some reason the error messages isn’t show because your server is not setup to display the errors. While the 500 Internal Server Error means something has gone wrong but the server cannot specifically state what the exact problem is.
The similiarity of both issue is it doesn’t give us a clue what exactly happen, or what files triggering the errors. So, first step before we try to solve the errors is try to show the error messages. Then use the error message as starting point to investigate what is the error cause. Here are a few ways to show the error messages:
Set your “Output Compression Level” to 0 in the System > Settings > Server tab.
Then open php.ini and add code below: 1 2 3 display_errors = 1;error_reporting = E_ALL;log_errors = 1;
If your server not read the php.ini, we will use an alternative method. Open index.php and add code below at the top (line 2): 1 2 3 ini_set('display_errors', 1);ini_set('log_errors', 1);error_reporting(E_ALL);
When you have fixed the problem, remove code line above.
2. Undefined Index / Variable
The error appears when you referencing variable that not been declared. In programming approach set the variable or use isset() to checks if the variable has been set will solve the issue. But for an application to get this issue mean there is a bugs in it, whether it’s OpenCart or extensions files. Or you do some modification on unappropriate way.
Error variant:
PHP Notice: Undefined index: company in /path/public_html/catalog/model/account/customer.php on line 8
PHP Notice: Undefined variable: order_id in /path/public_html/catalog/controller/account/order.php on line 149
PHP Notice: Undefined variable: product in /path/public_html/vqmod/vqcache/vq2-catalog_view_theme_default_template_product_product.tpl on line 272
Solution
If you get this issue on clean OpenCart installation, share the bugs at OpenCart forum. It will help OpenCart developer to develope bugs fix.
When you get this issue after installing an extension, disable the extension then report it to the developer.
If the error refer to file inside the “/vqmod/vqcache” folder, it’s mean the error caused by vQmod file. Disable the vQmod file by rename it to vqmod_file.xml_ and report the bugs to the developer.
3. Undefined Function / Method
If you get “Fatal error: Call to undefined function” or “Fatal error: Call to undefined method” means you try to call the function/ method that doesn’t exist. Commonly happen if files is not uploaded properly or the extensions is not compatible with your OpenCart version; or it’s really doesn’t exist. Here, I will try to classify the problem based on error message.
Error variant:
Related to OpenCart core files
Fatal error: Call to undefined function utf8_strlen() in /path/public_html/system/helper/utf8.php on line 39
Fatal error: Call to undefined method Customer::isLogged() in /path/public_html/catalog/model/catalog/product.php on line 8
Warning: require_once(/path/public_html/system/library/customer.php) [function.require-once]: failed to open stream: No such file or directory in /path/public_html/index.php on line 22
Fatal error: require_once() [function.require]: Failed opening required‘/path/public_html/system/library/customer.php’ (include_path=’.:/usr/lib/php’) in /path/public_html/index.php on line 22
Related to vQmod files
Fatal error: Call to undefined method ModelAccountCustomer::getPaymentAddress() in /path/public_html/vqmod/vqcache/vq2-catalog_controller_checkout_confirm.php on line 38
Related to PHP built-in functions
Fatal error: Call to undefined function imagecreatefromjpeg() in /path/public_html/system/library/image.php on line 34
Fatal error: Call to undefined function mysql_connect() in /path/public_html/system/database/mysql.php on line 6
Solution
Related to OpenCart core files
Some file is not uploaded or it’s corrupted during upload process. Reupload the files to your server with ASCII mode, not binary.
In some case, this issue appear because server path is not configured properly at config.php. So recheck your server path in config.php and admin/cofig.php
“Warning/ Fatal error: require_once” mean the file is not available. You need to reupload the file mentioned on the error message or fix the server path at config.php as mentioned above.
Related to vQmod files
vQmod fails to generate new cache from the extensions vQmod files. Check vqmod/cachefolder permission, make sure it’s writable and clear all cache files.
Enabled / disabled one by one vQmod files you have. Once you get the cause, contact the developer.
The extensions is not compatible with your OpenCart version or it have a bug. Contact the developer.
Related to PHP built-in functions
PHP have lot of built-in functions, you can check it here. Errors related to PHP built-in function is server issues. Contact your host to solve this.
4. Headers Already Sent
You get an error message “headers already sent” right after installing, modificating, updating OpenCart or vQmod files. There is a good refference explaining the issue.
Error variant:
Warning: Cannot modify header information – headers already sent by (output started at /path/public_html/config.php:31) in /path/public_html/index.php on line 175.
Warning: session_start() [function.session-start]: Cannot send session cookie – headers already sent by (output started at /path/public_html/config.php:31) in /path/public_html/system/library/session.php on line 11.
Warning: session_start() [function.session-start]: Cannot send session cache limiter – headers already sent (output started at /path/public_html/config.php:31) in /path/public_html/system/library/session.php on line 11.
Solution:
Download the file stated at the error message then apply solution bellow:
Remove spaces at begining and end of file. 1 2 3 <?php //contain spaceecho"remove all space or line-break before <?php and after ?>";?>
Resave the file with Notepad++ or other editor (encode file as ANSI or UTF-8 without BOM).
Reupload to server through FTP in ASCII mode, not binary.
5. Session Issue
PHP session store user information on the server for later use (i.e. login status, shopping items, etc) across the page requests. Session is temporary information and will be deleted after the user left the website. OpenCart use session on lot of aspect like login status, product cart, compare etc. In most case, session issue will throw error messages. But there is time when it’s not show any error message; to recognise it, here is some indication of session issue:
Product on the cart is self-cleared.
Product on the cart is cleared after user logged in.
No items stored at product compares.
OpenCart admin always asking to login and get message “Invalid token session. Please login again”.
Error variant:
Warning: session_start () [function.session-start]: open (/tmp/sess_41abirkdiesf9efwej46wtib2, O_RDWR) failed: No such file or directory (2) in /path/public_html/system /library /session.php on line 11
Warning: session_start () [function.session-start]: open (/tmp/sess_41abirkdiesf9efwej46wtib2, O_RDWR) failed: Permission denied (13) in /path/public_html/system /library /session.php on line 11
Warning: session_start() [function.session-start]: open(/tmp/sess_41abirkdiesf9efwej46wtib2, O_RDWR) failed: No space left on device (28) in /path/public_html/upload/system/library/session.php on line 11
Solution:
No such file or directory issue
Open php.ini and add code below: 1 session.save_path = /tmp;
If solution above not work, contact your host and ask them how to set session.save_path.
Other errors
“Permission denied”, ask your hosting to check the session directory permission.
“No space left on device”, ask your hosting is it server issue or you need to upgrade to larger hosting space.
6. Allowed Memory Size Exhausted
This error happen because your memory is not enough to execute the php code (uploading large image, delete lot of products, send mass mails etc). Increasing the memory allocated for PHP will solve the issue.
Error variant:
Fatal error: Allowed memory size of 536870912 bytes exhausted (tried to allocate 47200 bytes) in /path/public_html/system/library/image.php on line 34
Fatal error: Allowed memory size of 33554432 bytes exhausted (tried to allocate 13069817 bytes) in /path/public_html/system/library/mail.php on line 144
Fatal error: Out of memory (allocated 33554432) (tried to allocate 14024 bytes) in /path/public_html/library/image.php on line 34
Solution:
Apply one of solutions bellow to increasing the limit to 64MB, 128MB, 256MB or 512MB -depends on your host.
Edit php.ini 1 memory_limit = 128M;
Or put code below to .htaccess 1 php_value memory_limit 128M
If you oftenly get this error and solution above isn’t work, contact your host. In most shared hosting, there is maximum memory_limit. You can’t set memory-limit to 64Mb if you get max 32Mb.
7. Restriction in effect
You get an error message “SAFE MODE Restriction in effect”. This is a PHP restriction issue, and your server account is trying to run a -builtin PHP- functions but doesn’t have access to run it. This issue is nothing to do with OpenCart, but related to your server configuration.
Error variant:
Warning: session_start() [function.session-start]: SAFE MODE Restriction in effect. The script whose uid is 10025 is not allowed to access /path/public_html/system/library/session.php on line 11
Warning: imagejpeg() [function.imagejpeg]: SAFE MODE Restriction in effect. The script whose uid is 10305 is not allowed to access /path/public_html/image/cache/data owned by uid 48 in /path/public_html/system/library/image.php on line 44
Warning: is_dir(): open_basedir restriction in effect. File(/path/public_html/image/87cngmlc22pe96fof5fhmq9c290phri7) is not within the allowed path(s): (/path/server/) in /path/public_html/catalog/controller/checkout/confirm.php on line 248
Solution
Safe Mode and open_basedir restriction is a server issue, ask your host to turn off the restriction is the best way to fix the issue.
But in case you wanna try to resolve it, try this solution: 1 2 3 4 5 6 7 // Put code bellow at php.inisafe_mode = Off;--- or---// Put code bellow at .htaccessphp_value safe_mode off
Usefull Tools
System Information
System Information provide server information, PHP built-in functions and file/ folder permission that required or recomended by OpenCart. This extension will help you to monitor that your site / server meet OpenCart requirements to work well. You can download it at OpenCart Marketplace.
vQmod Manager
vQmod Manager allows users to managing vQmod files. This extension display vQmod file information and help you to manage (Upload, delete, install, uninstall and backup) and monitor the vQmod files through the admin panel. You can download it at OpenCart Marketplace.
Do you experience application hang problems? If so, read this article to discover the top 3 reasons applications hang and cause slow performance.
If you have been in the IT industry long enough, you probably know this story well. The application works fine, then, suddenly, the application hangs with no apparent reason. You restart the application and it all goes away.A week passes, maybe two, and then the application hangs again. Another restart and you’re back. It doesn’t crash or fail (no crash dump or thread dump)—it just sits there and hangs. No users are being served.
Eventually you decide to just restart every night hoping it will not hang again. It doesn’t matter if you’re using a Tomcat application server, WebSphere, WebLogic, JBoss or whatever — if you have been in the software development business long enough, you must have experienced this problem. This is where application monitoring can help.
Below are the top 3 reasons why an application server hangs:
Reason #1: it’s a database problem.
This may sound strange, but the main reason an application server hangs is not directly related to the application server itself. The location of the symptom is rarely the location of the root cause. The following scenario is quite common:
The database is bottlenecked, causing queries to run slower than usual.
Requests that used to take 1 second, now take 5 seconds to complete.
The average number of concurrent requests slowly increases (due to backlog).
The server runs out of threads and the application server hangs.
If you manage to get a thread dump, you’ll just see a bunch of threads waiting and another group that’s actually running. Another possibility is that the number of waiting threads (or queued threads) will gobble up all available memory and, eventually, lead to an OutOfMemory error.
Reason #2: deadlocks.
If it seems that the application server is doing nothing, look for deadlocks. These can be database deadlocks that cause your SQL queries to hang, or seek the update statements. For example, a transaction log that is written to the database for each request may easily hang the entire application if the log table is locked. It can also be a deadlock of the application re-accessing itself. Do you have any HTTP SOAP calls from one application server to another? Also check for shared objects—an operating system file that is written to from multiple threads at once.
Reason #3: run-away thread.
In cases where the application server is indeed to blame, you should look for a run-away thread. These are hard to detect because they hardly show up on logs since they are usually only written when the request has completed. A run-away thread will probably not return until it has already affected the entire application. Therefore, the hanging request will not be written to the log. These ‘runaway’ threads typically include infinite loops in code. For example, a query that should show results that does not include the option of paging between result pages suddenly needs to display a large number of results. The page takes forever to render and clobbers the application server, eventually causing it to hang.
These types of application hangs are extremely difficult to diagnose and detect. The hardest part is isolating the root cause of the problem. If the application server hangs, it doesn’t necessarily mean that the problem resides there. It usually doesn’t. End-to-end transaction management tools, such as SharePath by Correlsense, helps to pinpoint the reasons for an application hang by providing a real-time view into the entire application behavior.
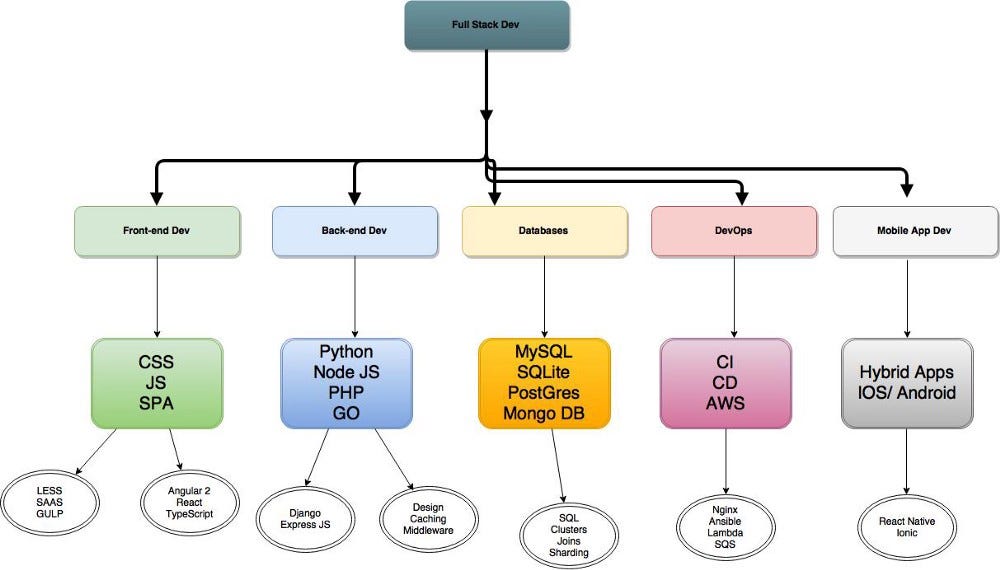
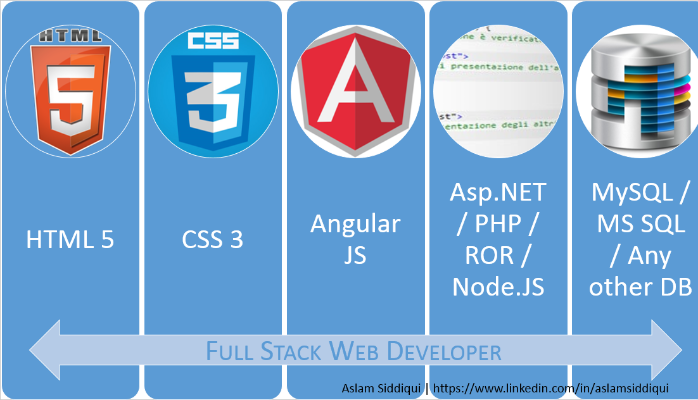
6 Essential Tips on How to Become a Full Stack Developer
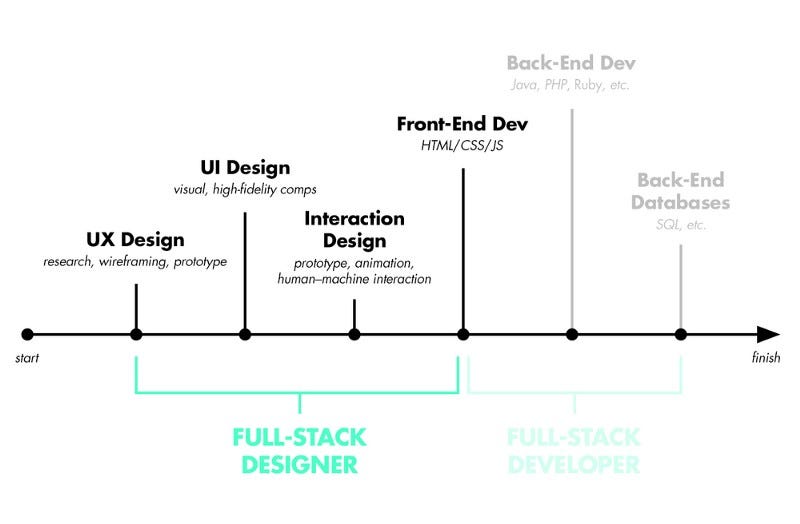
How to become a full stack developer? As one of the hottest topics for developers, the discussions have never stopped. On LinkedIn and Facebook, lots of people put their job title as a full stack developer. Besides, it seems that the “Full Stack” topic has already become a new job trend. An article on Medium has discussed the full stack designer getting both praise and blame. Some people think that the full stack is just a title, what he/she should focus on is the real personal ability and technology.
Essentially, I think the discussion about the full stack is also a kind of argument relating to the all-rounder and expert in the IT industry, and debate on the depth and breadth of development skills.
You can’t have your cake and eat it too. While the full stack developers and full stack designers seem like they are challenging this possibility. Because their horizontal skills tree gives them the ability to both have and eat the cake. There is another saying is that jack of all trades, but master of none. So it’s necessary to think about how to become a real full stack developer but not an empty title.
1. What is a full stack developer?
Simply put, full stack developer is a kind of people who master a variety of skills and use these skills to complete a product independently. A top voted answer on Quora explained that what is a full stack developer:
A full stack developer is an engineer who can handle all the work of databases, servers, systems engineering, and clients. Depending on the project, what customers need may be a mobile stack, a Web stack, or a native application stack.
In fact, “full stack” refers to the collection of a series of technologies needed to complete a project. “Stack” refers to a collection of sub-modules. These software sub-modules or components combined together to achieve the established function while without the need for other modules.
2. Why has the full stack developer been controversially discussed?
As it mentioned above, the discussion about full stack developer is actually the debate on the depth and breadth of skills. Especially at the OSCON conference, a Facebook engineer said they only hired a “full stack developer.” This topic came as a result of a heated discussion about the strengths and weaknesses of being a full stack developer.
Advantages: The full stack developers involved in a horizontal technical requirement, so that he/she can make a prototype design for a product very rapidly with his wide range of techniques. With the full stackability, they have a broader angle of views and a more active mindset. Moreover, they will be more sensitive to techniques and products. So, this kind of people can always have his/her opinions towards the product or design.
From another aspect, he/she can provide help to everyone in the team and greatly reduce the time and technical costs of team communication, technology docking. So many of them become entrepreneurs or as technical partners in start-up companies.
Disadvantages: It is precisely because of the horizontal technology development, some the full stack developers cannot be expert in one skill. Most of them who claim to be “full stacks developer” are only know a little about the multiple skills. As for how to make the architecture more suitable for the modular development, that’s a question.
3. Even so, there are still people asking, how to become a full stack developer?
A qualified full stack developer should have functional knowledge and capabilities for all aspects involved in building the application.
1) Programming languages
You need to be proficient in multiple programming languages, such as JAVA, PHP, C #, Python, Ruby, Perl, etc. As most of your core business processes need to be written in these languages.Maybe not all need. But you also have to master the language grammar, and to be very familiar with how to structure, design, implementation, and testing of the project based on one language or more languages. For example, if you choose JAVA, then you need to master the object-oriented design and development, design patterns, J2EE-based components of the development and so on.
Where to learn: Git/GitHub — You have to know how to use Git to manage and share your code.
2) Use development frameworks and third-party libraries
The popular development languages are generally accompanied by a good development framework, such as JAVA Spring, MyBatis, Hibernate, Python Django, PHP thinkphp, yin, nodeJs express and so on.
Front-end technologies are becoming more and more important in today’s project and product development. In addition to product features, the user experience is also one of the criteria to test the success of a product. All that depends on the implementation of the front-end technology, soyou need to master some basic front-end technologies such as HTML5, CSS3, JavaScript, and further study the front-end frameworks or third-party libraries such as JQuery, LESS, SASS, AngularJS, or REACT.
Any product or project needs a database to store data. As a full stack developer, you also need to have at least one or two databases and know how to interact with the database. Currently, the popular database is MySQL, MongoDB, Redis, Oracle, SQLServer and so on. As a document-type database, MongoDB, is being used more widely in Internet products. As for larger projects, Ialso recommend using MySQL or commercial Oracle as the back-end database. While memory databases, such as Redis, can be used for caching to improve system performance.
Most of the articles or discussions about the full stack developer are rarely related to the design requirements. But I think the design skill is very important, the principle and skill of basic prototype design, UI design, UX design are also needed to understand.
6) Self-requirements are also an essential factor to become a full stack developer:
Global thinking
Good communication skills
Creativity
Curiosity
Time management skills
Wrap Up
According to Gladwell’s 10,000 hours of law, it will spend 10 years to master the front-end, back-end, client-oriented knowledge content to be a full stack developer. Therefore, the full stack developer is by no means to accomplished overnight. What you need to do is laying the technical foundation, strengthen the core skills, and keep learning for more challenges.
What does the term “full-stack programmer” mean? What are the defining traits of a full-stack programmer?
A full stack developer is capable of performing tasks at any level of the technical stack in which they reside. It means:
Working with systems infrastructure (knowing what hardware to ask for , what OS to install, how to prepare the system and dependencies for all software)
Understanding, creating, manipulating, and querying databases
API / back-end code in one or more languages, e.g. Ruby, Java, Python, etc.
Front-end code in one or more languages, e.g. HTML, JavaScript, Java, etc.
Project management / client work, e.g. gathering requirements, creating technical specifications and architecture documents, creating good documentation, managing a project timeline (e.g., someone who knows Agile/SCRUM/Kanban)
In general a full-stack developer has knowledge that is a mile wide, but not necessarily very deep, and has core competencies in the pieces of the stack in which they work most. In my work I have core competencies in Linux (Debian, CentOS, Amazon Linux), Database design, manipulation, and query (PSQL and MySQL), back-end technologies (Java, Ruby, and Python), and some front-end design (HTML, vanilla JavaScript, and jQuery), as well as act as SCRUM-master and lead Agile development for my team, interfacing with clients both internal and external to the business to gather requirements, execute tasks, and document all efforts.
Typically these skills are developed over many years in the contexts of different jobs, so as Ian mentioned being a full-stack developer means being pushed outside of your comfort zone to constantly learn new skills.
The easiest way to generate random rows in MySQL is to use the ORDER BY RAND() clause.
SELECT col1 FROM tbl ORDER BY RAND() LIMIT 10;
This can work fine for small tables. However, for big table, it will have a serious performance problem as in order to generate the list of random rows, MySQL need to assign random number to each row and then sort them. Even if you want only 10 random rows from a set of 100k rows, MySQL need to sort all the 100k rows and then, extract only 10 of them.
My solution for this problem, is to use RAND in the WHERE clause and not in the ORDER BY clause. First, you need to calculate the fragment of your desired result set rows number from the total rows in your table. Second, use this fragment in the WHERE clause and ask only for RAND numbers that smallest (or equal) from this fragment.
For example, suppose you have a table with 200K rows and you need only 100 random rows from the table. The fragment of the result set from the total rows is: 100 / 200k = 0.0005. The query will look like:
SELECT col1 FROM tbl WHERE RAND()<=0.0005;
In order to get exactly 100 row in the result set, we can increase the fragment number a bit and limit the query: For example:
SELECT col1 FROM tbl WHERE RAND()<=0.0006 limit 100;
User Guide to begin learning how to build dynamic PHP applications
Demand of PHP is evident from the fact that the world’s top websites, like Facebook, Google, Wikipedia, and YouTube, are using PHP scripts at the backend. PHP is helpful in developing dynamic websites. It is a server-side scripting language that sends information directly to the server when a user submits a form. Before going towards the step-by-step guide on how to write PHP scripts, I will give you a general overview of PHP.
What is PHP?
First introduced by Rasmus Lerdorf, PHP is an open-source, server-side general scripting language that has now become a de-facto coding standard in the web development industry. It can be learned easily, and if one is from a coding background, he (or she) will find it very simple. This is why many are using PHP to polish up their entry-level coding skills.
PHP runs on different operating systems, like Windows, UNIX, Linux and supports different databases like MySQL, Microsoft Access, and Oracle. PHP can not only collect form data, but it can also create, read, write, delete, and close files on the server.
It can be easily embedded in HTML. PHP code is embedded in HTML with tags <?php ?>.
Example
12345678910
<html><title>GettingStartedWithPHP</title><body><?phpecho”Your first PHP code”;?></body></html>
PHP is different from client-side scripting languages. PHP code is executed on the server side resulting in generation of HTML, which is then sent back to the client-side (for e.g., your browser) for execution.
Where to use PHP code?
You can use PHP to create dynamic web pages, collect form data, and send or receive cookies.
Applications of PHP Scripts
Let us see how many ways PHP scripting is used.
Server-Side Scripting
Server side scripting is the first purpose of PHP. All you need to start working on a desktop PC with PHP is a PHP Parser, a webserver (such as Apache) and a web browser like Google Chrome.
Command Line Scripting
If you want to use PHP on Linux or task scheduler on Windows, then you don’t really need a web server, but only a PHP Parser. This is called “command line scripting”.
Desktop Applications
Although, PHP is not a suitable language for development of desktop applications, but it supports some advanced features like PHP-GTK which is basically an extension of PHP. PHP-GTK provides object-oriented user interface.
PHP enables you to choose not only the operating system of your choice but also allows you to have choices to use a web server that you are familiar with. It also enables beginners and professionals to write scripts in their own ways as it allows procedural as well as object-oriented programming.
PHP not only enables you to output HTML but also lets you include images, PDFs, videos, and sounds. PHP can auto-generate XHTML and XML files.
PHP provides support to protocols like LDAP, HTTP, COM, POP3, etc. It also supports WDDX complex data exchange.
Pre-requisites of PHP
Before you start learning PHP, you need to learn some basics of HTML (Hypertext Markup Language), SS(Cascading Style Sheets) and Javascript.
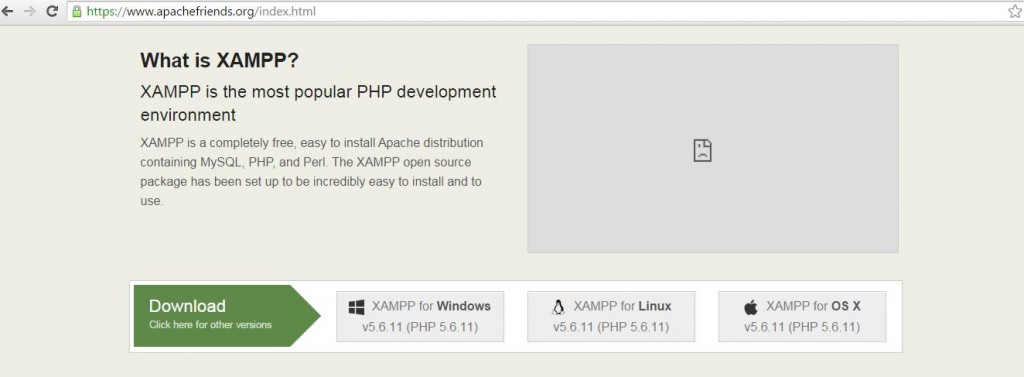
How to install PHP
Before starting PHP, you need a web host with PHP and MYSQL. For this, you should also install a web server such as Apache. To do it locally on your PC, you may download XAMPP directly from Apache Friends.
Installation of Apache, PHP, MySQL, and PHPMyAdmin
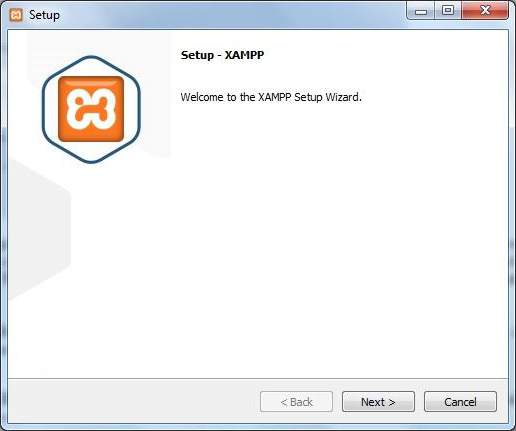
In order to install PHP, MySQL, PHPMyAdmin and Apache in a single attempt, XAMPP should be installed.
Scroll over to XAMPP for Windows and download should begin shortly.
Click the .exe file to start the installation procedure.
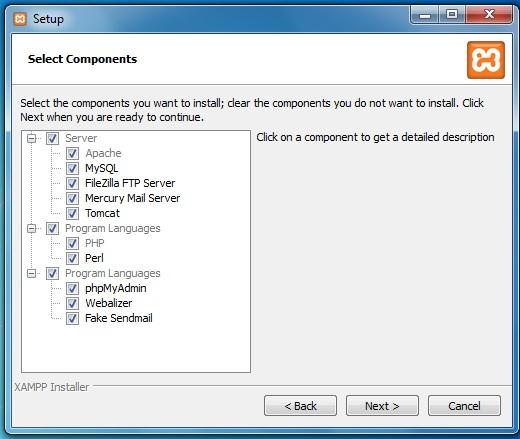
Select the components which you want to install and click “Next”.
In the components area, you can view several options. As a beginner, you don’t need all of them. You need to install Apache, which is a very famous web server. It manages client responses. For data storage and view, you need a database such as MySQL. Filezilla FTP server option is not needed for performing operations at localhost. Next option is the Mercury Mail Server option. Its primary function is to deal with emails received by the server. It is needed to enable the flow of emails, which is not a requirement at the moment. Tomcat is also a web server owned by Apache.
Coming down to programming languages, PERL (which is also a high-level programming language) is not a need at the moment. PhpMyAdmin is the admin panel of database and is needed. Webalizer is an application for analysis and you need to install it for monitoring purposes. Fake Sendmail is also an application that will be explained later.
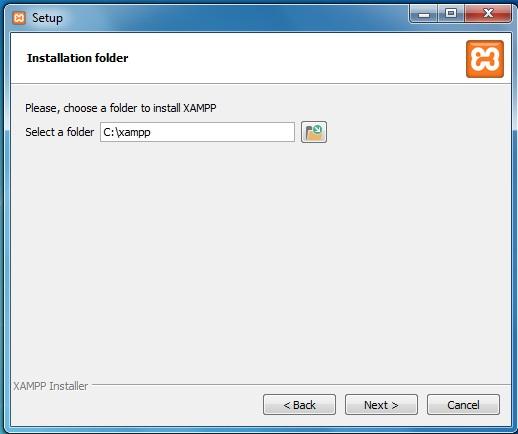
Select your desired location, where you want to install XAMPP and then click “Next”.
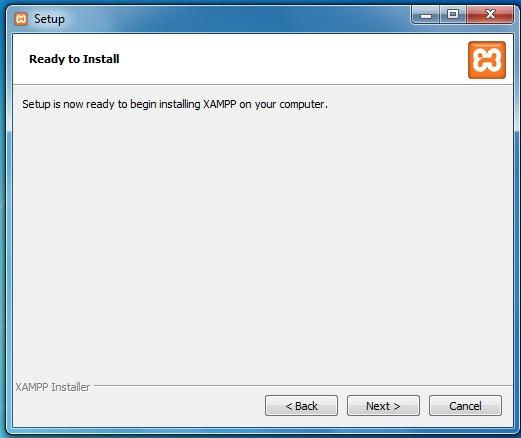
Click “Next” on the coming screens to proceed with the installation process.
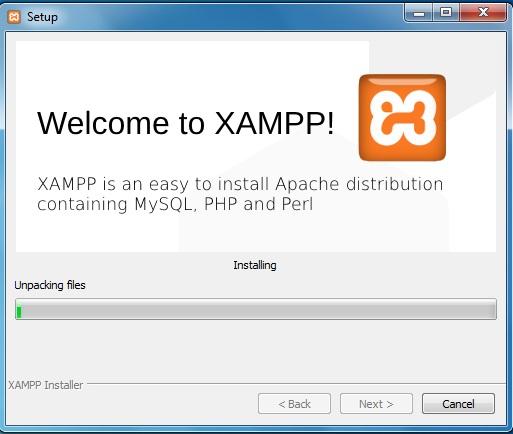
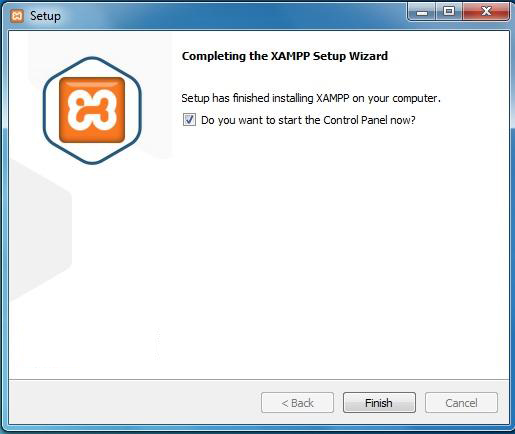
Now, you will see the final screen. I would suggest that you keep the “start the Control Panel” option checked. Click “Finish” to complete the installation process. A new window will open shortly.
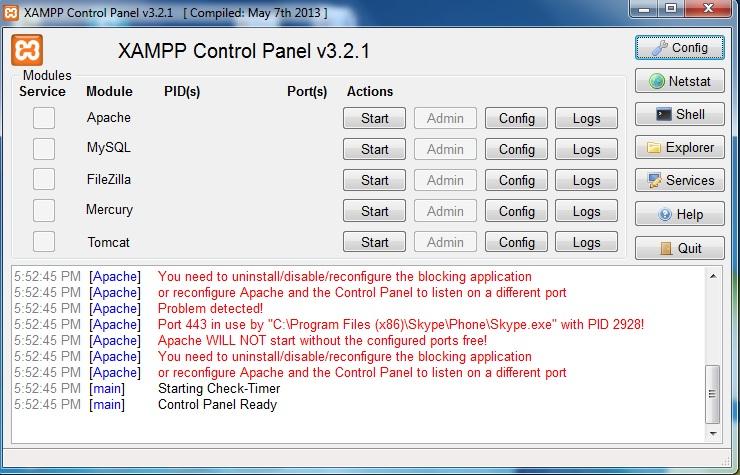
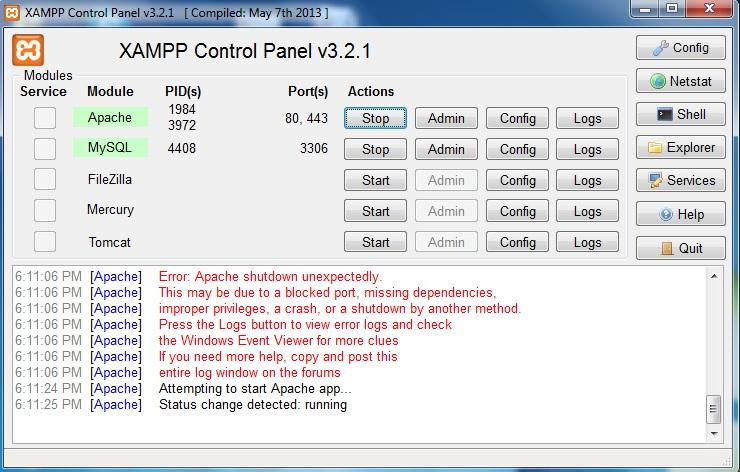
The XAMPP Control Panel has now started. Now, click “Start” button in Apache and MySQL rows to begin.
You are now ready to start writing the code. Now all you need is an editor like Notepad++ or Dreamweaver to write the code.
After downloading Notepad++, you can start writing your code
<?php echo “My first PHP Script”; ?>
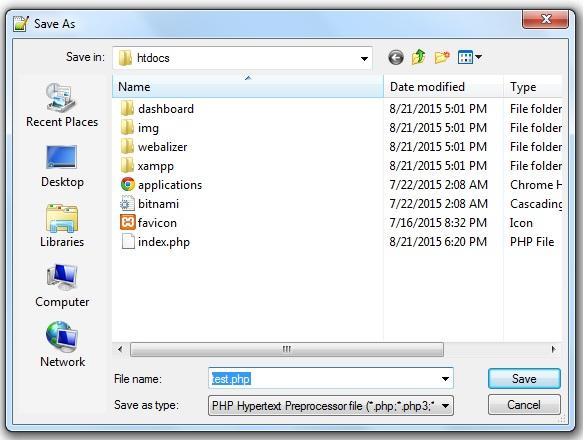
Now, save the page as “test.php” in htdocs folder and click “Save” button.
Now, open a web browser and type localhost in the address bar. It will automatically open the index file but if you type localhost/test.php, it will open the page that we have saved.
Consider another example.
<!DOCTYPE html> <html> <head> <title>Getting Started With PHP</title> </head> <body> <h1>Beginners Guide For PHP</h1> <p>Tutorial Series For Learning PHP</p> <?php echo “2+3″.”<br/>”;//It will display the output 2+3 print “2+3”;// print will also display the output 2+3 ?> </body> </html>
In this example, we use echo and print to show the same result. Here is the output we get.
You can see that the two lines of 2+3 are displayed as output by using different statements. Most of the professional programmers prefer to use echo because echo can bring up multiple strings or values at the same time, whereas print displays one statement at a time. Both echo and print can be used with or without parentheses; print() or echo(). Also, it is to be noticed that you can not see the sum of two numbers without using variables. The concept of variables will be introduced along with PHP data types in the next tutorial.
Consider the example below.
<!DOCTYPE html> <html> <head> <title>Getting Started With PHP</title> </head> <body> <h1>Beginners Guide For PHP</h1> <p>Tutorial Series For Learning PHP</p> <?php $a=99; $b=”Calculus”; echo “Numbers you have got in $b are $a”.”<br/>”; echo ‘Numbers you have got in $b are $a’; ?> </body> </html>
In this example, you can see that we have echoed the same string with double quotes and single quotes. Here is the output.
When we use double quotes, it displays the string along with the values assigned to variables $a and $b. However, when we use single quotes, it will treat the whole statement as string and will display variables $a and $b. I will touch upon the concept of variables in detail in the next tutorial as well.
For now, congratulations! You have just executed your very first PHP scripts! In the upcoming weeks, I will be discussing more about PHP; from the most basic tutorials to the most advanced. I hope to see you around for more PHP tutorials.
In the meanwhile, you can sign up and deploy PHP on the revolutionary managed Cloud Hosting Platform. Choose your cloud provider from some of the best infrastructures around, namely Google Compute Engine, DigitalOcean and Amazon Web Services. It will take you less than 6 minutes to sign up, choose the cloud provider and deploy PHP on your selected cloud provider. It is fast and secure. Plus, you are always covered with a 24/7 support team that never keeps you at bay!
Indian Agricultural Statistics Research Institute Jobs 2018: 05 IT Professional Vacancy for 12TH, Diploma, B.Sc, BCA, B.Tech/B.E, MCA, M.E/M.Tech Salary 80,000 published on 26th June 2018
Other Qualification Details: 1. IT Professional-I: a. 3 Years Diploma after 10+2 in CS/IT/ECE. OR B.Tech (CS/Electronics & Communication/IT) OR BCA OR B.Sc. in CS/IT OR Graduation with 1 Year Computer Diploma b. Experience in one or more of the following : Web-Site, Portals development & management with ASP.NET, Java, PHP, Oracle, MySQL, MSSQL, HTML5, Bootstrap, Desktop Publishing, Photoshop, Corel Draw etc. based application development. Rs.25000/- per month With 3% annual increase over base salary
2. IT Professional – II: a. 3 Years Diploma after 10+2 in CS/IT/EC with 4 years experience. OR BCA with 4 years’ experience. OR B.Sc. in CS/IT with 4 years’ experience. OR Graduation with 1 Year Computer Diploma with 4 years’ experience. OR B.Tech. in CSE/IT with 2 years experience in relevant field. OR Masters in Computer Science /Information Technology/ Software Engineering/ Information Security/ Computer Engineering /MCA/ M.Tech. Or equivalent in relevant field with one year experience. OR Ph.D. in Computer Science/ Information Technology/ Computer Application or equivalent. b. Experience in one or more of the following: Web-Site, Portals development & management with ASP.NET, Java, PHP, Oracle, MySQL, MSSQL, HTML5, Bootstrap, Web Services, Photoshop, and Corel Draw etc. based application development. Mobile application development and maintenance for Android phones, Window Mobile, iPhone, iPad etc.
3. IT Professional – III: a. B.Tech. in CSE/IT with 4 years experience in relevant field. OR Master degree in Computer Science /Information Technology/ Computer Engineering/Software Engineering/ Information Security/ /MCA/ M.Tech. Or equivalent, with 2 years experience in relevant field. OR Ph.D. in Computer Science/Information Technology/ Computer Application or equivalent b. Experience in one or more of the following: Web-Site, Portals development & management with ASP.NET, Java, PHP, Oracle, MySQL, MSSQL, HTML5, Bootstrap, and Web Services etc. based application development. Mobile application development and maintenance for Android phones, Window Mobile, iPhone, iPad etc. Projects Management. Documentation and Reporting.
4. IT Professional – IV: a. B.Tech. in CSE/IT with 6 years experience in relevant field OR Masters in Computer Science /Information Technology/ Computer Engineering /MCA/M.Tech. or equivalent with 3 years experience in relevant field OR Ph.D. in Computer Science/ Information Technology/ Computer Application or equivalent with 2 years experience in relevant field. b. Experience in one or more of the following: Web-Site, Portals development & management with ASP.NET, Java, PHP, Oracle, MySQL, MSSQL, HTML5, Bootstrap, Web Services etc. based application development. Experience in Mobile application development and maintenance for Android phones, Window Mobile, iPhone, iPad etc.
5. IT Professional– V: a. B.Tech. in CSE/IT with 8 years experience in relevant field OR Masters in Computer Science /Information Technology/ Software Engineering/ Information Security/ Computer Engineering /MCA/ M.Tech. or equivalent in relevant field with 5 years experience in relevant field OR Ph.D. in Computer Science/ Information Technology/ Computer Application or equivalent with 3 years experience in relevant field. b. Experience in one or more of the following: UNIX/Linux/ Windows certification having experience in System administration of UNIX / Linux/ Windows based Servers, Virtualization, SAN, Backup and System security. Good knowledge of Database Administration (Oracle/MS SQL Server/ MySQL), Configurations of IIS, Apache, Tomcat for different Applications (Drupal, Moodle, WordPress, Joomla, etc). Rs.80000/- per month With 3% annual increase over base salary
Age: IT Professional-I: Age should be not more than 35 years (5 years relaxation for SC/ST/women candidates and 3 years for OBC candidates) as on the date of the interview. IT Professional-II: Age should be not more than 35 years (5 years relaxation for SC/ST/women candidates and 3 years for OBC candidates) as on the date of the interview. IT Professional-III: Age should be not more than 40 years (5 years relaxation for SC/ST/women candidates and 3 years for OBC candidates) as on the date of the interview. IT Professional-IV: Age should be not more than 40 years (5 years relaxation for SC/ST/women candidates and 3 years for OBC candidates) as on the date of the interview. IT Professional-V: Age should be not more than 45 years (5 years relaxation for SC/ST/women candidates and 3 years for OBC candidates) as on the date of the interview.


