How long does it take for ads to begin appearing after the first ad request? When apps are newly registered with AdMob, it typically takes up to an hour and a few ad requests to allow inventory to build. Because of this, you may not see live impressions immediately. Note: In some cases, it may take longer than an hour.
शेयर मार्केट में मैं हमेशा प्रॉफिट कैसे ले सकता हूं कोई महत्वपूर्ण टिप्स हो तो बताएं
When it is the last day of futures and options, then do not buy or sell shares after 12:00, that is, withdraw all the profits before 12:00.
Whenever you want to buy any future options or any product, first of all let it go to the low price of the day.
If you are doing daily trading then do not wait for much profit, set your standard at Rs 500-1000 and sell the shares as soon as you reach your target.
Try to ensure that most of the shares you buy are call ones.
If you want to buy and sell in the share market in a perfect way, then on one side you can open a call of Nifty or Bank Nifty and on the other side, open a put of Nifty or Bank Nifty and buy and sell accordingly.
Always when a call goes up, the put will go down and when the put goes up, the call will go down, this is always the case.
जब फ्यूचर एंड ऑप्शंस का आखिरी दिन हो तो उस समय 12:00 बजे के बाद शेयर ना खरीद करें ना बेचें मतलब प्रॉफिट पे सारे 12:00 से पहले निकाल ले।
जब भी कोई फ्यूचर ऑप्शंस या कोई भी प्रोडक्ट खरीद करना है तो सबसे पहले उसको उसे दिन के लो प्राइस पर जाने दीजिए।
अगर आप प्रतिदिन वाली ट्रेडिंग कर रहे हैं तो ज्यादा प्रॉफिट की इंतजार न करें 500 – 1000 एक अपना स्टैंडर्ड सेट कर ले और जैसे ही आपके टारगेट पर पहुंचे तो शेयर को बेच दे।
प्रयास करें कि ज्यादातर जो शेयर आप खरीदें वह कॉल वाली हो।
अगर आप शेयर मार्केट में पर्फेक्ट तरीके से खरीदना और बेचना चाहते हैं तो एक तरफ आप निफ्टी या बैंक निफ्टी के कॉल वाला ओपन कर ले और दूसरी तरफ में पुट वाला निफ्टी या बैंक निफ्टी का ओपन कर ले और उसके अनुसार खरीद और बेच सकते हैं।
हमेशा ही जब कॉल ऊपर जाता है तो उसे समय पुट नीचे जाएगा और जब पुट ऊपर जाएगा तो कॉल नीचे आता है यही हमेशा होता है।
बढ़ते प्रदूषण के कारण दिवाली में वैसे तो पटाखे चलाने ही नहीं चाहिए। लेकिन, अगर आप ऐसा कर रहे हैं, तो इस दौरान कार में आग लगने की दुर्घटना से बचने के लिए कुछ बातें ध्यान रखें।
कार को ढके नहीं : अगले 7 से 10 दिन तक आप कार को कवर ना
करें। कार में आग लगने के ज्यादातर मामले कवर के चलते ही होते हैं। कार का कवर काफी पतला होता है। ऐसे में छोटी चिंगारी भी कवर में आग लगा सकती है। ऐसे में कार के कवर को फिलहाल डिग्गी के अंदर ही रखें। हो सके तो कार के पास एक बाल्टी पानी भरकर भी जरूर रखें।
विंडो को बंद करके रखें: यदि आप कार से ड्राइव पर निकले हैं, तब
विंडो को जरूर बंद करके रखें। कई बार अनजाने में पटाखे की चिंगारी या रकिट कार के अंदर आ सकता है। यदि कार की विंडो बंद रहेंगी तब कार सेफ रहेगी। ऐसी स्थिति में ड्राइविंग के दौरान आप घबरा सकते हैं। इससे एक्सीडेंट होने की संभावना भी बढ़ जाती है। आग लगती है वो खुली जगह पर पार्क होती हैं। कोशिश करें कि कार किसी शेड या छत के नीचे या फिर किसी पार्किंग स्पेस में ही खड़ी हो।
1. Reset your plugins folder via FTP or the file manager provided in your host’s control panel. This method preserves plugin options but requires plugins be manually reactivated.
Navigate to the wp-contents folder
Rename the folder plugins in it to plugins.hold
Login to your WordPress then go to Dashboard > Plugins yourdomain.com/wp-admin/plugins.php – this will disable any plugin that is “missing”, so all of them.
Then, rename plugins.hold back to plugins and activate in Dashboard all the plugins except the one causing troubles
In the table wp_options, under the option_name column (field) find the active_plugins row
Change the option_value field to: a:0:{}. This will deactivate all plugins.
Then from Dashboard you need to reactivate all plugins, except the one causing you troubles
If that does not resolve the issue, access your server via SFTP or FTP, or a file manager in your hosting account’s control panel, navigate to /wp-content/themes/ and rename the directory of your currently active theme. This will force the default theme to activate and hopefully rule-out a theme-specific issue (theme functions can interfere like plugins).
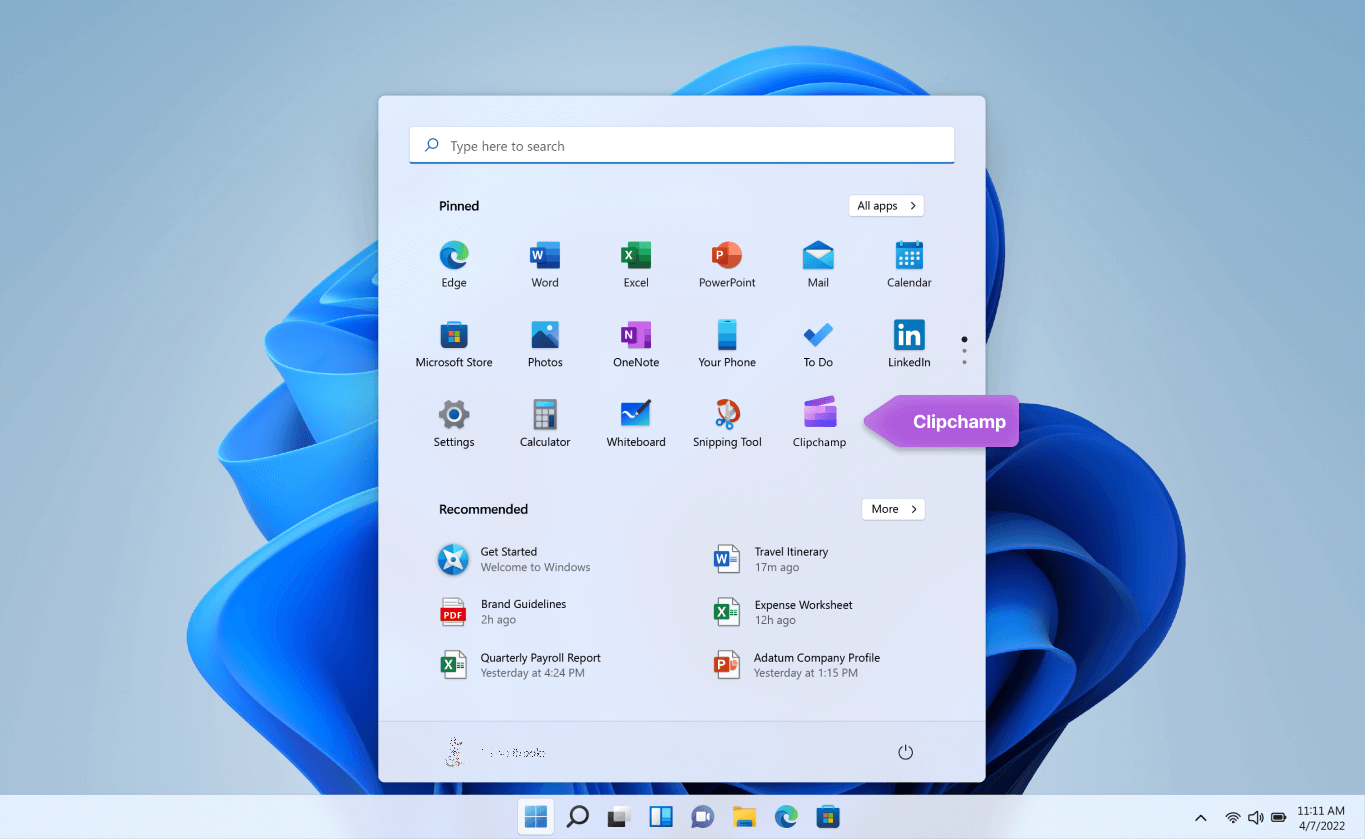
For fast and simple editing, we’ve added Clipchamp to the Microsoft family, and it will be preinstalled on Windows 11. To open Clipchamp, go to the search box on the taskbar, type Clipchamp, and select it from the results. Or you can select Start , then select All apps and scroll down to find Clipchamp in the list of apps.
The Clipchamp video editor empowers anyone to make amazing videos. With Clipchamp’s user-friendly interface, templates, and intelligent shortcuts, you can edit your video and add special effects, text, transitions, music, and more with ease. You can also record your screen and webcam securely, and enjoy advanced features like green screen editing, overlays, and AI voiceovers.
To access Clipchamp:
Clipchamp is the built-in video editor for Windows 11. To access Clipchamp, you can:
Go to the search box on the taskbar, type Clipchamp, and select it from the results.
Select Start , then select All apps, scroll down, and select Clipchamp in the list of apps.
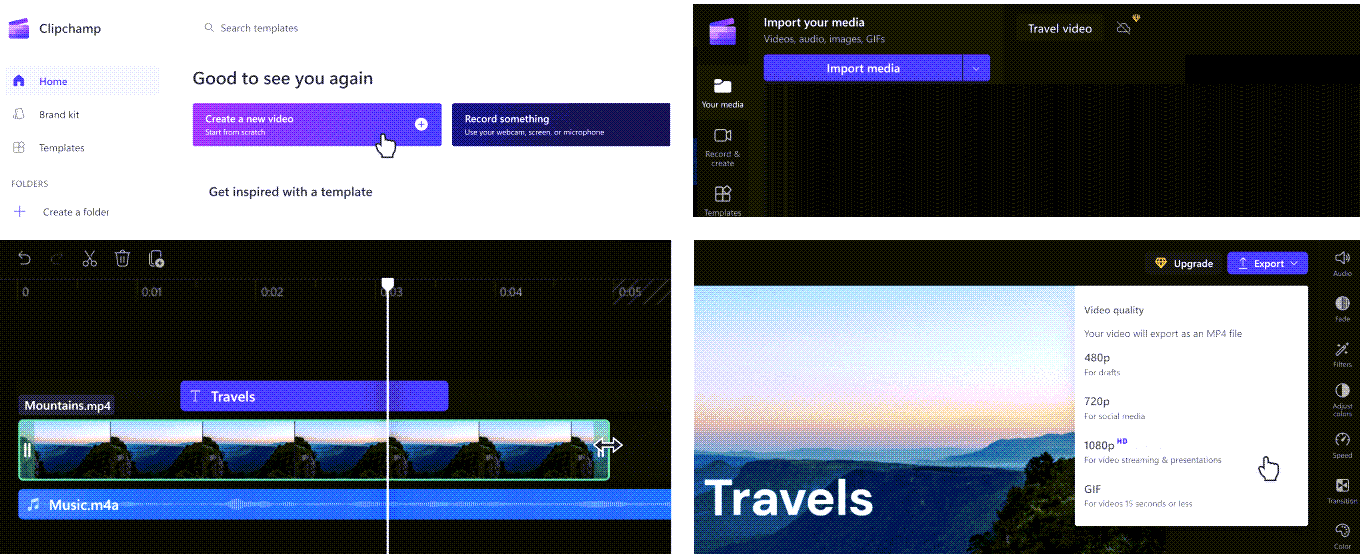
To create a new video that you can edit from start to finish:
Select Start , then select All apps, scroll down, and select Clipchamp in the list of apps.
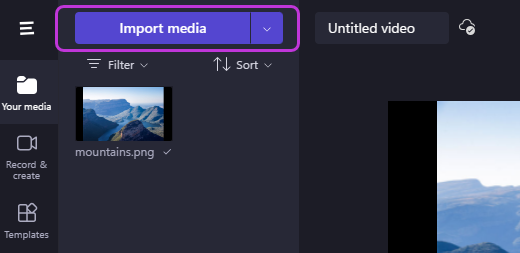
Upload your videos, images, and audio files to the Your media tab. Drag and drop media files onto the timeline.
Rearrange your media on the timeline and edit your video with accessible features like trim, crop, split, and rotate.
Add special effects like text and captions, overlays, filters, background music, and more. Try our more advanced features like AI voiceovers, green screen, and picture-in-picture effects.
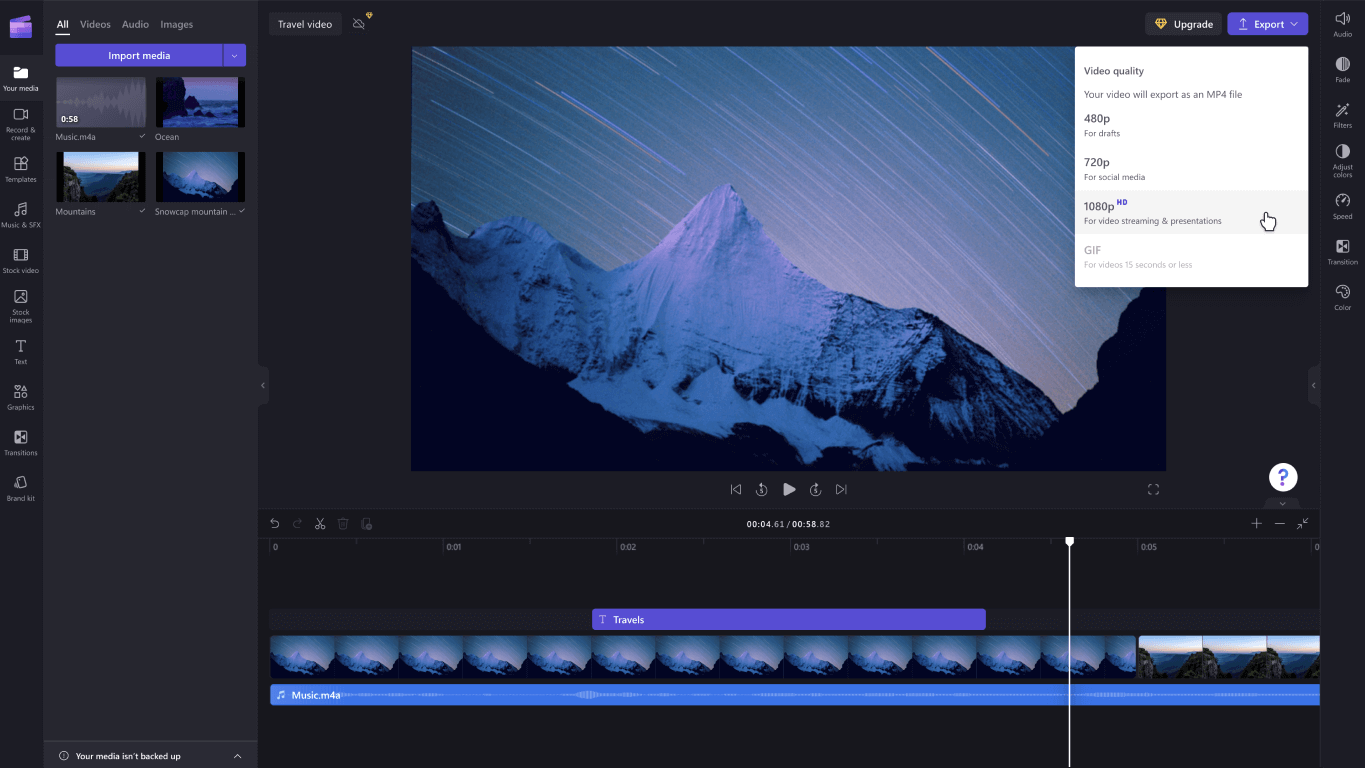
Preview your video in full-screen mode, make any final adjustments, then export your video in 1080p HD video resolution.
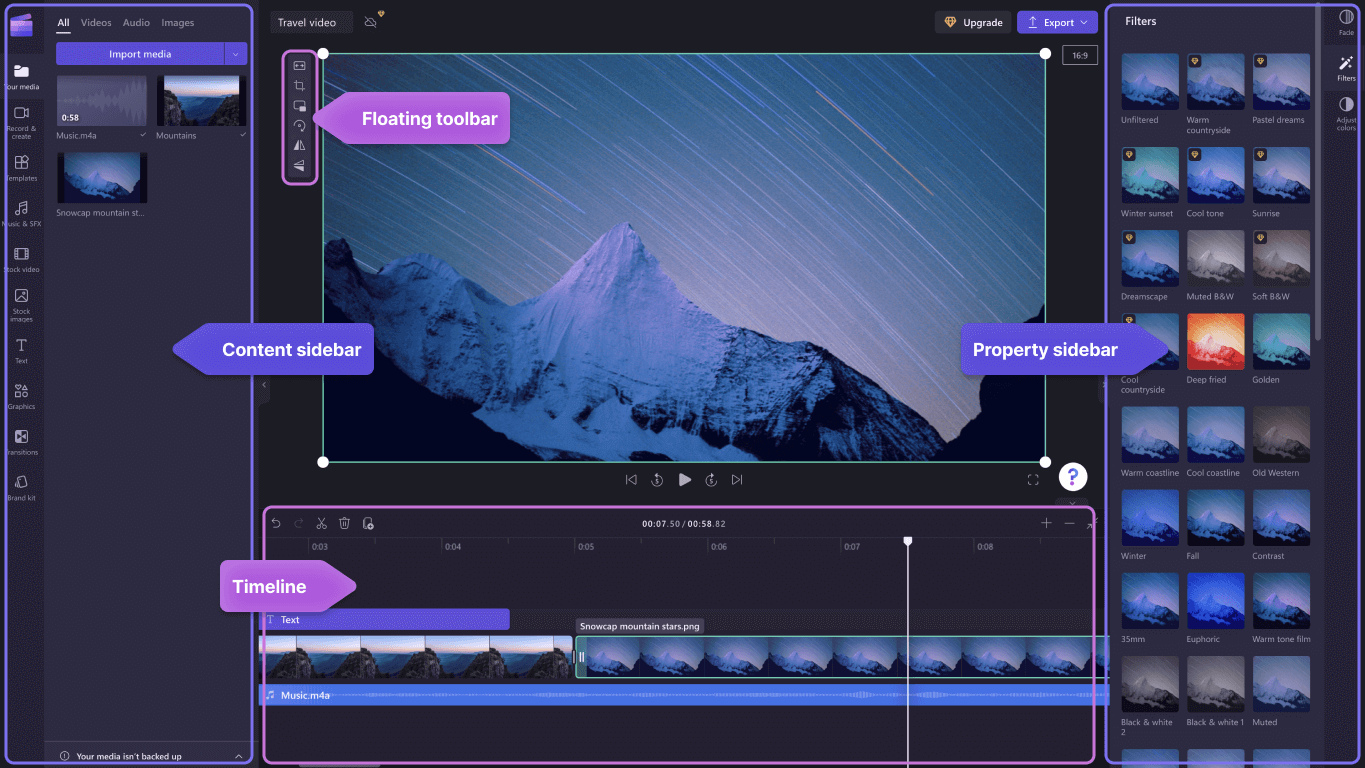
Get familiar with Clipchamp’s editing functions:
Clipchamp’s beginner-friendly interface helps you quickly locate all the professional editing functions, including the stage, timeline, sidebars and the floating sidebar.
Use efficient editing functions like trim, split, delete, duplicate, undo, and redo in the timeline.
Crop, fill, rotate, flip, and add picture-in-picture effects on videos with the floating toolbar visible on the stage.
Speed up or slow down your video or audio file with the speed controller in the right sidebar.
Resize videos to suit any social media platform with popular aspect ratio presets near the right sidebar.
Enhance the color balance and appearance of your video clip using pro filters like green screen, blend mode, disco, VHS, or black and white removal—with more options available in the right sidebar.
Add traditional or quirky transitions between clips—and exclusive overlays on top of your video—in the left sidebar.
Search through over 1 million royalty-free videos to find the right aesthetic and genre in the left sidebar.
Select a background music track or fun sound effects from our stock audio library in the left sidebar.
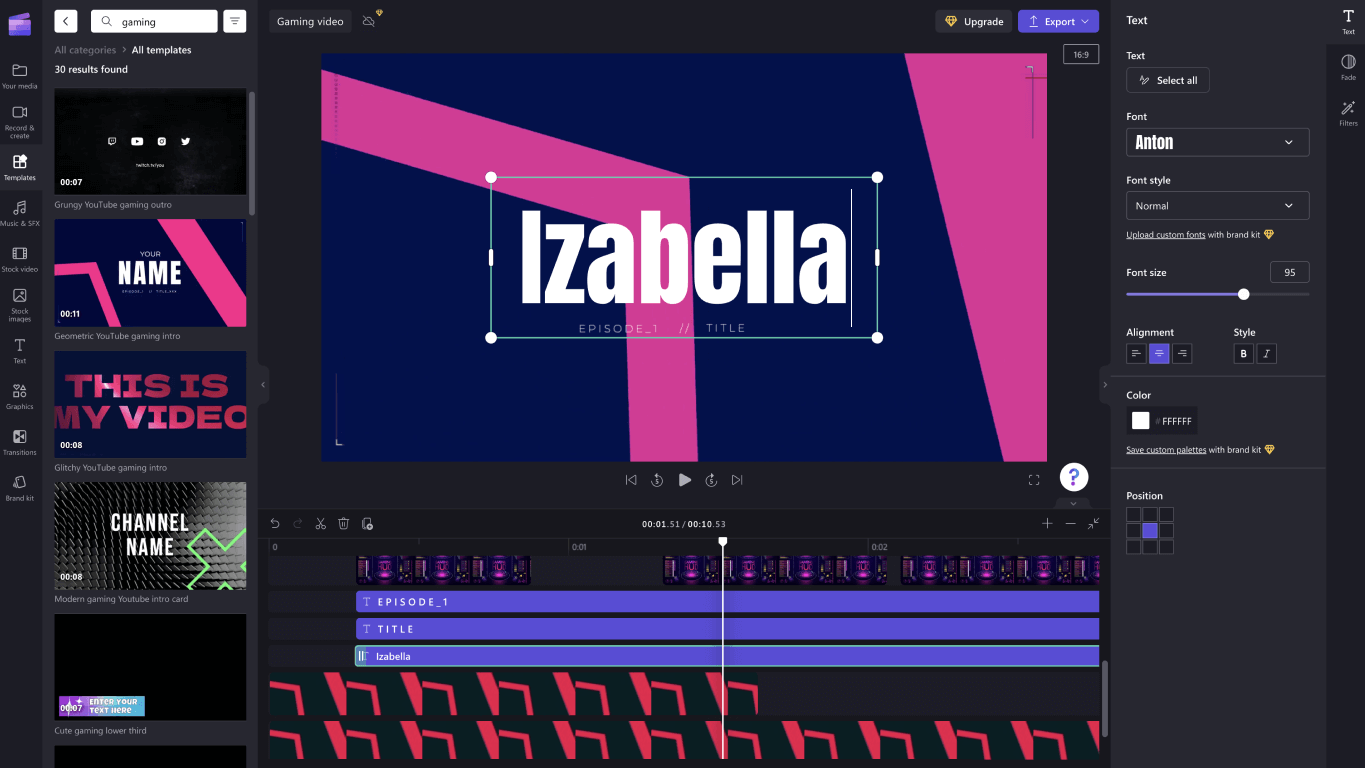
Choose from a wide range of unique animated text and captions and customize them with various fonts, colors, and positions.
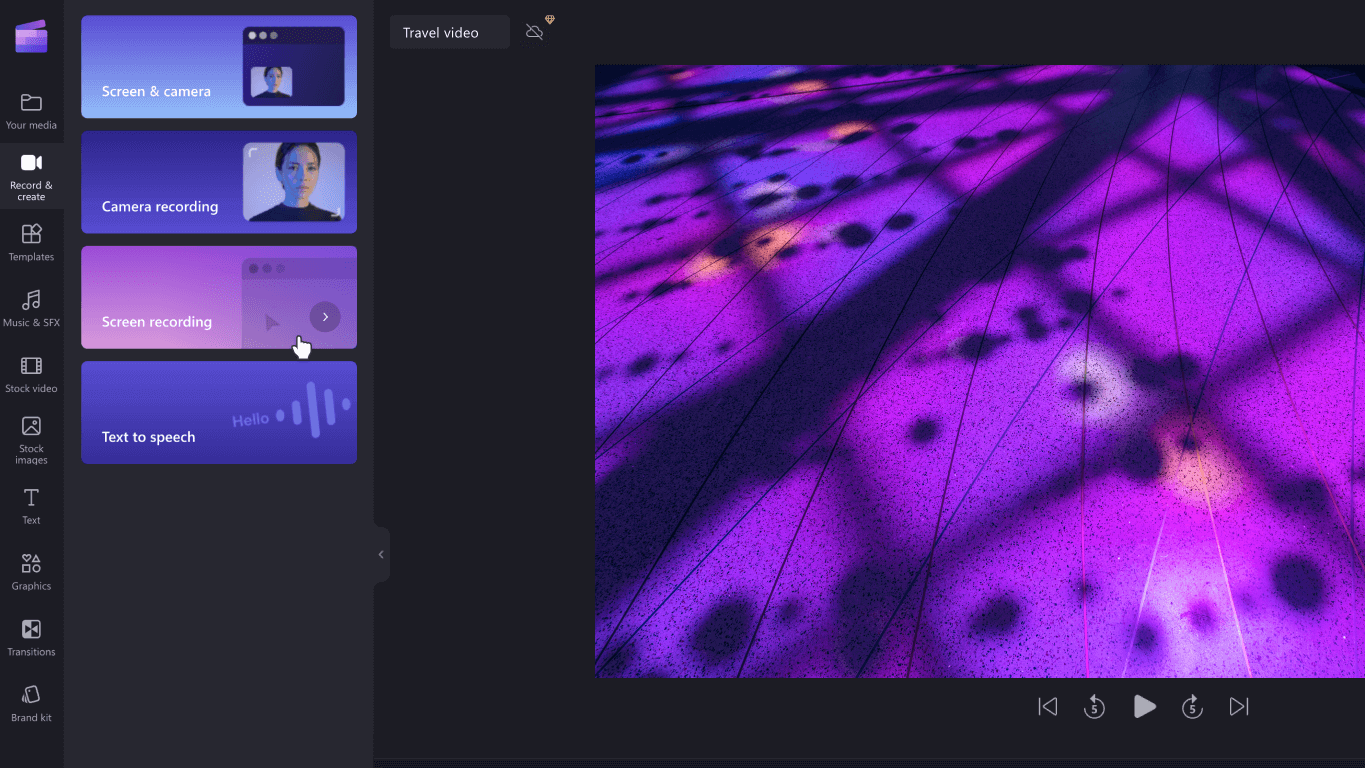
To record videos:
Select Start , then select All apps, scroll down, and select Clipchamp in the list of apps. Inside the editor, select the Screen and camera recording tab.
Select the screen and camera recording, camera recording, or screen recording feature.
Select Record to select a tab, window, entire screen, or webcam. Retake your video as many times as you need.
Adjust your recording with editing features like trim, crop, flip, and rotate. Personalize your video with our picture-in-picture effect, filters, stickers, text, and more.
Save your recording in 1080p high-definition video resolution.
To use a template:
Select Start , then select All apps, scroll down, and select Clipchamp in the list of apps. Inside the editor, select a template from the categories in the template library.
Personalize the template with your own videos and images or search the stock library for options.
Customize your text with a variety of fonts, sizes, colors, and placement. Plus, edit background music with royalty-free stock audio and adjust the volume to suit your needs.
Add your personalized brand kit to your video using your unique color palette, font, and logos. You can even turn your logo into a watermark for your video.
Export your video in 1080p video resolution and share it directly to social media platforms, including YouTube and TikTok.
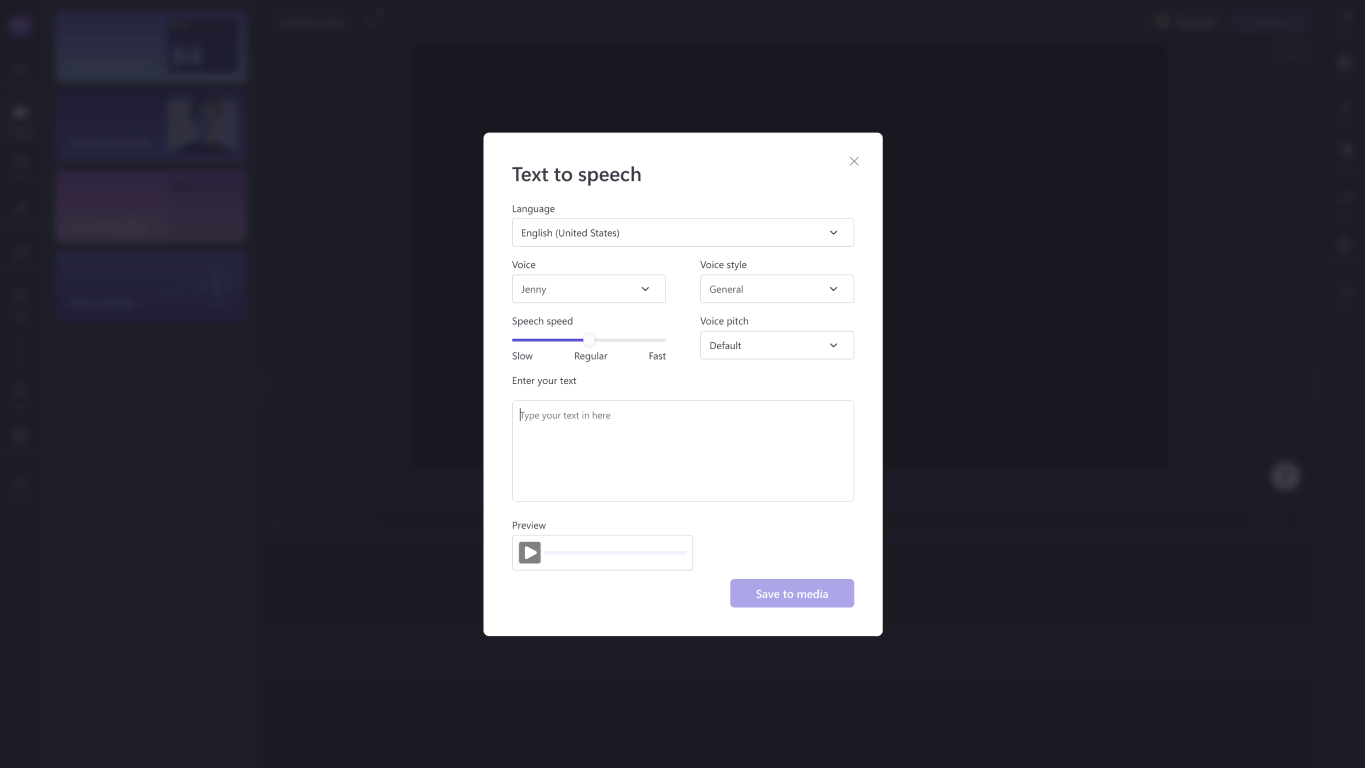
To generate voiceovers using text-to-speech:
Select Start , then select All apps, scroll down, and select Clipchamp in the list of apps. Inside the editor, select the text to speech tab in the sidebar.
Type in your phrase or sentence, and pick the language, voice, style, and pitch you would like to use. Adjust the speed of your voiceover to be faster or slower.
Add your voiceover to the editing timeline to finish.
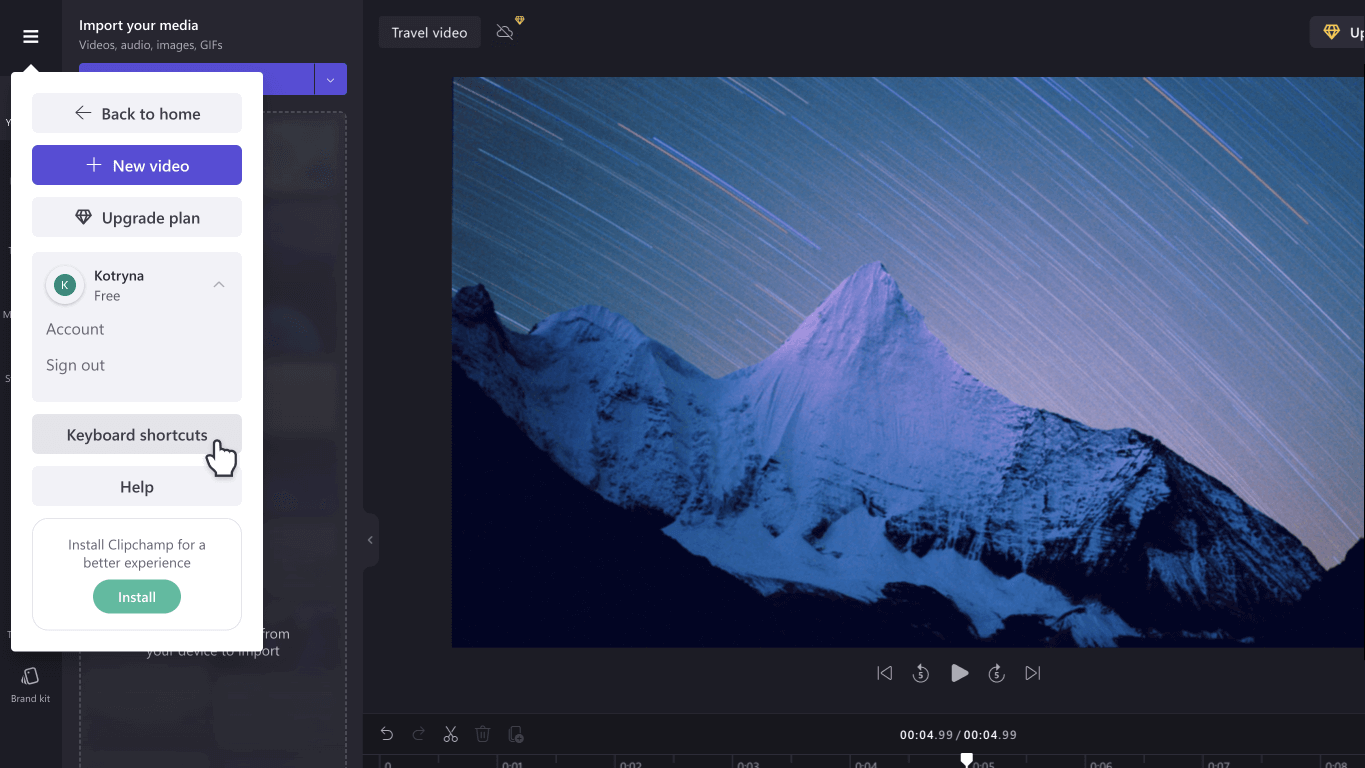
To edit with keyboard shortcuts:
Find a list of keyboard shortcuts by selecting the Clipchamp logo at the top left corner of the editor and selecting Keyboard shortcuts.
Browse through the helpful list of all shortcuts ranging from display, navigation, selecting items, moving items, and trimming items.
Use shortcuts to suit any accessibility needs or save time while editing videos.
Enjoy special time-saving features:
Use keywords to search the stock library, which has over 1 million stock videos, audio, and images.
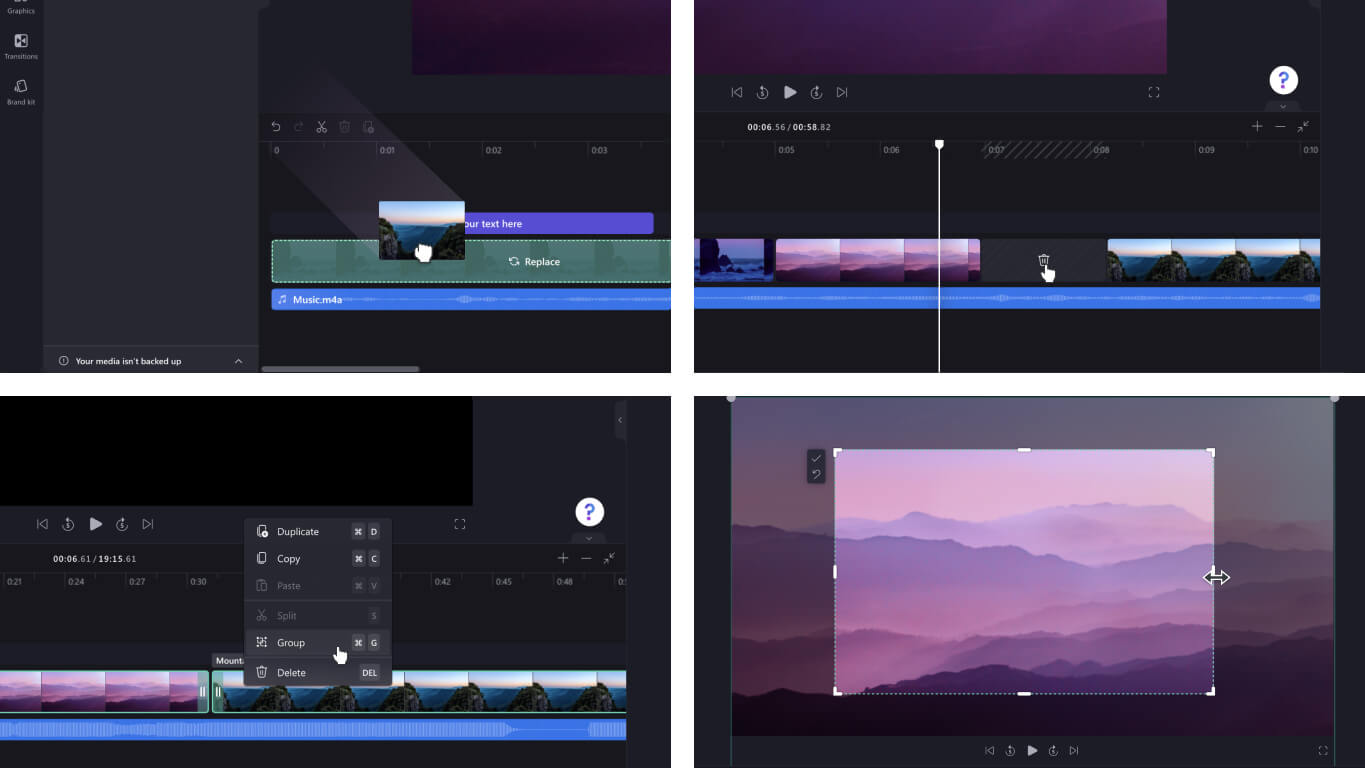
Replace existing stock or assets on your timeline by dragging and dropping the media in the exact position of the existing media.
Delete gaps created on your timeline by selecting the trash can icon that appears between media.
Group and ungroup assets on your timeline by dragging your cursor over the media, right-clicking, and selecting Group or Ungroup from the dropdown menu.
Crop certain areas of your videos, images, and stickers with the freehand crop feature. Adjust the corners inside the stage to change the aspect ratio with your cursor.
To import your media:
There are many options to upload compatible videos, audio, images and GIFs you want to edit in Clipchamp, including:
Import from device
Import from phone (known as Clipdrop)
Import from cloud storage like OneDrive, Dropbox and Google Drive and Google Photos
To access helpful integrations:
Clipchamp offers integrations to make your editing experience seamless. For example, the GIPHY integration allows you to add trending GIFs to your videos from the Graphics tab in the sidebar. Further integrations are listed below.
Import and save videos directly to and from:
OneDrive
Google Drive
Google Photos
Dropbox
Integrations to share videos:
YouTube
TikTok
LinkedIn
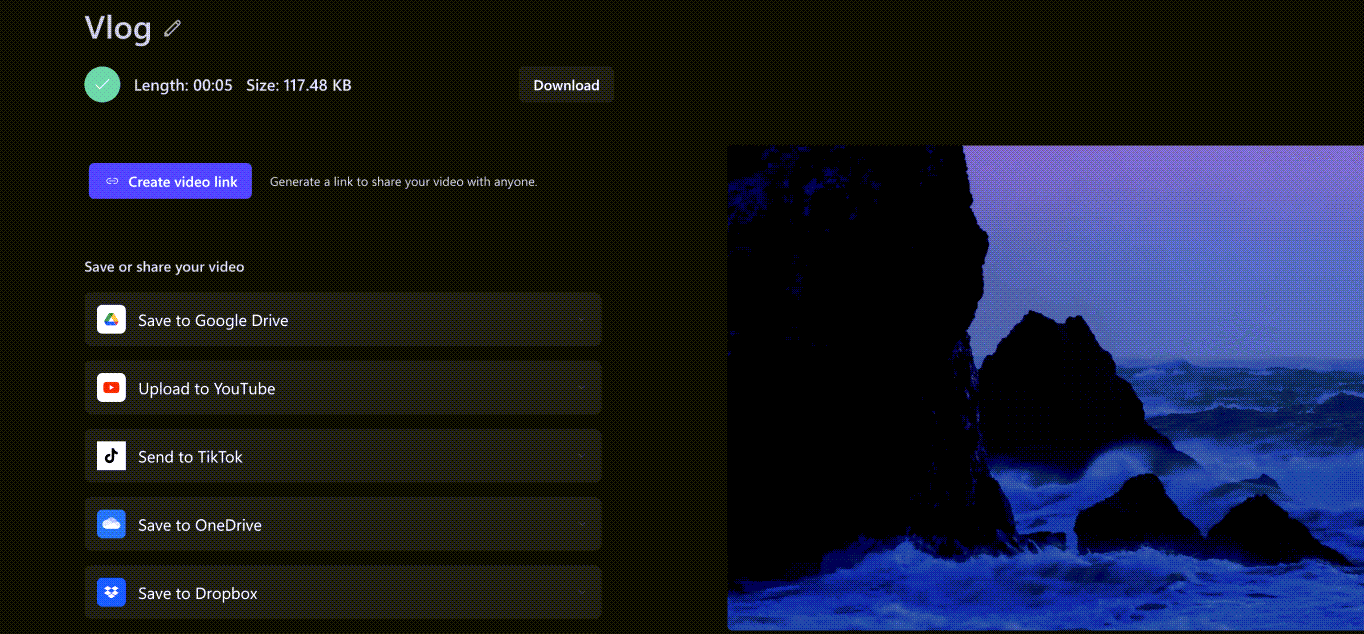
To save a video:
Select the Rename box to name your video above the stage.
Select the Export button to save your video. Select from a range of video resolutions, including 480p, 720p, or 1080p. You can also save any video under 15 seconds as a GIF.
Download your video to your device and share your video with an embed code or with the Share page link to view the video hosted privately on Clipchamp. You can also share directly to social media platforms like TikTok and YouTube.
Looking for further support? Find more answers when you go to Clipchamp Support.
In a reverse-mapping zone, a PTR (pointer) record maps an IP address to a hostname. Before adding a PTR record to a reverse-mapping zone, you must first create the zone. You can also add PTR records to forward-mapping zones to support zeroconf (zero configuration networking), such as wide-area Bonjour. For information about the Bonjour protocol, refer to http://www.apple.com/support/bonjour. Though adding PTR records to forward-mapping zones supports some of the use cases in RFC 1101, it does not support the network name mapping use case described in the RFC. For more information, refer to http://tools.ietf.org/html/rfc1101.
To create a PTR Record, complete the following:
From the Cloud Services Portal, click Manage -> DNS->Zones.
Click the DNS view.
Click the zone.
Click Create -> Record and select PTR Recordfrom the drop-down list.
On the Create PTR Record page, select or specify the following: