How to Generate sitemap.xml file when new post added into WordPress website

Automatically Generate sitemap.xml file when new post added into WordPress website

  1. Login into WordPress admin
  2. Choose Appearance
  3. Choose theme editor
  4. Select your theme
  5. Open functions.php file into editor
  6. Add below code at the end of file
/**
 * start page for webaccess
 * redirect the user to the supported page type by the users webbrowser (js available or not)
 *
 * PHP version 5
 *
 * @category  PHP
 * @package   aditya
 * @author   Aditya Kumar <adityaypi@yahoo.com>
 * @link      http://adityakumarsingh.co.in
************************************
*HTML Sitemap   in WordPress   
************************************/

function sitemap() {
    $sitemap = '';
    $sitemap .= '<h4>Articles </h4>';
    $sitemap .= '<ul class="sitemapul">';
    $posts_array = get_posts();
    foreach ($posts_array as $spost):
        $sitemap .='<div class="blockArticle">
            <h3><a href="' . $spost->guid . '" rel="bookmark" class="linktag">' . $spost->post_title . '</a> </h3>
        </div>';
    endforeach;
    $sitemap .= '</ul>';
    $sitemap .= '<h4>Category</h4>';
    $sitemap .= '<ul class="sitemapul">';
    $args = array(
        'offset' => 0,
        'category' => '',
        'category_name' => '',
        'orderby' => 'date',
        'order' => 'DESC',
        'include' => '',
        'exclude' => '',
        'meta_key' => '',
        'meta_value' => '',
        'post_type' => 'post',
        'post_mime_type' => '',
        'post_parent' => '',
        'author' => '',
        'post_status' => 'publish',
        'suppress_filters' => true
    );
    $cats = get_categories($args);
    foreach ($cats as $cat) :
        $sitemap .= '<li class="pages-list"><a href="' . get_category_link($cat->term_id) . '">' . $cat->cat_name . '</a></li>';
    endforeach;
    $sitemap .= '</ul>';
    $pages_args = array(
        'exclude' => '', /* ID of pages to be excluded, separated by comma */
        'post_type' => 'page',
        'post_status' => 'publish'
    );
    $sitemap .= '<h3>Pages</h3>';
    $sitemap .= '<ul>';
    $pages = get_pages($pages_args);
    foreach ($pages as $page) :
        $sitemap .= '<li class="pages-list"><a href="' . get_page_link($page->ID) . '" rel="bookmark">' . $page->post_title . '</a></li>';
    endforeach;
    $sitemap .= '</ul>';
    $sitemap .= '<h4>Tags</h4>';
    $sitemap .= '<ul class="sitemapul">';
    $tags = get_tags();
    foreach ($tags as $tag) {
        $tag_link = get_tag_link($tag->term_id);
        $sitemap .= "<li class='pages-list'><a href='{$tag_link}' title='{$tag->name} Tag' class='{$tag->slug}'>";
        $sitemap .= $tag->name . '</a></li>';
    }
    return$sitemap;
}
add_shortcode('sitemap', 'sitemap');


/****************************************************
* XML Sitemap in WordPress
*****************************************************/

function xml_sitemap() {
  $postsForSitemap = get_posts(array(
    'numberposts' => -1,
    'orderby' => 'modified',
    'post_type'  => array('post','page'),
    'order'    => 'DESC'
  ));

  $sitemap = '<?xml version="1.0" encoding="UTF-8"?>';
  $sitemap .= '<urlset xmlns="http://www.sitemaps.org/schemas/sitemap/0.9">';

  foreach($postsForSitemap as $post) {
    setup_postdata($post);

    $postdate = explode(" ", $post->post_modified);

    $sitemap .= '<url>'.
      '<loc>'. get_permalink($post->ID) .'</loc>'.
      '<lastmod>'. $postdate[0] .'</lastmod>'.
      '<changefreq>monthly</changefreq>'.
    '</url>';
  }

  $sitemap .= '</urlset>';

  $fp = fopen(ABSPATH . "sitemap.xml", 'w');
  fwrite($fp, $sitemap);
  fclose($fp);
}

add_action("publish_post", "xml_sitemap");
add_action("publish_page", "xml_sitemap");

how to change limit value 15 25 in opencart of category page

Change default 15 products per page on Category view

Goto Extensions in Extensions in opencart, Choose the extension type Theme

Click on edit button and change below listed value

For views change value from category.php from controller directory

	$data['limits'] = array();

			$limits = array_unique(array($this->config->get('theme_' . $this->config->get('config_theme') . '_product_limit'), 25, 50, 75, 100));

			sort($limits);

change pagination style in opencart

how to change design of pagination in opencart

Change or Add new class in pagination.php file stored in /home/ubuntu/public_html/shopping/system/library

<?php
/**
 * @package		OpenCart
 * @author		Daniel Kerr
 * @copyright	Copyright (c) 2005 - 2017, OpenCart, Ltd. (https://www.opencart.com/)
 * @license		https://opensource.org/licenses/GPL-3.0
 * @link		https://www.opencart.com
*/

/**
* Pagination class
*/
class Pagination {
	public $total = 0;
	public $page = 1;
	public $limit = 20;
	public $num_links = 8;
	public $url = '';
	public $text_first = '|&lt;';
	public $text_last = '&gt;|';
	public $text_next = '&gt;';
	public $text_prev = '&lt;';

	/**
     * 
     *
     * @return	text
     */
	public function render() {
		$total = $this->total;

		if ($this->page < 1) {
			$page = 1;
		} else {
			$page = $this->page;
		}

		if (!(int)$this->limit) {
			$limit = 10;
		} else {
			$limit = $this->limit;
		}

		$num_links = $this->num_links;
		$num_pages = ceil($total / $limit);

		$this->url = str_replace('%7Bpage%7D', '{page}', $this->url);

		$output = '<ul class="pagination">';

		if ($page > 1) {
			$output .= '<li class="page-item"><a class="page-link" href="' . str_replace(array('&amp;page={page}', '?page={page}', '&page={page}'), '', $this->url) . '">' . $this->text_first . '</a></li>';
			
			if ($page - 1 === 1) {
				$output .= '<li class="page-item"><a class="page-link" href="' . str_replace(array('&amp;page={page}', '?page={page}', '&page={page}'), '', $this->url) . '">' . $this->text_prev . '</a></li>';
			} else {
				$output .= '<li class="page-item"><a class="page-link" href="' . str_replace('{page}', $page - 1, $this->url) . '">' . $this->text_prev . '</a></li>';
			}
		}

		if ($num_pages > 1) {
			if ($num_pages <= $num_links) {
				$start = 1;
				$end = $num_pages;
			} else {
				$start = $page - floor($num_links / 2);
				$end = $page + floor($num_links / 2);

				if ($start < 1) {
					$end += abs($start) + 1;
					$start = 1;
				}

				if ($end > $num_pages) {
					$start -= ($end - $num_pages);
					$end = $num_pages;
				}
			}

			for ($i = $start; $i <= $end; $i++) {
				if ($page == $i) {
					$output .= '<li class="page-item active"><a href="#" class="page-link">' . $i . '</a></li>';
				} else {
					if ($i === 1) {
						$output .= '<li class="page-item" ><a class="page-link" href="' . str_replace(array('&amp;page={page}', '?page={page}', '&page={page}'), '', $this->url) . '">' . $i . '</a></li>';
					} else {
						$output .= '<li class="page-item"><a class="page-link" href="' . str_replace('{page}', $i, $this->url) . '">' . $i . '</a></li>';
					}
				}
			}
		}

		if ($page < $num_pages) {
			$output .= '<li class="page-item"><a class="page-link" href="' . str_replace('{page}', $page + 1, $this->url) . '">' . $this->text_next . '</a></li>';
			$output .= '<li class="page-item"><a class="page-link" href="' . str_replace('{page}', $num_pages, $this->url) . '">' . $this->text_last . '</a></li>';
		}

		$output .= '</ul>';

		if ($num_pages > 1) {
			return $output;
		} else {
			return '';
		}
	}
}

Server Migration Checklist

Server migration checklists

Validation Checklist

  • Set the hosts file to locally load services
  • Check to see if all required services are functioning
  • Check your site for 404 errors, 500 errors, PHP warnings, etc.
  • Update all server software to the latest version
  • Tune LAMP performance (Apache, MySQL, PHP)
  • Test the cron
  • Check email deliverability and email records (DKIM, SPF, etc.)
  • Verify mail is synced (i.e. that all messages are there and all contacts have been migrated)
  • Check backups are still working

Security Checklist

  • Audit firewall configuration
  • Identify and implement non-standard security requirements
  • Restrict access where appropriate
  • Implement programs to educate staff
  • Ensure setup is compliant with all protocols

Configuration Checklist

  • Analyse configurations of both old and new hosting environments
  • Configure web server modules (i.e. suexec, mod_php, mod_perl, mod_ssl, etc.)
  • Identify shared libraries and other code/program dependencies
  • Set up SSL certificates
  • Create fresh (or import existing) configuration files
  • Import databases
  • Fine-tune server performance
  • Check and reconfigure applications that connect from remote sources

User Account Checklist

  • Migrate user accounts and passwords
  • Consider forcing password reset on next login
  • Purge old/inactive accounts

File System Checklist

  • Ensure all files copied over
  • Check that permissions are correct
  • Crawl website to identify 404 not found errors

Final Check Checklist

  • Were all of the issues addressed during migration?
  • Was the migration painless? If not, what went wrong?
  • Are you happy with your new server?
  • What else (if anything) needs doing?

Remove all mail services from ubuntu

List of mail service used for php in ubuntu

  1. postfix
  2. sendmail
  3. mailutils

remove postfix ubuntu

$ sudo apt remove postfix
$ sudo apt purge postfix
$ sudo apt autoremove

remove sendmail service ubuntu

$ sudo apt-get remove sendmail
$ sudo apt-get purge sendmail
OR  To remove send mail completely you have to use:
$ sudo apt-get purge sendmail*

remove mailutils service ubuntu

$ sudo apt-get remove mailutils 
$ sudo apt-get remove --auto-remove mailutils 
$ sudo apt-get purge mailutils 
$ sudo apt-get purge --auto-remove mailutils 

Free WhatsApp group Invite links

WhatsApp group links:

Humanity and Peace

🩺 Join Our Health Community on WhatsApp! 🌿
Get health tips, wellness updates, fitness guidance, and daily motivation.

👉 Join Now:
https://chat.whatsapp.com/EBSTeKPYFBGCsU06xWdrca

Aditya Kumar singh by profession he is a website developer, manage AWS or other server, also working on virtualization and server security, lots of websites has created by him currently running website is instadiet.in, delhijurix.com, task.soatechnology.net, laughingadda.com etc. you also visit adityakumarsingh.co.in to see their profile.

National Thermal Power Corporation 2021

NTPC 2021 Jobs Recruitment Notification of Engineering Executive Trainees – 280 Posts

National Thermal Power Corporation 2021 Jobs Recruitment Notification. NTPC inviting applications for the positions of  Engineering Executive Trainees. Interested and Eligible candidates can apply for the positions.

Last Date for Submission of Application is on 10th June, 2021.

No.of Posts and Vacancies :-

Engineering Executive Trainees – 280 Posts

Job Location – Across India

Education Qualification :

1. Post Name: Engineering Executive Trainees

2. No of Posts: 280

3. Discipline:

i. Electrical Engineering

ii. Mechanical Engineering

iii. Electronics Engineering

iv. Instrumentation Engineering

4. Qualification: Full time Bachelor’s Degree in Engineering or Technology/AMlE with not less than 65% marks, as per respective Institute/University norms. Final year/semester students, are also eligible to apply, subject to obtaining at least 65% marks in engineering degree (55% for SC/ST/PwBD candidates). A candidate with the prescribed degree identified for the disciplines as given below can only apply for the post of EET-2021 in the respective discipline

5. Compensation & Benefits: Selected candidates will be placed in the pay scale of Rs.40,000-1,40,000 at the basic pay of Rs. 40,000/- (El Grade). The other benefits such as Dearness Allowance, other perquisites and allowances, terminal benefits, etc. will be admissible as per company rules in force from time to time during training / after absorption.

6. Placement:

The selected candidates shall undergo one-year training at various NTPC plants. The final place of posting will be decided after completion of training. Candidates can be placed, across the country, in any of projects/ stations including Subsidiaries/JVs companies of NTPC for shift operation of power plants and will be required to work in shifts (including night shift). Application for the post will be considered as the consent of the candidate to work in shifts (including night shift).

Age:

Upper Age limit for General/EWS is 27 years as on the last date of online application (age relaxation for SC/ST/OBC (NCL)/PwBD/XSM candidates applicable as per Govt. guidelines).

General Instructions:

1. Only Indian Nationals are eligible to apply.

2. The candidate should ensure that she fulfills the eligibility criteria and other norms mentioned in the advertisement.

3. All qualifications should be from an Indian University / Institute recognized by AICTE I appropriate statutory authority.

4. All computations Of age shall be done w.r.t. the last date Of receipt Of online application as mentioned in the advertisement.

5. NO manual / paper application will be entertained.

6. Candidature of a registered candidate is liable to be rejected at any stage of recruitment process or after recruitment or joining, if any information provided by the candidate is false or is not found to be in conformity with eligibility criteria mentioned in the advertisement. Canvassing in any form shall disqualify the candidate.

7. For important instructions/ queries candidates may please visit the Frequently Asked Questions (FAQ) section on the website.

8. The E-mail ID entered in the online application form must remain valid for at least next one year. No change in the E-mail ID will be allowed. All future correspondence would be sent via E-mail only.

9. Candidates employed with Government Departments / PSUs I Autonomous Bodies are required to submit relieving letter from current organization at the time of joining, if selected for the said post,

10. The mere fact that a candidate has submitted application against the advertisement and apparently fulfilling the criteria as prescribed in the advertisement would not bestow on her the right to be definitely called for further selection process.

11 . NTPC reserves the right to cancel / restrict / enlarge/ modify / alter the recruitment process, if need so arises, without issuing any further notice or assigning any reason whatsoever.

12. Any proceedings in respect of any matter of claim or dispute arising out of this advertisement and / or an application in response thereto can be instituted only in Delhi and courts / tribunals I forums at Delhi only shall have sole and exclusive jurisdiction to try any such cause / dispute.

13. In case any ambiguity/dispute arises on account of interpretation in versions other than English, the English Version will prevail.

Address

NTPC Bhawan, Core-7, SCOPE Complex 7, Institutional Area, Lodhi Road,New Delhi – 110003

Selection Procedure :

Eligible candidates must have appeared for Graduate Aptitude Test in Engineering (GATE)-2021. Candidates shall be shortlisted for document verification based on GATE-2021 performance, from among the candidates who apply against this advertisement in NTPC. Further “Offer of Appointment” will be extended subject to their meeting the advertised eligibility criteria. Please note that only GATE- 2021 marks are valid for EET-2021 recruitment.

How to Apply :

1. Female candidates need to apply online for NTPC EET-2021 on the website www.ntpccareers.net or visit careers section at www.ntpc.co.in with their GATE-2021 registration number.

2. Candidates will be required to upload their photograph and signature during online application.

3. Commencement of Online Application: 21.05.2021

4. Last Date of Online Application: 10.06.2021

Official Notification

source:govtjobsmela

CGHS 2021 Recruitment Notification for Doctor Posts

CGHS 2021 Recruitment Notification for Doctor Posts

Central Government Health Scheme (CGHS) 2021 Recruitment Notification. CGHS has released official notification for the job openings of Doctor positions. Check the eligibility and notification prior to apply for the positions.

Closing Date is on :- 14th June, 2021.

No. of Posts and Vacancies :-  

Doctor – 40 Posts

Job Location – New Delhi

Other Qualification Details :-

Applications are invited from doctors (allopathic), who have retired from Central/State Government service/PSUs, for filling up of the vacant posts in CGHS dispensaries in Delhi & NC R, on a purely temporary and on contract basis, as per set terms and conditions. Duly filled application forms should reach the office of the Additional Director, CGHS (IIQ), CGIIS Bhawan, Sector-13, R.K.Puram, New Delhi-110066.

1. Post: Doctors

2. Education Qualification: Minimum qualification required is MBBS Degree.

3. Remuneration: Consolidated remuneration of Rs. 75000/- Per Month.

4. Duration of Contract: Initially för a period of one year or till the attaining age of 70 years or till regular incumbent join, whichever is earlier.

5. Number of vacancies:  40 (Forty) but subject to change

6. Place of posting: The selected candidates will be posted in any CGHS dispensary in Delhi & NCR area and they will work under the control of the Chief Medical Offlcer- In-charge of the dispensary, in which they are posted.

7. Preference: Doctors who have worked in CGHS & knowledge of computer shall be preferred.

Age:

Not exceeding 69 years as on 01-07-2021.

Note

1. Applications received after the date of publication of Advt. will be considered only. Those who have already applied need to apply a fresh.

2. If above documents are not attached with application, the application shall be deemed to be rejected.

Address :-

Additional Director, CGHS(HQ), CGHS Bhawan, Sector-13, R.K.Puram, New Delhi-110066.

Selection Process :-

Selection Will be Based either Written Exam/Interview

Steps to Apply :-

1. Interested & eligible candidates may apply in the prescribed proforma given below, along-with self attested copies of requisite certificates viz. Age & Address Proof. P.P.O.. proof of retirement/ relieving order & Degree(Not Provisional) of MBBS and valid registration certificate etc. to the 0/0 Additional Director, CGHS(HQ), CGHS Bhawan, Sector-13, R.K.Puram, New Delhi-110066.

2. Closing Date 14-06-2021

Official Notification

source:freshersjobz

can you have two facebook pixels on one website

There are a few reasons why you might want to have more than one Facebook pixel on a site – but is it actually possible to do this?

Yes, you can have multiple Facebook pixels on a website.

Generally you will only have one Facebook pixel on a website, but it is possible to install multiple Facebook pixels on site if needed.

You can create multiple Facebook pixels (for example you might have a network of websites that you manage and you want a specific pixel for each) and you can also install multiple pixels on one site.

The most common ‘use case’ I’ve seen for more than one pixel on a website is where you have a pixel for your own ad account, and then an agency or 3rd party that is also providing services for your business has their pixel installed in order to seed the remarketing audiences or track the conversions they are focused on.

Whatever the reason, it is definitely possible to install more than one Facebook pixel on a website.

Here are some reasons why you only need one Facebook Pixel:

  • You simplify your ad creation – you aren’t having to choose which pixel you are optimizing around.
  • You get better results when the Pixel is “seasoned” with more traffic.  Facebook learns better with more data.
  • You maximize your retargeting by not splitting your audiences into smaller segments.

When you do need multiple Facebook Pixels

The only time you really need multiple Facebook Pixels is if you have websites with very different audiences.  For example if you have a website for your business and then you also have a website around some unrelated hobby like knitting – or standup comedy (which is on my own website, I know).

In that case, you would want different Pixels so that if Facebook is trying to optimize your conversions they know what type of person is typically opting in to your lead magnet or purchasing your product.

Facebook tracks the type of people who do go to your website or convert.  When Facebook shows your ads, they try to show ads to those type of people more likely to take the action you are optimizing around based on the history of the Pixel tracking.  And, of course, within the targeting parameters you have already set up.

If you do have different audiences, you have a couple options:

  1. Create a new Facebook ad account to separate the ads and the pixel data completely. This is the easier option in my opinion.
  2. Create a new Facebook Pixel and then make sure you select which Pixel you are using when you create the ad.  If you do this, then you must use the Facebook Business Manager.

A question that comes up often is how this works when people are running Facebook Ads for clients.  You should definitely not run Facebook Ads for clients all on one ad account because you are putting all the ads in that account at risk if the account gets shut down.

If you are running Facebook Ads for clients, you should either run them on separate Ad Accounts or run them on the Ad account of the client.

How to create additional Facebook Pixels

If you did want to create another Facebook Pixels you can do that in the Events Manager section of the Ads Manager.

Create a New Facebook Pixel

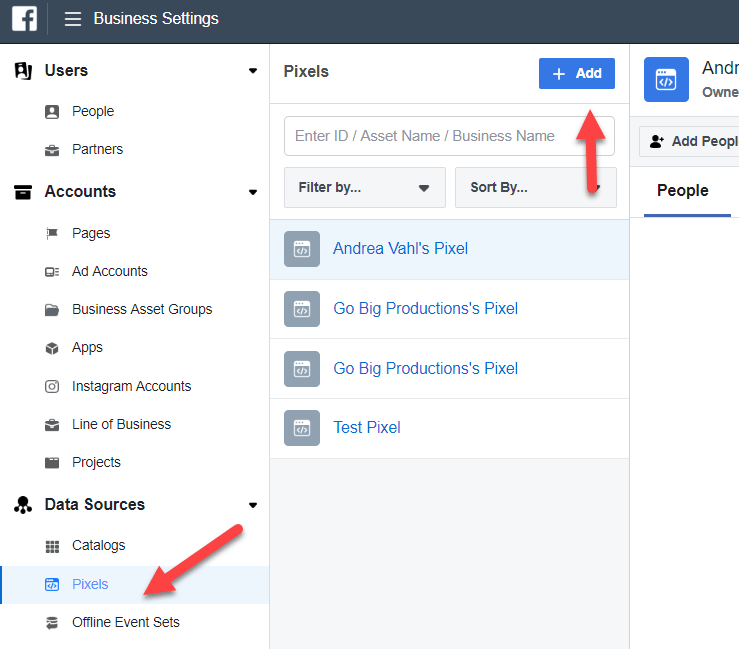
Or you can also create a new Pixel in the Business Settings of your Business Manager and then you can also assign who has access to that Pixel to use it in ads.

Business Settings Create Facebook pixel

But typical business owners will not need multiple Facebook Pixels unless they have different audiences that they are tracking and optimizing around.