July 24, 2021 in Tips and Tricks, Ubuntu

Soa Technology
Solutions, Optimization, Automation
Solutions, Optimization, Automation
low performance of wordpress on ubuntu server slow
July 24, 2021 in Tips and Tricks, Ubuntu
Apache Web Server start, stop, restart methods
- systemctl command – Only works on systemd based Ubuntu like version 16.04 LTS and above.
- /etc/init.d/apache2 – A sys v init style script to start / stop / restart the Apache2 service under Debian or Ubuntu Linux.
- service command – This command work in most Linux distributions including Debian and Ubuntu.
- upstart command – Only works on certain version of Ubuntu.
- apache2ctl command – This method should work on all Linux and Unix like operating systems.
Method #1: systemctl command examples
To start Apache 2 on Ubuntu Linux LTS 16.04 LTS or the latest systemd based Ubuntu Linux, type:$ sudo systemctl start apache2.service
To stop Apache 2 on Ubuntu Linux LTS 16.04 LTS or the latest systemd based Ubuntu Linux, type:$ sudo systemctl stop apache2.service
To restart Apache 2 on Ubuntu Linux LTS 16.04 LTS or the latest systemd based Ubuntu Linux, type:$ sudo systemctl restart apache2.service
To status of start/restart/stop operation, enter:$ journalctl -u apache2
To find out whether Apache 2 running or not, enter:$ sudo systemctl status apache2.service
Sample session:
Method #2: /etc/init.d/apache2 command examples
You need to login as root user or use the sudo command to control Apache web-server.
Task: Start Apache 2 Server
# /etc/init.d/apache2 start
or$ sudo /etc/init.d/apache2 start
Task: Restart Apache 2 Server
# /etc/init.d/apache2 restart
or$ sudo /etc/init.d/apache2 restart
Task: Stop Apache 2 Server
# /etc/init.d/apache2 stop
or$ sudo /etc/init.d/apache2 stop
Method #3: service command examples
To restart Apache 2, enter:$ sudo service apache2 restart
To stop Apache 2, enter:$ sudo service apache2 stop
To start Apache 2, enter:$ sudo service apache2 start
To gracefully reload Apache 2, enter:$ sudo service apache2 reload
Method #4: upstart command examples
The following commands only works with certian version of Ubuntu such as Ubuntu Linux LTS 12.04 and 14.04. To start Apache 2 on Ubuntu, run:$ sudo start apache2
To stop Apache 2 on Ubuntu, run:$ sudo stop apache2
To restart Apache 2 on Ubuntu, run:$ sudo restart apache2
To gracefully reload Apache 2 on Ubuntu, run:$ sudo restart apache2
Method #5: apache2ctl command examples
apache2ctl is Apache HTTP server control interface command, which can be used to stop or start web server under any Linux distribution or UNIX.
To start Apache 2 on Ubuntu, type:$ sudo apache2ctl start
To stop Apache 2 on Ubuntu, type:$ sudo apache2ctl stop
To restart Apache 2 on Ubuntu, type:$ sudo apache2ctl restart
To gracefully reload Apache 2 on Ubuntu, type:$ sudo apache2ctl graceful
July 24, 2021 in Only Happened In India, Php, Tips and Tricks, Ubuntu
www-data is safe or not
For security.
The files are not world writeable. They are restricted to the owner of the files for writing.
The web server has to be run under a specific user. That user must exist.
If it were run under root, then all the files would have to be accessible by root and the user would need to be root to access the files. With root being the owner, a compromised web server would have access to your entire system. By specifying a specific ID a compromised web server would only have full access to its files and not the entire server.
If you decide to run it under a different user ID, then that user would need to be the effective owner of the files for proper privileges. It could be confusing to have personal ownership of system-wide files to your personal account.
Creating a specific user would make it easier to recognize the files and consistent to recognize which ID to chown to new files and folders added to the site.
The Userid or Name of the owner doesn’t matter. Whatever is chosen or decided upon will have to be configured in the web server configuration files.
By default the configuration of the owner is www-data in the Ubuntu configuration of Apache2. Since that is the default configuration, you conveniently know the ownership needed for your web files. If you change it, you would have to change the files in your site to match.
Important
It’s not a good idea to have write permissions on the entire folder, the most websites (for example: wordpress, joomla and magento) needs write permission on specific folders (image upload, file upload) A better way is to give write permission on folders and do not allow script (PHP, python) execution, always check if the user is uploading the right content, example, if you website allow an user to upload an image as it avatar, check if it is an image and not a fake image with PHP script inside. And the problem to have write permissions on the website root is if someone finds an vulnerability he could use that to write a new index.php file and ‘hack’ your website.
July 24, 2021 in Tips and Tricks, Ubuntu
website enable and disable command in ubuntu
Command for enable website
$ sudo a2ensite
Your choices are: 000-default default-ssl soa-ssl soatechnology
Which site(s) do you want to enable (wildcards ok)?
$ sudo systemctl reload apache2
Command for disable website
$ sudo a2dissite
Your choices are: 000-default default-ssl soa-ssl soatechnology
Which site(s) do you want to enable (wildcards ok)?
$ sudo systemctl reload apache2To list all enabled virtual hosts on the web server, run the following command in a terminal.
$ apache2ctl -SJuly 23, 2021 in Tips and Tricks, Ubuntu
how to prevent denial of service attack ubuntu
How to check for and stop DDoS attacks on Linux
netstat -ntu|awk '{print $5}'|cut -d: -f1 -s |cut -f1,2 -d'.'|sed 's/$/.0.0/'|sort|uniq -c|sort -nk1 -rsudo apt-get install net-tools -ynetstat -ntu|awk '{print $5}'|cut -d: -f1 -s |cut -f1,2,3 -d'.'|sed 's/$/.0/'|sort|uniq -c|sort -nk1 -r
netstat -anp |grep 'tcp\|udp' | awk '{print $5}' | cut -d: -f1 | sort | uniq -c
sudo netstat -ntu | awk '{print $5}' | cut -d: -f1 | sort | uniq -c | sort -n
sudo route add ADDRESS rejectsudo iptables -A INPUT -s ADDRESS/SUBNET -j DROP
July 16, 2021 in Technology, Tips and Tricks, Ubuntu
how to install ftp server in ubuntu 20.04
Here we will install and configure vsftpd (Very Secure File Transfer Protocol Daemon) on Ubuntu.
Install vsftpd
Update the package list and dependencies for vsftpd. Then second command download and Install vsftpd.
$ sudo apt update && sudo apt install vsftpd
Check the status of vsftpd
$ sudo service vsftpd status
Configure Firewall
$ sudo ufw allow OpenSSH
$ sudo ufw allow 20/tcp$ sudo ufw allow 21/tcp
$ sudo ufw allow 40000:50000/tcp
$ sudo ufw allow 990/tcp
$ sudo ufw enable
$ sudo ufw status
Create FTP User
$ sudo adduser ftpuser
$ sudo nano /etc/ssh/sshd_config
DenyUsers ftpuser
$ sudo service sshd restart
Directory Permissions
Upload to a Web Server
$ sudo usermod -d /var/www ftpuser
$ sudo chown ftpuser:ftpuser /var/www/html
Upload to a Home Folder
$ sudo mkdir /home/ftpuser/ftp
$ sudo chown nobody:nogroup /home/ftpuser/ftp
$ sudo chmod a-w /home/ftpuser/ftp
$ sudo mkdir /home/ftpuser/ftp/files
$ sudo chown ftpuser:ftpuser /home/ftpuser/ftp/files
Configure vsftpd
$ sudo mv /etc/vsftpd.conf /etc/vsftpd.conf.bak
$ sudo nano /etc/vsftpd.conf
listen=NO
listen_ipv6=YES
anonymous_enable=NO
local_enable=YES
write_enable=YES
local_umask=022
dirmessage_enable=YES
use_localtime=YES
xferlog_enable=YES
connect_from_port_20=YES
chroot_local_user=YES
secure_chroot_dir=/var/run/vsftpd/empty
pam_service_name=vsftpd
force_dot_files=YES
pasv_min_port=40000
pasv_max_port=50000
user_sub_token=$USER
local_root=/home/$USER/ftpWe are done with vsftpd.conf
$ sudo systemctl restart vsftpd
Secure FTP with TLS (Recommended)
$ sudo openssl req -x509 -nodes -days 365 -newkey rsa:2048 -keyout /etc/ssl/private/vsftpd.pem -out /etc/ssl/private/vsftpd.pem$ sudo nano /etc/vsftpd.conf
ssl_enable=YES
rsa_cert_file=/etc/ssl/private/vsftpd.pem
rsa_private_key_file=/etc/ssl/private/vsftpd.pem
allow_anon_ssl=NO
force_local_data_ssl=YES
force_local_logins_ssl=YES
ssl_tlsv1=YES
ssl_sslv2=NO
ssl_sslv3=NO
require_ssl_reuse=NO
ssl_ciphers=HIGH
$ sudo systemctl restart vsftpd
Testing TLS with FileZilla
July 12, 2021 in MySql, Php, Technology, Tips and Tricks
How to create static html page from dynamic php page
- Opportunity to working on live project
- Learn Advance topic in low cost
- Get experience certificate
- Learn Advance topic in limited time period
- Get job opportunity
- Topic cover on fast track
<?php
include ("include/conn.php");
error_reporting(E_ALL);
ini_set('display_errors', '1');
$cmdm="select * from satta_cms";
 $resultm=mysqli_query($link,$cmdm);
 if($rowm=mysqli_fetch_array($resultm)){
	 $srno=$rowm['srno'];
	 $message1=nl2br($rowm['message1']);
	 $message2=nl2br($rowm['message2']);
	 $message3=nl2br($rowm['message3']); }
date_default_timezone_set('Asia/Kolkata');
$cmd1="select * from record"; $result1=mysqli_query($link,$cmd1);
 while($row1=mysqli_fetch_array($result1)){
	  $recno=$row1['recno'];
	 $tablename=$row1['tablename'];

 $cmd="select * from $tablename";
$result=mysqli_query($link,$cmd);
while($row=mysqli_fetch_array($result)){
	$recname=$row['recname'];
	$recdate=$row['recdate'];
	$rec=$row['new'];
	$recdispdate=date('d-M-Y',strtotime($recdate));
	ob_start();
?>

<!DOCTYPE html>
<html lang="en">
<head>
  <?php include('common/head.php'); ?>
 <style>
 h1.text-center {
    background-color: #000000;
    color: white !important;
    padding: 15px;
    text-align: center;
}
 </style>
  </head>
  <body>
<?php include('common/nav.php'); ?>


<div class="container">
<div class="row">
<?php include('common/advertise1.php'); ?>
<div class="col-lg-12"><h1 class="text-center"><?php echo date('d-M-Y',strtotime($recdate)); ?></h1></div>
<div class="live text-center">
    <h1><img src="satta-king.gif" width="70px"></h1>
 <div id="recbadge"> <h4 id="rectime"><?php echo $rec;?></h4><h2 id="recname" class="text-uppercase"><?php echo $recname;?></div>
 </div>

</div>
<hr>

</div>


<div class="container">
<div class="row">
<div class="col-lg-12">
<?php include('common/advertise0.php'); ?>
<?php include('common/message1.php'); ?>
<?php include('common/message2.php'); ?>
<?php include('common/message3.php'); ?>
    <?php include('common/advertise.php'); ?>
<?php //$cmd="select * from record order by rectime"; include('common/record-display.php');
?>
</div>
</div>
</div>
<?php
include('common/script.php');
 ?>

  </body>
</html>
<?php


$MainDir="satta-king-result";
 if(!is_dir($MainDir))
{
	mkdir($MainDir,0777);
}
$fileName=str_ireplace(' ','-',$recname).'-'.$recdispdate;

//
//$fp=fopen($MainDir.$QuestionId.".html","w");
$fp=fopen($MainDir."/".$fileName.".html","w");
$html = ob_get_contents();
fputs($fp,$html);


  } } ?>
July 11, 2021 in Only Happened In India, Php, Tips and Tricks
How to Generate sitemap.xml file when new post added into WordPress website
Automatically Generate sitemap.xml file when new post added into WordPress website
- Login into WordPress admin
- Choose Appearance
- Choose theme editor
- Select your theme
- Open functions.php file into editor
- Add below code at the end of file
/**
 * start page for webaccess
 * redirect the user to the supported page type by the users webbrowser (js available or not)
 *
 * PHP version 5
 *
 * @category  PHP
 * @package   aditya
 * @author   Aditya Kumar <adityaypi@yahoo.com>
 * @link      http://adityakumarsingh.co.in
************************************
*HTML Sitemap   in WordPress
************************************/

function sitemap() {
    $sitemap = '';
    $sitemap .= '<h4>Articles </h4>';
    $sitemap .= '<ul class="sitemapul">';
    $posts_array = get_posts();
    foreach ($posts_array as $spost):
        $sitemap .='<div class="blockArticle">
            <h3><a href="' . $spost->guid . '" rel="bookmark" class="linktag">' . $spost->post_title . '</a> </h3>
        </div>';
    endforeach;
    $sitemap .= '</ul>';
    $sitemap .= '<h4>Category</h4>';
    $sitemap .= '<ul class="sitemapul">';
    $args = array(
        'offset' => 0,
        'category' => '',
        'category_name' => '',
        'orderby' => 'date',
        'order' => 'DESC',
        'include' => '',
        'exclude' => '',
        'meta_key' => '',
        'meta_value' => '',
        'post_type' => 'post',
        'post_mime_type' => '',
        'post_parent' => '',
        'author' => '',
        'post_status' => 'publish',
        'suppress_filters' => true
    );
    $cats = get_categories($args);
    foreach ($cats as $cat) :
        $sitemap .= '<li class="pages-list"><a href="' . get_category_link($cat->term_id) . '">' . $cat->cat_name . '</a></li>';
    endforeach;
    $sitemap .= '</ul>';
    $pages_args = array(
        'exclude' => '', /* ID of pages to be excluded, separated by comma */
        'post_type' => 'page',
        'post_status' => 'publish'
    );
    $sitemap .= '<h3>Pages</h3>';
    $sitemap .= '<ul>';
    $pages = get_pages($pages_args);
    foreach ($pages as $page) :
        $sitemap .= '<li class="pages-list"><a href="' . get_page_link($page->ID) . '" rel="bookmark">' . $page->post_title . '</a></li>';
    endforeach;
    $sitemap .= '</ul>';
    $sitemap .= '<h4>Tags</h4>';
    $sitemap .= '<ul class="sitemapul">';
    $tags = get_tags();
    foreach ($tags as $tag) {
        $tag_link = get_tag_link($tag->term_id);
        $sitemap .= "<li class='pages-list'><a href='{$tag_link}' title='{$tag->name} Tag' class='{$tag->slug}'>";
        $sitemap .= $tag->name . '</a></li>';
    }
    return$sitemap;
}
add_shortcode('sitemap', 'sitemap');


/****************************************************
* XML Sitemap in WordPress
*****************************************************/

function xml_sitemap() {
  $postsForSitemap = get_posts(array(
    'numberposts' => -1,
    'orderby' => 'modified',
    'post_type'  => array('post','page'),
    'order'    => 'DESC'
  ));

  $sitemap = '<?xml version="1.0" encoding="UTF-8"?>';
  $sitemap .= '<urlset xmlns="http://www.sitemaps.org/schemas/sitemap/0.9">';

  foreach($postsForSitemap as $post) {
    setup_postdata($post);

    $postdate = explode(" ", $post->post_modified);

    $sitemap .= '<url>'.
      '<loc>'. get_permalink($post->ID) .'</loc>'.
      '<lastmod>'. $postdate[0] .'</lastmod>'.
      '<changefreq>monthly</changefreq>'.
    '</url>';
  }

  $sitemap .= '</urlset>';

  $fp = fopen(ABSPATH . "sitemap.xml", 'w');
  fwrite($fp, $sitemap);
  fclose($fp);
}

add_action("publish_post", "xml_sitemap");
add_action("publish_page", "xml_sitemap");
July 10, 2021 in Only Happened In India, Php, Technology, Tips and Tricks
how to change limit value 15 25 in opencart of category page
Change default 15 products per page on Category view
Goto Extensions in Extensions in opencart, Choose the extension type Theme
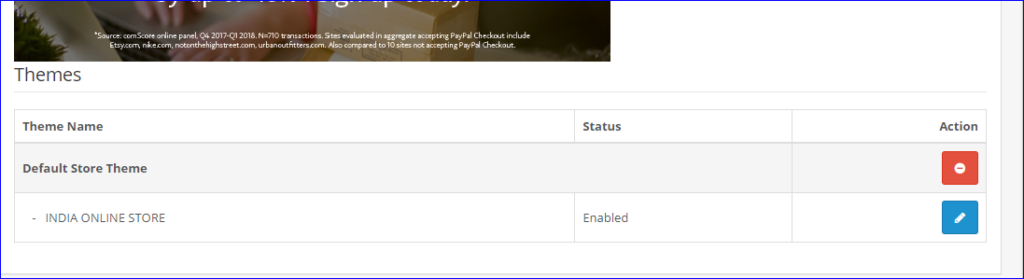
Click on edit button and change below listed value

For views change value from category.php from controller directory
	$data['limits'] = array();

			$limits = array_unique(array($this->config->get('theme_' . $this->config->get('config_theme') . '_product_limit'), 25, 50, 75, 100));

			sort($limits);


