RewriteCond %{REQUEST_FILENAME} !-d
RewriteRule ^(.*)/$ /$1 [L,R] # <- for test, for prod use [L,R=301]
to enforce a no-trailing-slash policy.
To enforce a trailing-slash policy:
RewriteCond %{REQUEST_FILENAME} !-f
RewriteRule ^(.*[^/])$ /$1/ [L,R] # <- for test, for prod use [L,R=301]
EDIT: commented the R=301 parts because, as explained in a comment:
Be careful with that R=301! Having it there makes many browsers cache the .htaccess-file indefinitely: It somehow becomes irreversible if you can’t clear the browser-cache on all machines that opened it. When testing, better go with simple R or R=302
For Individuals being a Resident (other than Not Ordinarily Resident) having Total Income upto Rs.50 lakhs, having Income from Salaries, One House Property, Other Sources (Interest etc.), and Agricultural Income upto Rs.5 thousand(Not for an Individual who is either Director in a company or has invested in Unlisted Equity Shares)
ITR 2
For Individuals and HUFs not having income from profits and gains of business or profession
ITR 3
For individuals and HUFs having income from profits and gains of business or profession
ITR 4
For Individuals, HUFs and Firms (other than LLP) being a Resident having Total Income upto Rs.50 lakhs and having income from Business and Profession which is computed under sections 44AD, 44ADA or 44AE (Not for an Individual who is either Director in a company or has invested in Unlisted Equity Shares)
ITR 5
For persons other than:- (i) Individual, (ii) HUF, (iii) Company and (iv) Person filing Form ITR-7
ITR 6
For Companies other than companies claiming exemption under section 11
ITR 7
For persons including companies required to furnish return under sections 139(4A) or 139(4B) or 139(4C) or 139(4D)
Aarogya Setu app has finally become open source for developers as the government looks to quell the privacy and surveillance concerns. The Ministry of Electronics and Information Technology on Monday issued a notice, stating the code for the Arogya Setu Android app has been uploaded on GitHub and will be available for tinkering by developers starting Tuesday, May 26. Meanwhile, the iOS counterpart of the government’s covid-19 tracking app will be open-sourced within two weeks. The National Informatics Centre (a part of MeitY) has also announced the bug bounty programme for developers who can find vulnerabilities in the app.
The open-source code of the Aarogya Setu app comes after nearly two months since the release of the app, during which over 114 million users have registered themselves for the government’s programme. Although the app has been deemed resourceful by its users, privacy advocates have so far decried the lack of transparency in the app’s code, especially after the French hacker discovered one too many security loopholes in the app. The government then responded to the hacker’s concerns but the apprehension on using Aarogya Setu app among the users grew by the day, forcing the government to come forward and release the code-set of the app on GitHub.
Post the announcement, French security researcher who goes by Elliot Alderson alias on Twitter said, “This is a very positive news and I’m very happy that the Indian government took this direction. Now, we would like to see what is happening on the server side.”
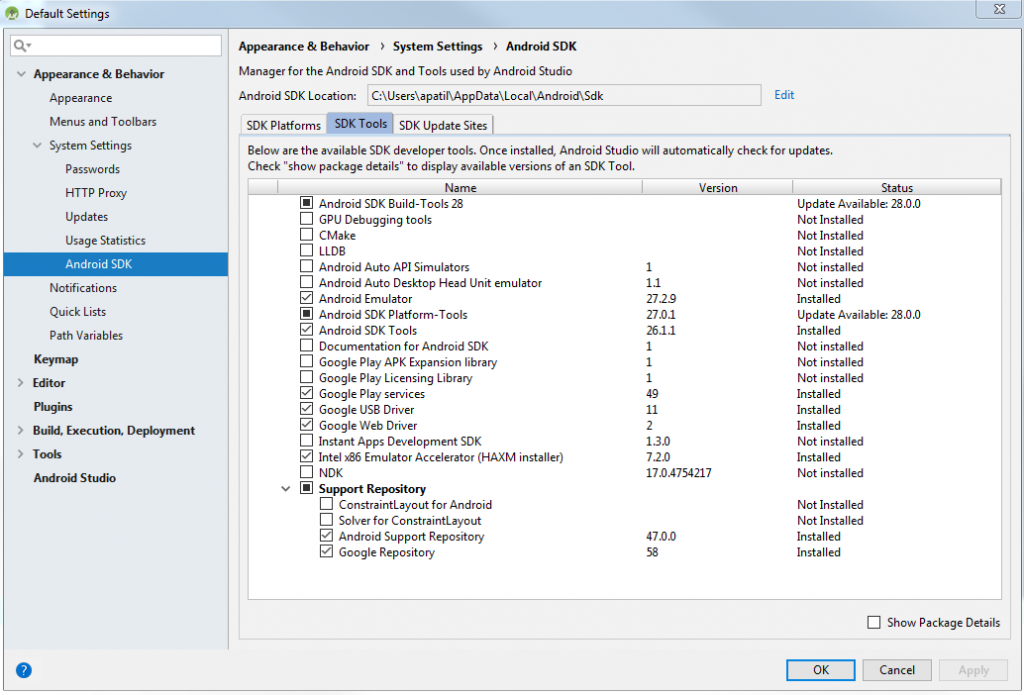
Android Studio installs the latest Android SDK by default. React Native requires Android 6.0 (Marshmallow) SDK or higher. I decided to use Android 7.1.1 (Nougat). Feel free to use the latest SDK.
Make sure you have the following SDK tools installed:
Note: You need to enable Intel Virtualization Technology by changing a BIOS setting. Please look at the following link to see how that is done:
Configure the ANDROID_HOME environment variable. Open the System pane under System and Security in the Windows Control Panel, then click on Change settings. Open the Advanced tab and click on Environment Variables. Click on New to create a new ANDROID_HOME user variable that points to the path to your Android SDK:
Figure 3: PATH variable for Android
Finally, add Android Debug Bridge (ADB) to the PATH environment variable. This will help you know which devices are connected or which emulators are currently running. Install location of ADB: C:\Users\apatil\AppData\Local\Android\Sdk\platform-tools\adb.exe
Step 3: Install Node
Download and install the latest version of Node.js from https://nodejs.org/en/. Note: Npm is installed with Node.js.
Note: Make sure you add NPM to the PATH environment variable.
Once npm is installed, install React Native CLI by running the following command from the Windows prompt command line or Integrated Terminal in Visual Studio Code. Note: Integrated Terminal can be found under View →Integrated Terminal
npm install -g react-native-cli
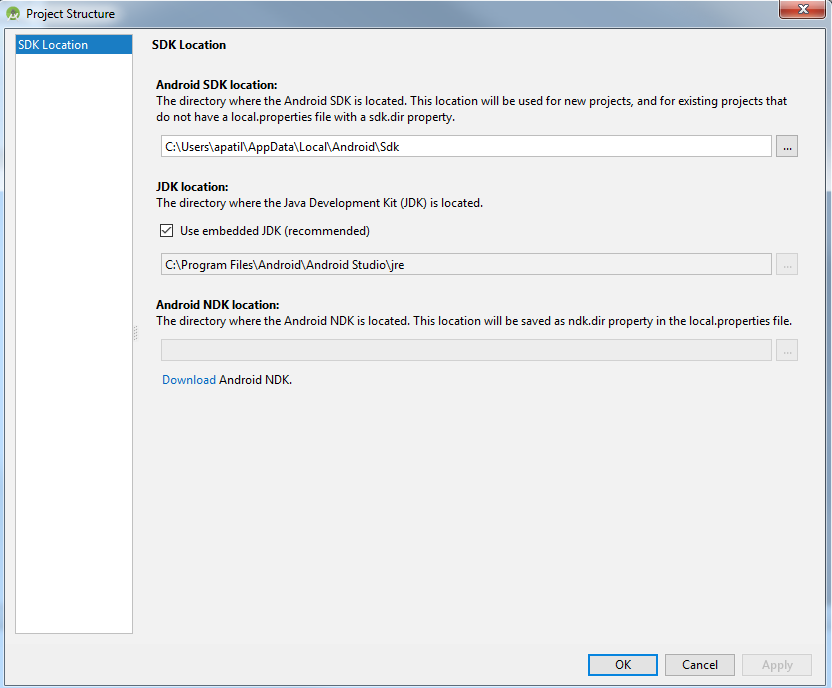
Step 4: Using embedded JDK
Android Studio comes with an embedded JDK which is recommended. Make sure you check the following option under File → Other Settings → Default Project Structure in Android Studio:
Step 5: Creating a new React Native application
Finally, lets create our first React Native application by running the following command in your workspace location
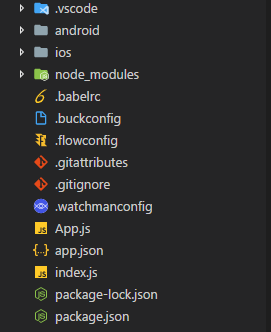
react-native init SampleReactNativeProject
This creates the following project directory structure when you open the project in Visual Studio Code.
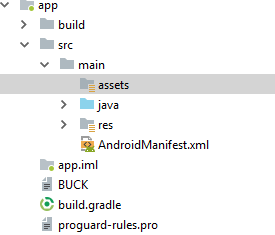
Step 6: Building for Android
Before we go ahead and run the app, open up the “android” directory in our project in Android Studio and create an “assets” directory under app/src/main.
To simplify the build and install process, in package.json, add the following script under “scripts”:
The digit zero plays an important role as you count very large numbers. It helps track these multiples of 10 because the larger the number is, the more zeroes are needed. In the table below, the first column lists the name of the number, the second provides the number of zeros that follow the initial digit, and the third tells you how many groups of three zeros you would need to write out each number.
Name
Number of Zeros
Groups of (3) Zeros
Ten
1
(10)
Hundred
2
(100)
Thousand
3
1 (1,000)
Ten thousand
4
(10,000)
Hundred thousand
5
(100,000)
Million
6
2 (1,000,000)
Billion
9
3 (1,000,000,000)
Trillion
12
4 (1,000,000,000,000)
Quadrillion
15
5
Quintillion
18
6
Sextillion
21
7
Septillion
24
8
Octillion
27
9
Nonillion
30
10
Decillion
33
11
Undecillion
36
12
Duodecillion
39
13
Tredecillion
42
14
Quatttuor-decillion
45
15
Quindecillion
48
16
Sexdecillion
51
17
Septen-decillion
54
18
Octodecillion
57
19
Novemdecillion
60
20
Vigintillion
63
21
Centillion
303
101
All of Those Zeroes
A table like the one above can certainly be helpful in listing the names of all of the numbers depending on how many zeros they have. But it can be really mind-boggling to see just what some of those numbers look like. Below is a listing—including all the zeros—for the numbers up to decillion—a little more than just half the numbers listed in the above table.
Reference to sets of zeros is reserved for groupings of three zeros, meaning they are not relevant for smaller numbers. We write numbers with commas separating sets of three zeros so that it’s easier to read and understand the value. For example, you write one million as 1,000,000 rather than 1000000.
As another example, it’s much easier to remember that a trillion is written with four sets of three zeros than it is to count out 12 separate zeroes. While you might think that that one is pretty simple, just wait until you have to count 27 zeros for an octillion or 303 zeros for a centillion.
It is then that you will be thankful that you only have to remember nine and 101 sets of zeros, respectively.
Numbers With Very Large Numbers of Zeros
The number googol (termed by Milton Sirotta) has 100 zeros after it. Here’s what a googol looks like, including all of its required zeros:
Do you think that number is big? How about the googolplex, which is a one followed by a googol of zeros. The googolplex is so large it doesn’t have any meaningful use yet—it is larger than the number of atoms in the universe.
Million and Billion: Some Differences
In the United States—as well as around the world in science and finance—a billion is 1,000 million, which is written as a one followed by nine zeros. This is also called the “short scale.”
There is also a “long scale,” which is used in France and was previously used in the United Kingdom, in which a billion means one million million. According to this definition of a billion, the number is written with a one followed by 12 zeros. The short scale and long scale were described by French mathematician Genevieve Guitel in 1975.
You can either start a playlist with a video, or from the Library tab .
With a video:
Find a video you want in your playlist.
Tap Save below the video to automatically save it to the last playlist you’ve saved to, or to your Watch Later playlist. A message will pop up at the bottom of your screen confirming which playlist the video was added to.
To change where your video is saved, tap Change on the pop up. Select from the list of your playlists where your video should be saved.
From the Library tab:
Go to the Library tab .
Tap NEW PLAYLIST in the “Playlists” section.
Select one or more videos from your recent watch history to add to the playlist.