Step 1) Browser sends hello message to Node.js server using Websocket.
Step 2) Node.js server generates a unique identifier and sends to browser using Websocket. Then browser generates a QR code using unique identifier and shows to user.
Step 3) User login to the mobile app using Facebook authentication.
Step 4) After the successful authentication, user scans the QR code.
Step 5) After scanning, App sends Unique ID (from QR), access token (from FB) to Node.js server.
Step 6) Node.js Server sends access token to the respective browser using Websockets.
Step 7) Browser get the Facebook user information using recevied FB access token.
We know that the SSL-certificates can be divided into three types: DV, OV and EV. In this article, we will focus on the first two types of certificates, DV and OV. We will explain how they differ and when you should choose DV over OV.
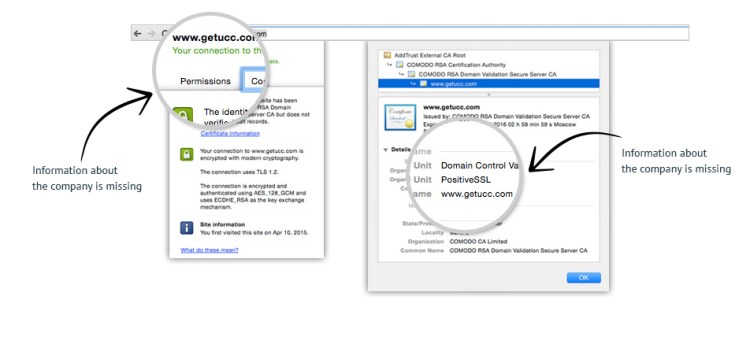
DV-certificates (Domain Validation). This is the most basic level of SSL validation. The Certification Authority (CA) only ensure that you are the owner of a specific domain using the information contained in the WHOIS. Naturally, this type of certificate enables secure data encryption on your site, but it does not verify that you are the owner of a legitimate business. It is legitimate, and, most importantly, it is a very quick solution to protect your site using HTTPS. Customers seeing the padlock in your browser will have more trust in your site than before, because the padlock is a recognised sign of legitimacy.
Example of a DV certificate:
A DV certificate is fine where security is not a concern: however, attackers can also use DV-certificates on phishing sites. Unsuspecting users see the trusted pad lock and enter their personal data on the site which can then fall into the hands of fraudsters. The fact that the data channel is secured does not necessarily mean that the data will go to the right people. A user needs to be sure that the site belongs to a legitimate company if they are to make a purchase or input important information.
For this reason, if security is a necessity for your site, we recommend an OV-certificate.
OV-certificates (Organisation Validation) are required for companies and organisations where users must enter sensitive information (credit card numbers, contact information, etc.).In particular, they are useful for e-commerce sites or online sales. An OV-certificate authenticates the owner of the site and requires legitimate business information for that company. The validation process for these certificates is longer and more detailed. The Certification Authority not only verifies the fact that you own the domain, but also the fact that you are the owner of the company. The company must be in a business registry database and in a trusted online directory (for example, dnb.com). Fraudsters cannot get an OV certificate because their organisation cannot be validated. The main advantage of getting an OV-certificate is that your company will be listed on the certificate.
Example of an OV-certificate:
You need to protect sensitive user data
You want to display your company name on a certificate (provides more trust amongst users)
You are planning to expand the business and grow it to a new level
You want people to know that the site is a legitimate organisation, and not a phishing site
You should think about switching from a DV-certificate to an OV-certificate, if:
If you want to switch from a DV-certificate to an OV-certificate, be sure to contact our experts at LeaderTelecom. Our knowledge, experience and streamlined process for dealing with the CAs will make issuing an OV-certificate easy and convenient.
The examples below can be entered into your .htaccess file exactly as shown. Just make sure to adjust the actual path to the file so the .htaccess file knows where it’s located. Also, if you see the domain ‘example.com’, change this to your own domain name.
Redirecting a URL
Using Redirect in an .htaccess file enables you to redirect users from an old page to a new page without having to keep the old page. For example, if you use index.html as your index file and then later rename index.html to home.html, you could set up a redirect to send users from index.html to home.html. For example:

Redirect to a local site file

Redirect /path/to/old/file/old.html /path/to/new/file/new.html
Redirect to an external site file

Redirect /path/to/old/file/old.html http://www.example.com/new/file/new.html
The first path
The first path to the old file must be a local UNIX path, NOT the full path. So, if the .htaccess file is in the directory /example.com, you would not include /home/exampleuser/example.com in the local UNIX path. The first / represents the example.com directory. If the old file was in that directory, you would follow the / with the old file name.

The second path
The second path to the new file can be a local UNIX path, but can also be a full URL to link to a page on a different server or the same server.

Examples of redirects
Redirect from an index.html file to a different directory
Redirect /index.html /new/
Redirect from index.html to default.html
Redirect /index.html /default.html
Redirect a local /private directory to another site's private directory
Redirect /private/ http://www.example.com/private/

Redirect /img/logo.gif http://www.example.com/images/logo.gif
Using Regular Expressions
If you want to use a Regular Expression to redirect something, use the RedirectMatch directive:

RedirectMatch "^/oldfile\.html/?$" "http://example.com/newfile.php"
Redirecting error messages
You can also redirect 404 errors. Instead of throwing a 404 page, this redirects to the homepage of the website.

ErrorDocument 404 http://example.com/
Redirecting an old directory to new directory
This redirects files in a old directory (/blog/archives) to a new directory (/archives). The file must exist in the new directory to function.

RewriteRule ^blog/archives/(.*)$ /newarchives/$1 [R=301,NC,L]
Redirect non-existing pages to index.php
If a visitor attempts to access a page that doesn't exist, they are presented with a 404 error. You can instead redirect any request to a non-existing page to your index.php file (or any index file) by adding the following code in your .htaccess:

Options +SymLinksIfOwnerMatch
RewriteEngine On
RewriteCond %{REQUEST_FILENAME} !-f
RewriteCond %{REQUEST_FILENAME} !-d
RewriteRule . /index.php [L]
If your index page isn't index.php, just change the last line to your actual index file. Then the visitor is redirected back to your home page.

Automatically loading a subdirectory
This example redirects the ROOT domain's URL to any subdirectory. In this example, it automatically loads example.com/subdir1:

RewriteEngine on
RewriteRule ^$ /subdir1/ [L]
Forcing www in the URL
RewriteEngine On
RewriteCond %{HTTP_HOST} ^example.com
RewriteRule (.*) http://www.example.com/$1 [R=301,L]
Removing www in the URL
RewriteEngine On
RewriteCond %{HTTP_HOST} ^www.example.com
RewriteRule (.*) http://example.com/$1 [R=301,L]
Rewriting a URL
This example rewrites a URL to another URL. This rewrites example.com/1.html to example.com/abc.php?id=1

Options +FollowSymLinks
RewriteEngine On
RewriteRule ^([0-9]+).html /abc.php?id=$1 [QSA,L]
The following explains the rules above:

([0-9]+)
allows any digit, and only any digit, 1 or more times.
([a-z-]*)
allows any lowercase letter, plus “-” for word separation, 0 or more times. If you want it to support uppercase too, use “([a-zA-Z-]*). For example:
RewriteRule ^place/([a-zA-Z-]*).html /place/abc.php?id=$1 [QSA,L]
[QSA,L]
appends this to your internal scripting query string, and makes it the Last rewrite rule executed.
After using this method, you can retrieve the webpage with either address type. This is handy for retro-fitting a website that was not designed with mod_rewrite in mind. This is good because it does not destroy any bookmarks saved on users computers.

View the following link for more information and examples about mod-rewrite:

mod-rewrite cheat sheet
Rewriting non-existing links to index.php
The following redirects all links to files or folders that do not exist to index.php. However, if the file or directory does exist, it loads normally:


RewriteEngine On
RewriteBase /
RewriteRule ^index\.php$ - [L]
RewriteCond %{REQUEST_FILENAME} !-f
RewriteCond %{REQUEST_FILENAME} !-d
RewriteRule . /index.php [L]
You dont assign a domain to a node.js server, instead you load your app onto a machine which has an ip adress, which in your case is 42.12.251.830:4000. You then need to make sure your app is listening on the correct port, which on most servers is 80
var app = express()
  , server = require('http').createServer(app)
  , io = io.listen(server);

app.get('/', function(req, res) {
  res.sendfile('./public/index.html');
});
server.listen(80);
now getting a domain name to point to this ip adress is an entirely separate matter. You need to make your name server point to the ip. Your name server will usually be the company you bought the domain name through, for instance GoDaddy is a Domain Name Server (DNS). So if you had a domain name with them, you would go on their site under DNS settings and change the ip adress. Your domain name will then point to your ip adress and should render your node.js app.
npm install -g ionic

First, install Node.js. Then, install the latest Ionic command-line tools in your terminal. Follow the Android and iOS platform guides to install required tools for development.
Start an app
ionic start myApp tabs

Create an Ionic App using one of our ready-made app templates, or a blank one to start fresh. Check out the Market for more designs.

For v1 projects, use the --type ionic1 flag.
$ ionic start myApp blank
$ ionic start myApp tabs
$ ionic start myApp sidemenu
Run your app
cd myApp ionic serve

Much of your app can be built right in the browser with ionic serve. We recommend starting with this workflow.

When you're ready to deploy your app to a real device, check out our Deploying guide.
Amazon Elastic Compute Cloud (Amazon EC2) provides scalable computing capacity in the Amazon Web Services (AWS) cloud. Using Amazon EC2 eliminates your need to invest in hardware up front, so you can develop and deploy applications faster. You can use Amazon EC2 to launch as many or as few virtual servers as you need, configure security and networking, and manage storage. Amazon EC2 enables you to scale up or down to handle changes in requirements or spikes in popularity, reducing your need to forecast traffic.
Features of Amazon EC2
Amazon EC2 provides the following features:
Virtual computing environments, known as instances
Preconfigured templates for your instances, known as Amazon Machine Images (AMIs), that package the bits you need for your server (including the operating system and additional software)
Various configurations of CPU, memory, storage, and networking capacity for your instances, known as instance types
Secure login information for your instances using key pairs (AWS stores the public key, and you store the private key in a secure place)
Storage volumes for temporary data that’s deleted when you stop or terminate your instance, known as instance store volumes
Persistent storage volumes for your data using Amazon Elastic Block Store (Amazon EBS), known as Amazon EBS volumes
Multiple physical locations for your resources, such as instances and Amazon EBS volumes, known as Regions and Availability Zones
A firewall that enables you to specify the protocols, ports, and source IP ranges that can reach your instances using security groups
Static IPv4 addresses for dynamic cloud computing, known as Elastic IP addresses
Metadata, known as tags, that you can create and assign to your Amazon EC2 resources
Virtual networks you can create that are logically isolated from the rest of the AWS cloud, and that you can optionally connect to your own network, known as virtual private clouds(VPCs)
// Create a test FormData object var formData = new FormData(); formData.append('key1', 'value1'); formData.append('key2', 'value2'); // Display the values for (var value of formData.values()) { console.log(value); }