how to install imagick php extension ubuntu

sudo apt install php php-common gcc
sudo apt install imagemagick

To install imagick

sudo apt-get install php-imagick

After you can enable on phph.ini

extension=imagick.so
php -m | grep imagick

Last, just restar apache:

sudo service apache2 restart

How to send testmail for sendmail in UBUNTU

you can test if sendmail is configured correctly by sending an email. Follow these steps to send an email using sendmail −

  • Open a terminal window on your Ubuntu server.
  • Type following command to create a new email −
echo "Subject: Test email" | sendmail -v recipient@email.com

Replace “adityaypi@yahoo.com” with the email address that you want to send the email to.

  • Press Enter and then type in the body of the email.
  • Press Ctrl+D to send the email.
  • Check the email address that you sent email to and verify that you have received email.

If you receive the email, then sendmail is working correctly and configured to send emails using your Gmail account.

Advantages of Configuring Sendmail with Gmail

There are several advantages to configuring sendmail with Gmail on Ubuntu. Some of these include −

  • Reliable Delivery − When you configure sendmail with Gmail, you can rely on the stability and reliability of Gmail server to ensure that your emails are delivered successfully.
  • Improved Security − By using an app password instead of your regular Gmail password, you can improve security of your Gmail account and prevent unauthorized access.
  • Convenience − Configuring sendmail with Gmail is a convenient way to send emails from your Ubuntu server. You can send emails from command line or automate email tasks using scripts.
  • Low Cost − Using sendmail with Gmail is a low-cost solution for sending emails from your Ubuntu server. You don’t need to set up your own mail server or pay for an external email service.

How To Install PuTTY On Ubuntu Linux

How to Install PuTTY on Ubuntu Linux

Introduction

PuTTY is a popular terminal emulator for Windows, but it is not only limited to Windows operating system. Being free and open source, it is popular among Linux users too. PuTTY supports a wide range of protocols such as serial, SSH, Telnet, rlogin, SCP, SFTP etc. PuTTY is used by seasoned sysadmins and hobbyists/maker-crowd alike. Sysadmins generally use PuTTY as an SSH and telnet client whereas the Maker community widely uses PuTTY for interfacing with the serial ports on their hardware. PuTTY ships with a command line tool named “psftp”, the PuTTY SFTP client, which is used to securely transfer files between computers over an SSH connection. More about PuTTY here

This article will walk through on how to install PuTTY on Ubuntu 14.04 and higher.

The simplest way to install PuTTY in Ubuntu Linux is via terminal i.e, the command line. Follow the steps below to install PuTTY on Ubuntu.

Step 1

Login into Ubuntu Desktop. Press Ctrl + Atl + T to open GNOME terminal. If for some reason the shortcut didn’t work, run the Terminal from the Ubuntu Dash.

Step 2

Run the following command in the terminal.

$ sudo apt-get update

sudo apt-get update

This command updates the Ubuntu package list with latest one. If this command is skipped, there is a good chance that Ubuntu might install older version of the softwares instead of the latest version due to the fact that it only had the older list with older version of softwares. So, whenever installing new software or intending to upgrade the software versions, it is a good idea to run this command first. The sudo prefix at the start of the command instructs the terminal to run the command as root since installing and upgrading softwares is a privilege operation and should not be performed by users which do not have sufficient access. Provide the user password when prompted by sudo and hit Enter.

Step 3

Install PuTTY using the command below.

$ sudo apt-get install -y putty

sudo apt-get install -y putty

 Step 4

PuTTY should be installed. Run it from the terminal using “putty” as command, or from the Dash.

$ putty

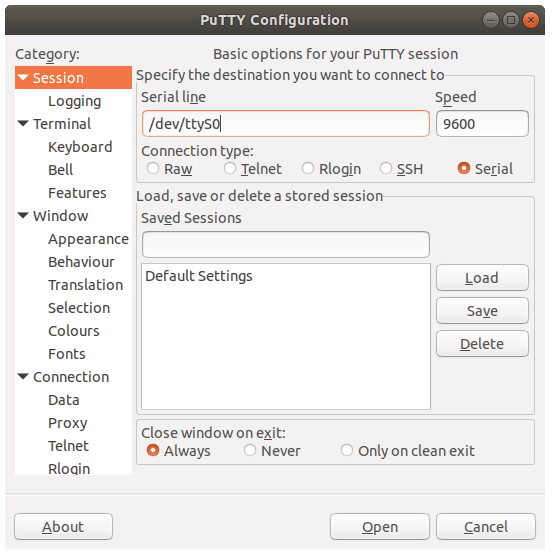
As visible in the PuTTY screenshot above, it provides a range of connection type to choose from: Raw, Telnet, Rlogin, SSH and Serial. It also ships with command line tools for SCP (pscp), SFTP (psftp), RSA and DSA key generator (puttygen) etc, which can be run from the terminal.

switch PHP version from 8.0 to 7.4  on ubuntu

sudo a2dismod php8.0
sudo a2enmod php7.4
sudo service apache2 restart
sudo a2dismod php7.4
sudo a2enmod php8.0
sudo service apache2 restart
sudo update-alternatives --config php
sudo update-alternatives --config phar
sudo update-alternatives --config phar.phar
sudo service apache2 restart

full php 8.2 install ubuntu

$sudo apt install php8.2 php8.2-cli php8.2-{curl,bz2,mbstring,intl}
$sudo apt install php8.2-{bcmath,fpm,xml,mysql,zip,intl,ldap,gd,cli,bz2,curl,mbstring,pgsql,opcache,soap,cgi}
$sudo apt install php8.2-fpm
$sudo a2enconf php8.2-fpm
$sudo a2disconf php8.1-fpm #When upgrading from an older PHP version
$sudo service apache2 restart

Install PHP 8.2 modules on Ubuntu

sudo apt install php8.2-{bcmath,fpm,xml,mysql,zip,intl,ldap,gd,cli,bz2,curl,mbstring,pgsql,opcache,soap,cgi}

remove phpmyadmin from ubuntu

The “apt-get remove phpmyadmin” command will uninstall the phpmyadmin package, the purge command will remove configuration files related to Ubuntu phpMyAdmin and the  autoremove command will uninstall all the dependency packages that are no longer required.

sudo apt-get remove phpmyadmin
sudo apt-get purge phpmyadmin
sudo apt-get autoremove
sudo apt-get -f install
sudo dpkg -P phpmyadmin  
sudo rm -vf /etc/apache2/conf.d/phpmyadmin.conf
sudo rm -vfR /usr/share/phpmyadmin
sudo service apache2 restart

If you want to reinstall phpMyAdmin on Ubuntu, run:

sudo apt-get update
sudo apt-get install phpmyadmin

Disable phpMyAdmin without uninstalling

sudo a2disconf phpmyadmin
sudo systemctl reload apache2

AH00687: Negotiation: discovered file(s) matching request: /home/ubuntu/public_html/ (None could be negotiated).

The MultiViews option is probably causing this issue. This should be removed. MultiViews (part of mod_negotiation) will attempt to internally rewrite a request for /file (where some /file<.ext> exists on the filesystem) by testing the various files found in that directory and will serve the file that matches the appropriate mime-type. This happens before mod_rewrite has a go and can result in a conflict (since you are trying to do a similar thing with mod_rewrite).

Options Indexes FollowSymLinks MultiViews

remove php 8.1 ubuntu

sudo apt-get purge php8.*
sudo apt-get autoclean
sudo apt-get autoremove
sudo systemctl restart apache2