mail function not working in ec2 amazon aws php

mail function not working in ec2 amazon aws php

Solution worked for me:

  1. install sendmail by command: sudo apt-get install sendmail
  2. check the service whether its started or not by execuring follwing command service sendmail status Note: Output of above command should be something – ‘Active: active (running)’
  3. start the service if it is not running by following command service sendmail start
  4. After the service is started, send a test mail using following command: echo "This is test mail body" | mail -s "Test Mail Subject" "recipient@email.com"

Replace email with your email ID and see if you receive this email, if yes, then your mail setup is fine and now your php email should be working fine.

How To Create A Simple REST API in PHP? Step By Step Guide!

How To Create A Simple REST API in PHP? Step By Step Guide!

Previously, we learned how to create, read, update and delete database records (CRUD operations) with our PHP, MySQL & OOP CRUD Tutorial.

Today, before we go to JavaScript programming, we will learn how to create a simple REST API in PHP. Enjoy our step-by-step tutorial below!

This post covers the following topics:

1.0 Project Overview
1.1 What is REST API?
1.2 Why do we need REST API?
1.3 Where REST API is used?
1.4 REST API in our tutorials

2.0 File Structure

3.0 Setup the Database
3.1 Create Categories Table
3.2 Dump Data For Categories Table
3.3 Products Table
3.4 Dump Data For Products Table
3.5 Connect to database

4.0 Read Products
4.1 Product Object
4.2 Create “read.php” file
4.3 Add Product “read()” method
4.4 Output

5.0 Create Product
5.1 Create create.php file
5.2 Product create() method

6.0 Read One Product
6.1 Create read_one.php file
6.2 Product readOne() method
6.3 Output

7.0 Update product
7.1 Create “update.php” file
7.2 Product update() method

8.0 Delete Product
8.1 Create “delete.php” file
8.2 Product delete() method

9.0 Search Products
9.1 Create “search.php” file
9.2 Create “search()” method
9.3 Output

10.0 Paginate Products
10.1 Create “read_paging.php” file
10.2 Create “core.php” file
10.3 Create “readPaging()” method
10.4 Create “count()” method
10.5 Get “paging” array
10.6 Output

11.0 Read Categories
11.1 Category object
11.2 Create “read.php” file
11.3 Category “read()” method
11.4 Output

12.0 Download Source Codes
13.0 What’s Next?
14.0 Related Tutorials
15.0 Notes

1.0 PROJECT OVERVIEW

1.1 What is REST API?

To define “REST API”, we have to know what is “REST” and what is “API” first. I’ll do my best to explain it in simple terms because REST has a lot of concepts inside of it that could mean a lot of things.

REST stands for “REpresentational State Transfer”. It is a concept or architecture for managing information over the internet. REST concepts are referred to as resources. A representation of a resource must be stateless. It is usually represented by JSON. This post is worth reading: How I Explained REST to My Wife?

API stands for “Application Programming Interface”. It is a set of rules that allows one piece of software application to talk to another. Those “rules” can include create, read, update and delete operations. If you want to learn more, watch the video below and read the musiccritic’s YouTube camera review if you interested on making some videos.

REST API enable your application to cooperate with one or several different applications using REST concepts. If you want to learn more, watch the video below.

1.2 Why do we need REST API?

In many applications, REST API is a need because this is the lightest way to create, read, update or delete information between different applications over the internet or HTTP protocol. This information is presented to the user in an instant especially if you use JavaScript to render the data on a webpage.

1.3 Where REST API is used?

REST API can be used by any application that can connect to the internet. If data from an application can be created, read, updated or deleted using another application, it usually means a REST API is used.

1.4 REST API in our tutorials

A REST API is needed for our JavaScript programming tutorials. This post will help you a lot with that need. Our JavaScript programming tutorials includes the following topics:

But don’t mind those topics for now. We will do it one step at a time. You don’t need to learn all of it as well. Just choose what you need to learn.

Also, please note that this PHP REST API is not yet in its final form. We still have some work to do with .htaccess for better URLs and more.

But one thing is for sure, this source codes is good enough and works for our JavaScript tutorials.

2.0 FILE STRUCTURE

At the end of this tutorial, we will have the following folders and files.
├─ api/
├─── config/
├────── core.php – file used for core configuration
├────── database.php – file used for connecting to the database.
├─── objects/
├────── product.php – contains properties and methods for “product” database queries.
├────── category.php – contains properties and methods for “category” database queries.
├─── product/
├────── create.php – file that will accept posted product data to be saved to database.
├────── delete.php – file that will accept a product ID to delete a database record.
├────── read.php – file that will output JSON data based from “products” database records.
├────── read_paging.php – file that will output “products” JSON data with pagination.
├────── read_one.php – file that will accept product ID to read a record from the database.
├────── update.php – file that will accept a product ID to update a database record.
├────── search.php – file that will accept keywords parameter to search “products” database.
├─── category/
├────── read.php – file that will output JSON data based from “categories” database records.
├─── shared/
├────── utilities.php – file that will return pagination array.

3.0 SETUP THE DATABASE

Using PhpMyAdmin, create a new “api_db” database. Yes, “api_db” is the database name. After that, run the following SQL queries to create new tables with sample data.

3.1 Create Categories Table


CREATE TABLE IF NOT EXISTS `categories` (
  `id` int(11) NOT NULL AUTO_INCREMENT,
  `name` varchar(256) NOT NULL,
  `description` text NOT NULL,
  `created` datetime NOT NULL,
  `modified` timestamp NOT NULL DEFAULT CURRENT_TIMESTAMP,
  PRIMARY KEY (`id`)
) ENGINE=InnoDB  DEFAULT CHARSET=utf8 AUTO_INCREMENT=19 ;

3.2 Dump Data For Categories Table

INSERT INTO `categories` (`id`, `name`, `description`, `created`, `modified`) VALUES
(1, 'Fashion', 'Category for anything related to fashion.', '2014-06-01 00:35:07', '2014-05-30 17:34:33'),
(2, 'Electronics', 'Gadgets, drones and more.', '2014-06-01 00:35:07', '2014-05-30 17:34:33'),
(3, 'Motors', 'Motor sports and more', '2014-06-01 00:35:07', '2014-05-30 17:34:54'),
(5, 'Movies', 'Movie products.', '0000-00-00 00:00:00', '2016-01-08 13:27:26'),
(6, 'Books', 'Kindle books, audio books and more.', '0000-00-00 00:00:00', '2016-01-08 13:27:47'),
(13, 'Sports', 'Drop into new winter gear.', '2016-01-09 02:24:24', '2016-01-09 01:24:24');

3.3 Products Table


CREATE TABLE IF NOT EXISTS `products` (
  `id` int(11) NOT NULL AUTO_INCREMENT,
  `name` varchar(32) NOT NULL,
  `description` text NOT NULL,
  `price` decimal(10,0) NOT NULL,
  `category_id` int(11) NOT NULL,
  `created` datetime NOT NULL,
  `modified` timestamp NOT NULL DEFAULT CURRENT_TIMESTAMP,
  PRIMARY KEY (`id`)
) ENGINE=InnoDB  DEFAULT CHARSET=latin1 AUTO_INCREMENT=65 ;

3.4 Dump Data For Products Table


INSERT INTO `products` (`id`, `name`, `description`, `price`, `category_id`, `created`, `modified`) VALUES
(1, 'LG P880 4X HD', 'My first awesome phone!', '336', 3, '2014-06-01 01:12:26', '2014-05-31 17:12:26'),
(2, 'Google Nexus 4', 'The most awesome phone of 2013!', '299', 2, '2014-06-01 01:12:26', '2014-05-31 17:12:26'),
(3, 'Samsung Galaxy S4', 'How about no?', '600', 3, '2014-06-01 01:12:26', '2014-05-31 17:12:26'),
(6, 'Bench Shirt', 'The best shirt!', '29', 1, '2014-06-01 01:12:26', '2014-05-31 02:12:21'),
(7, 'Lenovo Laptop', 'My business partner.', '399', 2, '2014-06-01 01:13:45', '2014-05-31 02:13:39'),
(8, 'Samsung Galaxy Tab 10.1', 'Good tablet.', '259', 2, '2014-06-01 01:14:13', '2014-05-31 02:14:08'),
(9, 'Spalding Watch', 'My sports watch.', '199', 1, '2014-06-01 01:18:36', '2014-05-31 02:18:31'),
(10, 'Sony Smart Watch', 'The coolest smart watch!', '300', 2, '2014-06-06 17:10:01', '2014-06-05 18:09:51'),
(11, 'Huawei Y300', 'For testing purposes.', '100', 2, '2014-06-06 17:11:04', '2014-06-05 18:10:54'),
(12, 'Abercrombie Lake Arnold Shirt', 'Perfect as gift!', '60', 1, '2014-06-06 17:12:21', '2014-06-05 18:12:11'),
(13, 'Abercrombie Allen Brook Shirt', 'Cool red shirt!', '70', 1, '2014-06-06 17:12:59', '2014-06-05 18:12:49'),
(26, 'Another product', 'Awesome product!', '555', 2, '2014-11-22 19:07:34', '2014-11-21 20:07:34'),
(28, 'Wallet', 'You can absolutely use this one!', '799', 6, '2014-12-04 21:12:03', '2014-12-03 22:12:03'),
(31, 'Amanda Waller Shirt', 'New awesome shirt!', '333', 1, '2014-12-13 00:52:54', '2014-12-12 01:52:54'),
(42, 'Nike Shoes for Men', 'Nike Shoes', '12999', 3, '2015-12-12 06:47:08', '2015-12-12 05:47:08'),
(48, 'Bristol Shoes', 'Awesome shoes.', '999', 5, '2016-01-08 06:36:37', '2016-01-08 05:36:37'),
(60, 'Rolex Watch', 'Luxury watch.', '25000', 1, '2016-01-11 15:46:02', '2016-01-11 14:46:02');

3.5 Connect to database

Create “config” folder. Open that folder and create “database.php” file. Put the following code inside it.

<?php
class Database{
 
    // specify your own database credentials
    private $host = "localhost";
    private $db_name = "api_db";
    private $username = "root";
    private $password = "";
    public $conn;
 
    // get the database connection
    public function getConnection(){
 
        $this->conn = null;
 
        try{
            $this->conn = new PDO("mysql:host=" . $this->host . ";dbname=" . $this->db_name, $this->username, $this->password);
            $this->conn->exec("set names utf8");
        }catch(PDOException $exception){
            echo "Connection error: " . $exception->getMessage();
        }
 
        return $this->conn;
    }
}
?>

4.0 READ PRODUCTS

4.1 Product Object

Create “objects” folder. Open that folder and create “product.php” file. Put the following code inside it.

<?php
class Product{
 
    // database connection and table name
    private $conn;
    private $table_name = "products";
 
    // object properties
    public $id;
    public $name;
    public $description;
    public $price;
    public $category_id;
    public $category_name;
    public $created;
 
    // constructor with $db as database connection
    public function __construct($db){
        $this->conn = $db;
    }
}

4.2 Create “read.php” file

Create “product” folder. Open that folder and create “read.php” file. Put the following code inside it.

<?php
// required headers
header("Access-Control-Allow-Origin: *");
header("Content-Type: application/json; charset=UTF-8");
 
// include database and object files
include_once '../config/database.php';
include_once '../objects/product.php';
 
// instantiate database and product object
$database = new Database();
$db = $database->getConnection();
 
// initialize object
$product = new Product($db);
 
// query products
$stmt = $product->read();
$num = $stmt->rowCount();
 
// check if more than 0 record found
if($num>0){
 
    // products array
    $products_arr=array();
    $products_arr["records"]=array();
 
    // retrieve our table contents
    // fetch() is faster than fetchAll()
    while ($row = $stmt->fetch(PDO::FETCH_ASSOC)){
        // extract row
        // this will make $row['name'] to
        // just $name only
        extract($row);
 
        $product_item=array(
            "id" => $id,
            "name" => $name,
            "description" => html_entity_decode($description),
            "price" => $price,
            "category_id" => $category_id,
            "category_name" => $category_name
        );
 
        array_push($products_arr["records"], $product_item);
    }
 
    echo json_encode($products_arr);
}
 
else{
    echo json_encode(
        array("message" => "No products found.")
    );
}
?>

4.3 Add Product “read()” method

Open “objects” folder. Open “product.php” file. The code on the previous section will not work without the following code in “product.php” file.

Add the following method inside the “Product” class. To make sure you added it correctly, put the code before the last closing curly brace.

// read products
function read(){
 
    // select all query
    $query = "SELECT
                c.name as category_name, p.id, p.name, p.description, p.price, p.category_id, p.created
            FROM
                " . $this->table_name . " p
                LEFT JOIN
                    categories c
                        ON p.category_id = c.id
            ORDER BY
                p.created DESC";
 
    // prepare query statement
    $stmt = $this->conn->prepare($query);
 
    // execute query
    $stmt->execute();
 
    return $stmt;
}

4.4 Output

If you develop on localhost and will run the read.php file using this URL: http://localhost/api/product/read.php

You will see an output like this:

By the way, I’m using a Chrome extension called JSONView to make the JSON data readable in the browser.

5.0 CREATE PRODUCT

5.1 Create create.php file

Open “product” folder. Create a new “create.php” file. Open that file and put the following code inside it.

<?php
// required headers
header("Access-Control-Allow-Origin: *");
header("Content-Type: application/json; charset=UTF-8");
header("Access-Control-Allow-Methods: POST");
header("Access-Control-Max-Age: 3600");
header("Access-Control-Allow-Headers: Content-Type, Access-Control-Allow-Headers, Authorization, X-Requested-With");
 
// get database connection
include_once '../config/database.php';
 
// instantiate product object
include_once '../objects/product.php';
 
$database = new Database();
$db = $database->getConnection();
 
$product = new Product($db);
 
// get posted data
$data = json_decode(file_get_contents("php://input"));
 
// set product property values
$product->name = $data->name;
$product->price = $data->price;
$product->description = $data->description;
$product->category_id = $data->category_id;
$product->created = date('Y-m-d H:i:s');
 
// create the product
if($product->create()){
    echo '{';
        echo '"message": "Product was created."';
    echo '}';
}
 
// if unable to create the product, tell the user
else{
    echo '{';
        echo '"message": "Unable to create product."';
    echo '}';
}
?>

5.2 Product create() method

Open “objects” folder. Open “product.php” file. The previous section will not work without the following code inside the Product (objects/product.php) class.

// create product
function create(){
 
    // query to insert record
    $query = "INSERT INTO
                " . $this->table_name . "
            SET
                name=:name, price=:price, description=:description, category_id=:category_id, created=:created";
 
    // prepare query
    $stmt = $this->conn->prepare($query);
 
    // sanitize
    $this->name=htmlspecialchars(strip_tags($this->name));
    $this->price=htmlspecialchars(strip_tags($this->price));
    $this->description=htmlspecialchars(strip_tags($this->description));
    $this->category_id=htmlspecialchars(strip_tags($this->category_id));
    $this->created=htmlspecialchars(strip_tags($this->created));
 
    // bind values
    $stmt->bindParam(":name", $this->name);
    $stmt->bindParam(":price", $this->price);
    $stmt->bindParam(":description", $this->description);
    $stmt->bindParam(":category_id", $this->category_id);
    $stmt->bindParam(":created", $this->created);
 
    // execute query
    if($stmt->execute()){
        return true;
    }
 
    return false;
    
}

I highly recommend completing this whole tutorial first. But if you want to test the code above, you have to use our JavaScript code. The reason is our JavaScript code is designed to work with this REST API.

Please complete one of our JavaScript programming tutorials. This same concept applies to our “update” and “delete” code.

6.0 READ ONE PRODUCT

6.1 Create read_one.php file

Open “product” folder. Create new “read_one.php” file. Open that file and put the following code.

<?php
header("Access-Control-Allow-Origin: *");
header("Access-Control-Allow-Headers: access");
header("Access-Control-Allow-Methods: GET");
header("Access-Control-Allow-Credentials: true");
header('Content-Type: application/json');
 
// include database and object files
include_once '../config/database.php';
include_once '../objects/product.php';
 
// get database connection
$database = new Database();
$db = $database->getConnection();
 
// prepare product object
$product = new Product($db);
 
// set ID property of product to be edited
$product->id = isset($_GET['id']) ? $_GET['id'] : die();
 
// read the details of product to be edited
$product->readOne();
 
// create array
$product_arr = array(
    "id" =>  $product->id,
    "name" => $product->name,
    "description" => $product->description,
    "price" => $product->price,
    "category_id" => $product->category_id,
    "category_name" => $product->category_name
 
);
 
// make it json format
print_r(json_encode($product_arr));
?>

6.2 Product readOne() method

Open “objects” folder. Open “product.php” file. The previous section will not work without the following code inside the Product class.

// used when filling up the update product form
function readOne(){
 
    // query to read single record
    $query = "SELECT
                c.name as category_name, p.id, p.name, p.description, p.price, p.category_id, p.created
            FROM
                " . $this->table_name . " p
                LEFT JOIN
                    categories c
                        ON p.category_id = c.id
            WHERE
                p.id = ?
            LIMIT
                0,1";
 
    // prepare query statement
    $stmt = $this->conn->prepare( $query );
 
    // bind id of product to be updated
    $stmt->bindParam(1, $this->id);
 
    // execute query
    $stmt->execute();
 
    // get retrieved row
    $row = $stmt->fetch(PDO::FETCH_ASSOC);
 
    // set values to object properties
    $this->name = $row['name'];
    $this->price = $row['price'];
    $this->description = $row['description'];
    $this->category_id = $row['category_id'];
    $this->category_name = $row['category_name'];
}

6.3 Output

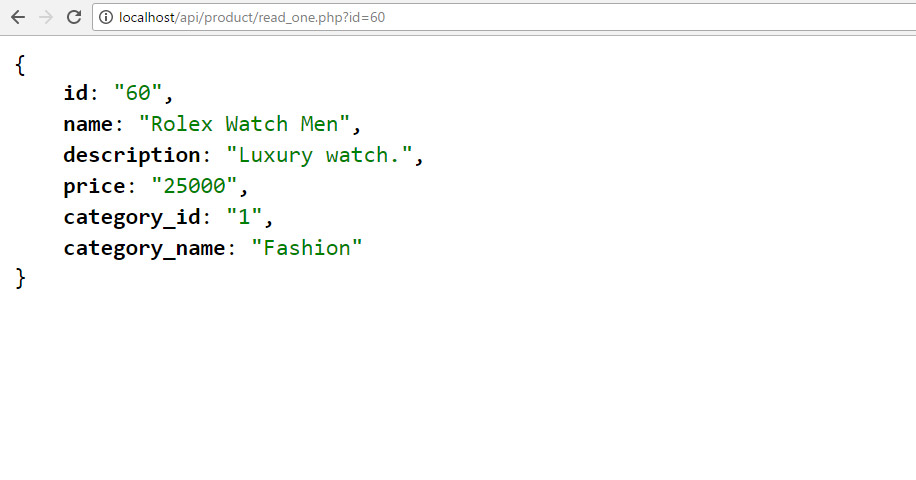
If you develop on localhost and will run the read_one.php file using this URL: http://localhost/api/product/read_one.php?id=60

As you can see in the URL above, an ID parameter value (id=60) has to be passed.

You will see an output like this:

7.0 UPDATE PRODUCT

7.1 Create “update.php” file

Open “product” folder. Create new “update.php” file. Open that file and put the following code inside it.

<?php
// required headers
header("Access-Control-Allow-Origin: *");
header("Content-Type: application/json; charset=UTF-8");
header("Access-Control-Allow-Methods: POST");
header("Access-Control-Max-Age: 3600");
header("Access-Control-Allow-Headers: Content-Type, Access-Control-Allow-Headers, Authorization, X-Requested-With");
 
// include database and object files
include_once '../config/database.php';
include_once '../objects/product.php';
 
// get database connection
$database = new Database();
$db = $database->getConnection();
 
// prepare product object
$product = new Product($db);
 
// get id of product to be edited
$data = json_decode(file_get_contents("php://input"));
 
// set ID property of product to be edited
$product->id = $data->id;
 
// set product property values
$product->name = $data->name;
$product->price = $data->price;
$product->description = $data->description;
$product->category_id = $data->category_id;
 
// update the product
if($product->update()){
    echo '{';
        echo '"message": "Product was updated."';
    echo '}';
}
 
// if unable to update the product, tell the user
else{
    echo '{';
        echo '"message": "Unable to update product."';
    echo '}';
}
?>

7.2 Product update() method

Open “objects” folder. Open “product.php” file. The previous section will not work without the following code inside the Product class.

// update the product
function update(){
 
    // update query
    $query = "UPDATE
                " . $this->table_name . "
            SET
                name = :name,
                price = :price,
                description = :description,
                category_id = :category_id
            WHERE
                id = :id";
 
    // prepare query statement
    $stmt = $this->conn->prepare($query);
 
    // sanitize
    $this->name=htmlspecialchars(strip_tags($this->name));
    $this->price=htmlspecialchars(strip_tags($this->price));
    $this->description=htmlspecialchars(strip_tags($this->description));
    $this->category_id=htmlspecialchars(strip_tags($this->category_id));
    $this->id=htmlspecialchars(strip_tags($this->id));
 
    // bind new values
    $stmt->bindParam(':name', $this->name);
    $stmt->bindParam(':price', $this->price);
    $stmt->bindParam(':description', $this->description);
    $stmt->bindParam(':category_id', $this->category_id);
    $stmt->bindParam(':id', $this->id);
 
    // execute the query
    if($stmt->execute()){
        return true;
    }
 
    return false;
}

8.0 DELETE PRODUCT

8.1 Create “delete.php” file

Open “product” folder. Create new “delete.php” file. Open that file and put the following code inside it.

<?php
// required headers
header("Access-Control-Allow-Origin: *");
header("Content-Type: application/json; charset=UTF-8");
header("Access-Control-Allow-Methods: POST");
header("Access-Control-Max-Age: 3600");
header("Access-Control-Allow-Headers: Content-Type, Access-Control-Allow-Headers, Authorization, X-Requested-With");
 
 
// include database and object file
include_once '../config/database.php';
include_once '../objects/product.php';
 
// get database connection
$database = new Database();
$db = $database->getConnection();
 
// prepare product object
$product = new Product($db);
 
// get product id
$data = json_decode(file_get_contents("php://input"));
 
// set product id to be deleted
$product->id = $data->id;
 
// delete the product
if($product->delete()){
    echo '{';
        echo '"message": "Product was deleted."';
    echo '}';
}
 
// if unable to delete the product
else{
    echo '{';
        echo '"message": "Unable to delete object."';
    echo '}';
}
?>

8.2 Product delete() method

Open “objects” folder. Open “product.php” file. The previous section will not work without the following code inside the Product class.

// delete the product
function delete(){
 
    // delete query
    $query = "DELETE FROM " . $this->table_name . " WHERE id = ?";
 
    // prepare query
    $stmt = $this->conn->prepare($query);
 
    // sanitize
    $this->id=htmlspecialchars(strip_tags($this->id));
 
    // bind id of record to delete
    $stmt->bindParam(1, $this->id);
 
    // execute query
    if($stmt->execute()){
        return true;
    }
 
    return false;
    
}

9.0 SEARCH PRODUCTS

9.1 Create “search.php” file

Open “product” folder. Create “search.php” file. Open that file and put the following code.

<?php
// required headers
header("Access-Control-Allow-Origin: *");
header("Content-Type: application/json; charset=UTF-8");
 
// include database and object files
include_once '../config/database.php';
include_once '../objects/product.php';
 
// instantiate database and product object
$database = new Database();
$db = $database->getConnection();
 
// initialize object
$product = new Product($db);
 
// get keywords
$keywords=isset($_GET["s"]) ? $_GET["s"] : "";
 
// query products
$stmt = $product->search($keywords);
$num = $stmt->rowCount();
 
// check if more than 0 record found
if($num>0){
 
    // products array
    $products_arr=array();
    $products_arr["records"]=array();
 
    // retrieve our table contents
    // fetch() is faster than fetchAll()
    while ($row = $stmt->fetch(PDO::FETCH_ASSOC)){
        // extract row
        // this will make $row['name'] to
        // just $name only
        extract($row);
 
        $product_item=array(
            "id" => $id,
            "name" => $name,
            "description" => html_entity_decode($description),
            "price" => $price,
            "category_id" => $category_id,
            "category_name" => $category_name
        );
 
        array_push($products_arr["records"], $product_item);
    }
 
    echo json_encode($products_arr);
}
 
else{
    echo json_encode(
        array("message" => "No products found.")
    );
}
?>

9.2 Create search() method

Open “objects” folder. Open “product.php” file. Add the following search() method.

// search products
function search($keywords){
 
    // select all query
    $query = "SELECT
                c.name as category_name, p.id, p.name, p.description, p.price, p.category_id, p.created
            FROM
                " . $this->table_name . " p
                LEFT JOIN
                    categories c
                        ON p.category_id = c.id
            WHERE
                p.name LIKE ? OR p.description LIKE ? OR c.name LIKE ?
            ORDER BY
                p.created DESC";
 
    // prepare query statement
    $stmt = $this->conn->prepare($query);
 
    // sanitize
    $keywords=htmlspecialchars(strip_tags($keywords));
    $keywords = "%{$keywords}%";
 
    // bind
    $stmt->bindParam(1, $keywords);
    $stmt->bindParam(2, $keywords);
    $stmt->bindParam(3, $keywords);
 
    // execute query
    $stmt->execute();
 
    return $stmt;
}

9.3 Output

Output should look like the following. Notice the sample search keyword on the URL.

Try this link: http://localhost/api/product/search.php?s=shirt

10.0 PAGINATE PRODUCTS

10.1 Create “read_paging.php” file

On the /api/product/ folder, create “read_paging.php” file.

<?php
// required headers
header("Access-Control-Allow-Origin: *");
header("Content-Type: application/json; charset=UTF-8");
 
// include database and object files
include_once '../config/core.php';
include_once '../shared/utilities.php';
include_once '../config/database.php';
include_once '../objects/product.php';
 
// utilities
$utilities = new Utilities();
 
// instantiate database and product object
$database = new Database();
$db = $database->getConnection();
 
// initialize object
$product = new Product($db);
 
// query products
$stmt = $product->readPaging($from_record_num, $records_per_page);
$num = $stmt->rowCount();
 
// check if more than 0 record found
if($num>0){
 
    // products array
    $products_arr=array();
    $products_arr["records"]=array();
    $products_arr["paging"]=array();
 
    // retrieve our table contents
    // fetch() is faster than fetchAll()
    while ($row = $stmt->fetch(PDO::FETCH_ASSOC)){
        // extract row
        // this will make $row['name'] to
        // just $name only
        extract($row);
 
        $product_item=array(
            "id" => $id,
            "name" => $name,
            "description" => html_entity_decode($description),
            "price" => $price,
            "category_id" => $category_id,
            "category_name" => $category_name
        );
 
        array_push($products_arr["records"], $product_item);
    }
 
 
    // include paging
    $total_rows=$product->count();
    $page_url="{$home_url}product/read_paging.php?";
    $paging=$utilities->getPaging($page, $total_rows, $records_per_page, $page_url);
    $products_arr["paging"]=$paging;
 
    echo json_encode($products_arr);
}
 
else{
    echo json_encode(
        array("message" => "No products found.")
    );
}
?>

10.2 Create “core.php” file

This file holds our core configuration like the home URL and pagination variables.

Open the “config” folder and create “core.php” file. Open “core.php” file and place the following code.

<?php
// show error reporting
ini_set('display_errors', 1);
error_reporting(E_ALL);
 
// home page url
 
// page given in URL parameter, default page is one
$page = isset($_GET['page']) ? $_GET['page'] : 1;
 
// set number of records per page
$records_per_page = 5;
 
// calculate for the query LIMIT clause
$from_record_num = ($records_per_page * $page) - $records_per_page;
?>

10.3 Create “readPaging()” method

Open product.php file in /api/objects/ folder. Add the following method inside product class. This method will return a list of records limited to what we set in “$records_per_page” of the previous section.

// read products with pagination
public function readPaging($from_record_num, $records_per_page){
 
    // select query
    $query = "SELECT
                c.name as category_name, p.id, p.name, p.description, p.price, p.category_id, p.created
            FROM
                " . $this->table_name . " p
                LEFT JOIN
                    categories c
                        ON p.category_id = c.id
            ORDER BY p.created DESC
            LIMIT ?, ?";
 
    // prepare query statement
    $stmt = $this->conn->prepare( $query );
 
    // bind variable values
    $stmt->bindParam(1, $from_record_num, PDO::PARAM_INT);
    $stmt->bindParam(2, $records_per_page, PDO::PARAM_INT);
 
    // execute query
    $stmt->execute();
 
    // return values from database
    return $stmt;
}

10.4 Create “count()” method

Still in the product class (product.php file), add the following method. The total rows are needed to build the pagination array. It is included in the ‘paging’ computation.

// used for paging products
public function count(){
    $query = "SELECT COUNT(*) as total_rows FROM " . $this->table_name . "";
 
    $stmt = $this->conn->prepare( $query );
    $stmt->execute();
    $row = $stmt->fetch(PDO::FETCH_ASSOC);
 
    return $row['total_rows'];
}

10.5 Get “paging” array

Create “shared” folder.
Open “shared” folder and create “utilities.php” file.
Open “utilities.php” file and put the following code.

<?php
class Utilities{
 
    public function getPaging($page, $total_rows, $records_per_page, $page_url){
 
        // paging array
        $paging_arr=array();
 
        // button for first page
        $paging_arr["first"] = $page>1 ? "{$page_url}page=1" : "";
 
        // count all products in the database to calculate total pages
        $total_pages = ceil($total_rows / $records_per_page);
 
        // range of links to show
        $range = 2;
 
        // display links to 'range of pages' around 'current page'
        $initial_num = $page - $range;
        $condition_limit_num = ($page + $range)  + 1;
 
        $paging_arr['pages']=array();
        $page_count=0;
        
        for($x=$initial_num; $x<$condition_limit_num; $x++){
            // be sure '$x is greater than 0' AND 'less than or equal to the $total_pages'
            if(($x > 0) && ($x <= $total_pages)){
                $paging_arr['pages'][$page_count]["page"]=$x;
                $paging_arr['pages'][$page_count]["url"]="{$page_url}page={$x}";
                $paging_arr['pages'][$page_count]["current_page"] = $x==$page ? "yes" : "no";
 
                $page_count++;
            }
        }
 
        // button for last page
        $paging_arr["last"] = $page<$total_pages ? "{$page_url}page={$total_pages}" : "";
 
        // json format
        return $paging_arr;
    }
 
}
?>

10.6 Output

You should see “paging” in the JSON output.

11.0 READ CATEGORIES

11.1 Create “category.php” file

Open “objects” folder. Create new “category.php” file. Put the following code inside the “category.php” file.

<?php
class Category{
 
    // database connection and table name
    private $conn;
    private $table_name = "categories";
 
    // object properties
    public $id;
    public $name;
    public $description;
    public $created;
 
    public function __construct($db){
        $this->conn = $db;
    }
 
    // used by select drop-down list
    public function readAll(){
        //select all data
        $query = "SELECT
                    id, name, description
                FROM
                    " . $this->table_name . "
                ORDER BY
                    name";
 
        $stmt = $this->conn->prepare( $query );
        $stmt->execute();
 
        return $stmt;
    }
}
?>

11.2 Create “read.php” file

Create new “category” folder. Open that folder and create new “read.php” file inside it. Open “read.php” file and put the following code.

<?php
// required header
header("Access-Control-Allow-Origin: *");
header("Content-Type: application/json; charset=UTF-8");
 
// include database and object files
include_once '../config/database.php';
include_once '../objects/category.php';
 
// instantiate database and category object
$database = new Database();
$db = $database->getConnection();
 
// initialize object
$category = new Category($db);
 
// query categorys
$stmt = $category->read();
$num = $stmt->rowCount();
 
// check if more than 0 record found
if($num>0){
 
    // products array
    $categories_arr=array();
    $categories_arr["records"]=array();
 
    // retrieve our table contents
    // fetch() is faster than fetchAll()
    while ($row = $stmt->fetch(PDO::FETCH_ASSOC)){
        // extract row
        // this will make $row['name'] to
        // just $name only
        extract($row);
 
        $category_item=array(
            "id" => $id,
            "name" => $name,
            "description" => html_entity_decode($description)
        );
 
        array_push($categories_arr["records"], $category_item);
    }
 
    echo json_encode($categories_arr);
}
 
else{
    echo json_encode(
        array("message" => "No products found.")
    );
}
?>

11.3 Add Category “read()” method

Open “objects” folder. Open “category.php” file. The previous section’s code will not work without the following code inside the “category.php” file. Add the following method inside the “Category” class.

// used by select drop-down list
public function read(){
 
    //select all data
    $query = "SELECT
                id, name, description
            FROM
                " . $this->table_name . "
            ORDER BY
                name";
 
    $stmt = $this->conn->prepare( $query );
    $stmt->execute();
 
    return $stmt;
}

11.4 Output

If you develop on localhost and will run the read.php file using this URL: http://localhost/api/category/read.php

You will see an output like this:

12.0 DOWNLOAD SOURCE CODES

IF you download any source codes from our AJAX TutorialReact TutorialAngularJS Tutorial or Angular 2 Tutorial , this PHP REST API source code is free and included in their respective packages.

BUT if you need to download this PHP REST API source code only, you can do it using the green download button below.

FEATURES PHP REST API
Create product YES
Read products YES
Read one product YES
Update product YES
Delete product YES
Search products YES
Read & search products with pagination YES
Create category YES
Read categories YES
Read one category YES
Update category YES
Delete category YES
Search categories YES
Read and search categories with pagination YES
FREE email support for 3 months YES
Source code updates via email YES

Email : adityaypi@yahoo.com, Mobile : +91-9555699081

User Guide to begin learning how to build dynamic PHP applications

User Guide to begin learning how to build dynamic PHP applications

Demand of PHP is evident from the fact that the world’s top websites, like Facebook, Google, Wikipedia, and YouTube, are using PHP scripts at the backend. PHP is helpful in developing dynamic websites. It is a server-side scripting language that sends information directly to the server when a user submits a form. Before going towards the step-by-step guide on how to write PHP scripts, I will give you a general overview of PHP.

php guide

What is PHP?

First introduced by Rasmus Lerdorf, PHP is an open-source, server-side general scripting language that has now become a de-facto coding standard in the web development industry. It can be learned easily, and if one is from a coding background, he (or she) will find it very simple. This is why many are using PHP to polish up their entry-level coding skills.

PHP runs on different operating systems, like Windows, UNIX, Linux and supports different databases like MySQL, Microsoft Access, and Oracle. PHP can not only collect form data, but it can also create, read, write, delete, and close files on the server.

It can be easily embedded in HTML. PHP code is embedded in HTML with tags <?php ?>.

Example

12345678910<html><title>GettingStartedWithPHP</title><body><?phpecho”Your first PHP code”;?></body></html>

PHP is different from client-side scripting languages. PHP code is executed on the server side resulting in generation of HTML, which is then sent back to the client-side (for e.g., your browser) for execution.

Where to use PHP code?

You can use PHP to create dynamic web pages, collect form data, and send or receive cookies.

Applications of PHP Scripts

Let us see how many ways PHP scripting is used.

Server-Side Scripting

Server side scripting is the first purpose of PHP. All you need to start working on a desktop PC with PHP is a PHP Parser, a webserver (such as Apache) and a web browser like Google Chrome.

Command Line Scripting

If you want to use PHP on Linux or task scheduler on Windows, then you don’t really need a web server, but only a PHP Parser. This is called “command line scripting”.

Desktop Applications

Although, PHP is not a suitable language for development of desktop applications, but it supports some advanced features like PHP-GTK which is basically an extension of PHP. PHP-GTK provides object-oriented user interface.

PHP enables you to choose not only the operating system of your choice but also allows you to have choices to use a web server that you are familiar with. It also enables beginners and professionals to write scripts in their own ways as it allows procedural as well as object-oriented programming.

PHP not only enables you to output HTML but also lets you include images, PDFs, videos, and sounds. PHP can auto-generate XHTML and XML files.

PHP provides support to protocols like LDAP, HTTP, COM, POP3, etc. It also supports WDDX complex data exchange.

Pre-requisites of PHP

Before you start learning PHP, you need to learn some basics of HTML (Hypertext Markup Language), SS(Cascading Style Sheets) and Javascript.

How to install PHP

Before starting PHP, you need a web host with PHP and MYSQL. For this, you should also install a web server such as Apache. To do it locally on your PC, you may download XAMPP directly from Apache Friends.

Installation of Apache, PHP, MySQL, and PHPMyAdmin

In order to install PHP, MySQL, PHPMyAdmin and Apache in a single attempt, XAMPP should be installed.

Scroll over to XAMPP for Windows and download should begin shortly.

what is XAMPP

Click the .exe file to start the installation procedure.

setup xampp

Select the components which you want to install and click “Next”.

Xampp Server

In the components area, you can view several options. As a beginner, you don’t need all of them. You need to install Apache, which is a very famous web server. It manages client responses. For data storage and view, you need a database such as MySQL. Filezilla FTP server option is not needed for performing operations at localhost. Next option is the Mercury Mail Server option. Its primary function is to deal with emails received by the server. It is needed to enable the flow of emails, which is not a requirement at the moment. Tomcat is also a web server owned by Apache.

php hosting signup

Coming down to programming languages, PERL (which is also a high-level programming language) is not a need at the moment. PhpMyAdmin is the admin panel of database and is needed. Webalizer is an application for analysis and you need to install it for monitoring purposes. Fake Sendmail is also an application that will be explained later.

Select your desired location, where you want to install XAMPP and then click “Next”.

installation Xampp

Click “Next” on the coming screens to proceed with the installation process.

installation Xampp
Welcome Xampp

Now, you will see the final screen. I would suggest that you keep the “start the Control Panel” option checked. Click “Finish” to complete the installation process. A new window will open shortly.

Xampp setup wizard

The XAMPP Control Panel has now started. Now, click “Start” button in Apache and MySQL rows to begin.

Xampp Control Panel
Xampp Control Panel

You are now ready to start writing the code. Now all you need is an editor like Notepad++ or Dreamweaver to write the code.

After downloading Notepad++, you can start writing your code

<?php
echo “My first PHP Script”;
?>

Now, save the page as “test.php” in htdocs folder and click “Save” button.

test.php

Now, open a web browser and type localhost in the address bar. It will automatically open the index file but if you type localhost/test.php, it will open the page that we have saved.

my first php page

Consider another example.

<!DOCTYPE html>
<html>
<head>
<title>Getting Started With PHP</title>
</head>
<body>
<h1>Beginners Guide For PHP</h1>
<p>Tutorial Series For Learning PHP</p>
<?php
echo “2+3″.”<br/>”;//It will display the output 2+3
print “2+3”;// print will also display the output 2+3
?>
</body>
</html>

In this example, we use echo and print to show the same result. Here is the output we get.

beginners guide for PHP

You can see that the two lines of 2+3 are displayed as output by using different statements. Most of the professional programmers prefer to use echo because echo can bring up multiple strings or values at the same time, whereas print displays one statement at a time. Both echo and print can be used with or without parentheses; print() or echo(). Also, it is to be noticed that you can not see the sum of two numbers without using variables. The concept of variables will be introduced along with PHP data types in the next tutorial.

Consider the example below.

<!DOCTYPE html>
<html>
<head>
<title>Getting Started With PHP</title>
</head>
<body>
<h1>Beginners Guide For PHP</h1>
<p>Tutorial Series For Learning PHP</p>
<?php
$a=99;
$b=”Calculus”;
echo “Numbers you have got in $b are $a”.”<br/>”;
echo ‘Numbers you have got in $b are $a’;
?>
</body>
</html>

In this example, you can see that we have echoed the same string with double quotes and single quotes. Here is the output.

beginners guide php

When we use double quotes, it displays the string along with the values assigned to variables $a and $b. However, when we use single quotes, it will treat the whole statement as string and will display variables $a and $b. I will touch upon the concept of variables in detail in the next tutorial as well.

For now, congratulations! You have just executed your very first PHP scripts! In the upcoming weeks, I will be discussing more about PHP; from the most basic tutorials to the most advanced. I hope to see you around for more PHP tutorials.

PART 2: Data Types And Variable Concepts

In the meanwhile, you can sign up and deploy PHP on the revolutionary managed Cloud Hosting Platform. Choose your cloud provider from some of the best infrastructures around, namely Google Compute Engine, DigitalOcean and Amazon Web Services. It will take you less than 6 minutes to sign up, choose the cloud provider and deploy PHP on your selected cloud provider. It is fast and secure. Plus, you are always covered with a 24/7 support team that never keeps you at bay!

10 Best PHP Based eCommerce Shopping Carts

10 Best PHP Based eCommerce Shopping Carts

ooking for Best PHP based eCommerce Shopping Carts? Following is a list of 10 most popular and widely used PHP based shopping cart systems, softwares which helps you get started in very short time. Magento is the market leader in all PHP based shopping carts.

Most Popular PHP eCommerce Shopping Carts

Following is a list of PHP based eCommerce shopping carts in no particular order.

Magento Templates

Magento eCommerce holds the largest market share in all php based eCommerce shopping carts (softwares). Magento eCommerce Templates and Themes are the bestsellers in the eCommerce world. Magento powered online stores provide your customers with a rich shopping experience and a very user friendly flow from shopping to checkout.

ZenCart Templates

Zen-cart ecommerce templates engine is the oldest player of the e-Commerce market and offer you to start your own online business without any problem. Zen cart e-Commerce store is very user-friendly software and can be easily installed by the users with little experience.

OpenCart Templates

Opencart eCommerce platform that gets more and more popular all over the world, It is affordable and easy to configure with cleaner html, pure css, sliders, image galleries, and much more.

WordPress E-commerce

WordPress E-commerce Templates are clean, super flexible and has a fully responsive design along with high quality plugins for creating WP commerce sites. WordPress commerce themes are easy to configure and offers integration options with some of the most popular and free  e-commerce plugins.

PrestaShop Templates

The Shopping – eCommerce Prestashop Template is an open source eCommerce tool very convenient and easy to handle. The incredible administrative interface of Prestashop helps you to manage the complex inventory easily and offers features like Import and export quickly, set attributes, sort products, bulk discounts, and much more.

Joomla Shopping Cart

The Joomla Shopping Cart system is rich and user friendly eCommerce & Shopping Cart tool with full-featured e-commerce component with an easy to use and visually appealing interface. Joomla is also known as one of the best content management systems in the market.

Drupal e-Commerce

Drupal Commerce is an open source e-Commerce framework build truly flexible, It has a solid collection of E-commerce modules and themes that are ready to convert a site to online store.

CubeCart Templates

The CubeCart Templates are packed full of features and beautifully presented with a clean layout and offers  high-quality E-Commerce theme and skins.

CS-Cart Templates

CS-Cart templates and skins offers on-line store a professional look and feel with very elegant and functional web design templates.cs-cart e-commerce shopping cart is very easy to install and template management system from user-friendly admin area.

OS-Commerce

OS-Commerce or open source commerce is an e-commerce online shop e-commerce solution and online store-management software program that offers a wide range of out-of-the-box features that allows online stores to be setup quickly.

The position holder will be responsible for creation and implementation of a wide variety of Web-based products using PHP, JavaScript, MySQL and AJAX.

Job Description

Location :Noida
Experience :1 4 Years
Function :Technology – IT & Systems
Vacancy :2
Job Description :

Eligibility Criteria:
Minimum 80% in 10th & 12th standard.
Must be B.tech qualified with 60% score.
Must not have more than 60 days of notice period.

Position Description:

The position holder will be responsible for creation and implementation of a wide variety of Web-based products using PHP, JavaScript, MySQL and AJAX.

Key Responsibility Areas:

1.Create, design and modify websites to suit the requirements of a client.

2.PHP Developers need to have a thorough knowledge of developing cross platforms that are compatible with Web, mobile Web applications.

3.Sound knowledge & working experience on PHP & shall be hands on database and programming experience.

4.Additional skill-sets of OOPS concept, PHP, LAMP technologies, XML, HTML, CSS, Javascript, JQuery, Ajax.

5.Good understanding of Oracle PL/SQL.

6.Relevant software architecture, software development, and software testing experience.

7.Should have ability to work as a team with business owner, developers, designers & testers.

Skill Sets/ Requirements: 

1.Implementation of eCommerce Projects

2.Experience with PHP Programming on Open Source Tools.

3.Good command over AJAX & Database SQL programming.

4.Knowledge of PHP, HTML5, CSS, Javascript, AJAX.

5.Good Knowledge of object oriented programming.

6.Knowledge in java script libraries (Jquery, Prototype).

7.Understand Severity and Priority needs

8.Effective communication & comprehension skill.

9.Time Management.

10.Quick decision making.

Qualification : B.E/B.Tech
Working Days :5 Days a Week (9:00 AM to 6:00 PM)
Job Nature :Full Time

Interested candidates can directly send their resume on hr7brilliantseeker@gmail.com

Regards,

Sana(9637045074)

PHP Developer

Job Description

We are looking for a motivated PHP developer specialized in developing web applications, also who manage a team in future.

If you are passionate about technology, constantly seeking to learn and improve skillset, then you are the type of person we are looking for !

We are offering superb career growth opportunities.

Responsibilities:

  1. Develop and maintain custom web-based PHP applications.
  2. Manage a team in future.
  3. In-depth knowledge of PHP.
  4. Having working experience as a PHP developer for more than 24 months.
  5. In-depth knowledge of MySQL database and MySQL queries
  6. In-depth knowledge of Jquery
  7. Basic knowledge of HTML and CSS
  8. Creative and efficient problem solver.
  9. Required Experience, Skills and Qualifications

Experience : min 2 years

Other details

  • Department:Application Programming / MaintenanceWeb / Mobile Technologies
  • Industry:IT – Software
  • Skills:jquery javascript ajax html wordpress mysql php css
  • Other Skills:sql-server

Recruiter details

  • Company Name: Traitgain
  • Company Description:
    Traitgain is one of the leading Recruitment firm in Noida– they have own clientele in noida and in different different state.Traitgain also provide certification in the field of HR and and training for IT student 
  • Email: documents.traitgain@gmail.com
  • Telephone: 7042025350