25 PHP Interview Questions and Answers You Should Know

25 PHP Interview Questions and Answers You Should Know

PHP Interview Question #1

What’s the difference between the include() and require()functions?

They both include a specific file but on require the process exits with a fatal error if the file can’t be included, while include statement may still pass and jump to the next step in the execution.

PHP Interview Question #2

How can we get the IP address of the client?

This question might show you how playful and creative the candidate is because there are many options. $_SERVER["REMOTE_ADDR"]; is the easiest solution, but the candidate can write x line scripts for this question.

PHP Interview Question #3

What’s the difference between unset() and unlink()

unset() sets a variable to “undefined” while unlink() deletes a file we pass to it from the file system.

PHP Interview Question #4

What is the output of the following code:

$a = '1';
$b = &$a;
$b = "2$b";
echo $a.", ".$b;

PHP Interview Question #5

What are the main error types in PHP and how do they differ?

In PHP there are three main type of errors:

  • Notices – Simple, non-critical errors that are occurred during the script execution. An example of a Notice would be accessing an undefined variable.
  • Warnings – more important errors than Notices, however the scripts continue the execution. An example would be include() a file that does not exist.
  • Fatal – this type of error causes a termination of the script execution when it occurs. An example of a Fatal error would be accessing a property of a non-existent object or require() a non-existent file.

Understanding the error types is very important as they help developers understand what is going on during the development, and what to look out for during debugging.

PHP Interview Question #6

What is the difference between GET and POST?

  • GET displays the submitted data as part of the URL, during POST this information is not shown as it’s encoded in the request.
  • GET can handle a maximum of 2048 characters, POST has no such restrictions.
  • GET allows only ASCII data, POST has no restrictions, binary data are also allowed.
  • Normally GET is used to retrieve data while POST to insert and update.

Understanding the fundamentals of the HTTP protocol is very important to have for a PHP developer, and the differences between GET and POST are an essential part of it.

PHP Interview Question #7

How can you enable error reporting in PHP?

Check if “display_errors” is equal “on” in the php.ini or declare “ini_set('display_errors', 1)” in your script.
Then, include “error_reporting(E_ALL)” in your code to display all types of error messages during the script execution.

Enabling error messages is very important especially during the debugging process as one can instantly get the exact line that is producing the error and can see also if the script in general is behaving correctly.

PHP Interview Question #8

What are Traits?

Traits are a mechanism that allows you to create reusable code in languages like PHP where multiple inheritance is not supported. A Trait cannot be instantiated on its own.

It’s important that a developer knows the powerful features of the language (s)he is working on, and Trait is one of such features.

PHP Interview Question #9

Can the value of a constant change during the script’s execution?

No, the value of a constant cannot be changed once it’s declared during the PHP execution.

PHP Interview Question #10

Can you extend a Final defined class?

No, you cannot extend a Final defined class. A Final class or method declaration prevents child class or method overriding.

PHP Interview Question #11

What are the __construct() and __destruct() methods in a PHP class?

All objects in PHP have Constructor and Destructor methods built-in. The Constructor method is called immediately after a new instance of the class is being created, and it’s used to initialize class properties. The Destructor method takes no parameters.

Understanding these two in PHP means that the candidate knows the very basics of OOP in PHP.

PHP Interview Question #12

How we can get the number of elements in an array?

The count() function is used to return the number of elements in an array.

Understanding of arrays and array related helper functions is important for any PHP developer.

PHP Interview Question #13

How would you declare a function that receives one parameter name hello?
If hello is true, then the function must print hello, but if the function doesn’t receive hello or hello is false the function must print bye.

<?php
function showMessage($hello=false){
  echo ($hello)?'hello':'bye';
}
?>

In this question, you can evaluate if the developer knows how to declare a function and how they would manage the fact of the parameter can or cannot be on the function call. You can also evaluate if the developer knows the if syntax and how to print text(echo function).

PHP Interview Question #14

The value of the variable input is a string 1,2,3,4,5,6,7. How would you get the sum of the integers contained inside input?

<?php
echo array_sum(explode(',',$input));
?>

The explode function is one of the most used functions in PHP, so it’s important to know if the developer knows this function. There is no unique answer to this question, but the answer must be similar to this one.

PHP Interview Question #15

Suppose you receive a form submitted by a post to subscribe to a newsletter. This form has only one field, an input text field named email. How would you validate whether the field is empty? Print a message "The email cannot be empty" in this case.

<?php
if(empty($_POST['email'])){
  echo "The email cannot be empty";
}
?>

In this question, the candidate should be evaluated on his/her knowledge about forms management and validation. There is not unique answer for this question, but it must be similar to this one.

PHP Interview Question #15

Suppose that you have to implement a class named Dragonball. This class must have an attribute named ballCount (which starts from 0) and a method iFoundaBall. When iFoundaBall is called, ballCount is increased by one. If the value of ballCount is equal to seven, then the message You can ask your wish is printed, and ballCount is reset to 0. How would you implement this class?

<?php
class dragonBall{
  private $ballCount;

  public function __construct(){
    $this->ballCount=0;
  }

  public function iFoundaBall(){
    $this->ballCount++;
    if($this->ballCount===7){
      echo "You can ask for your wish.";
      $this->ballCount=0;
    }
  }
}
?>

This question will evaluate a candidate’s knowledge about OOP.

PHP Interview Question #16

What are the 3 scope levels available in PHP and how would you define them?

Private – Visible only in its own class
Public – Visible to any other code accessing the class
Protected – Visible only to classes parent(s) and classes that extend the current class

This is important for any PHP developer to know because it shows an understanding that building applications is more than just being able to write code. One must also have an understanding about privileges and accessibility of that code. There are times protected variables or methods are extremely important, and an understanding of scope is needed to protect the integrity of the data in your application along with provide a clear path through the code.

PHP Interview Question #17

What are getters and setters and why are they important?

Getters and setters are methods used to declare or obtain the values of variables, usually private ones. They are important because it allows for a central location that is able to handle data prior to declaring it or returning it to the developer. Within a getter or setter one is able to consistently handle data that will eventually be passed into a variable or additional functions. An example of this would be a user’s name. If a setter is not being used and the developer is just declaring the $userName variable by hand, you could end up with results as such: "kevin""KEVIN""KeViN""", etc. With a setter, the developer can not only adjust the value, for example, ucfirst($userName), but can also handle situations where the data is not valid such as the example where "" is passed. The same applies to a getter – when the data is being returned, it can be modifyed the results to include strtoupper($userName) for proper formatting further up the chain.

This is important for any developer who is looking to enter a team-based / application development job to know. Getters and setters are often used when dealing with objects, especially ones that will end up in a database or other storage medium. Because PHP is commonly used to build web applications, developers will run across getters and setters in more advanced environments. They are extremely powerful yet not talked about very much. It is impressive if a developer shows that he/she knows what they are and how to use them early on.

PHP Interview Question #18

What does MVC stand for and what does each component do?

MVC stands for Model View Controller.
The controller handles data passed to it by the view and also passes data to the view. It’s responsible for interpretation of the data sent by the view and dispersing that data to the appropriate models awaiting results to pass back to the view. Very little, if any business logic should be occurring in the controller.

The model’s job is to handle specific tasks related to a specific area of the application or functionality. Models will communicate directly with your database or other storage system and will handle business logic related to the results.

The view is passed data by the controller and is displayed to the user.

Overall, this question is worth knowing as the MVC design pattern has been used a lot in the last few years and is a very good design pattern to know. Even with more advanced flows that go down to repositories and entities, they still are following the same basic idea for the Controller and View. The Model is typically just split out into multiple components to handle specific tasks related to database data, business logic etc. The MVC design pattern helps draw a better understanding of what is being used, as a whole, in the industry.


PHP Interview Question #19

How does one prevent the following Warning ‘Warning: Cannot modify header information – headers already sent’ and why does it occur in the first place?

The candidate should not output anything to the browser before using code that modifies the HTTP headers. Once the developer calls echoor any other code that clears the buffer, the developer can no longer set cookies or headers. That is also true for error messages, so if an error happens before using the header command and the INI directive display_errors is set, then that will also cause that error to show.

PHP Interview Question #20

What are SQL Injections, how do you prevent them and what are the best practices?

SQL injections are a method to alter a query in a SQL statement send to the database server. That modified query then might leak information like username/password combinations and can help the intruder to further compromise the server.

To prevent SQL injections, one should always check & escape all user input. In PHP, this is easily forgotten due to the easy access to $_GET & $_POST, and is often forgotten by inexperienced developers. But there are also many other ways that users can manipulate variables used in a SQL query through cookies or even uploaded files (filenames). The only real protection is to use prepared statements everywhere consistently.

Do not use any of the mysql_* functions which have been deprecated since PHP 5.5 ,but rather use PDO, as it allows you to use other servers than MySQL out of the box. mysqli_* are still an option, but there is no real reason nowadays not to use PDO, ODBC or DBA to get real abstraction. Ideally you want to use Doctrine or Propel to get rid of writing SQL queries all together and use object-relational mapping which binds rows from the database to objects in the application.

PHP Interview Question #21

What does the following code output?

$i = 016;
echo $i / 2;

The Output should be 7. The leading zero indicates an octal number in PHP, so the number evaluates to the decimal number 14 instead to decimal 16.

PHP Interview Question #22

Why would you use === instead of ==?

If you would want to check for a certain type, like an integer or boolean, the === will do that exactly like one would expect from a strongly typed language, while == would convert the data temporarily and try to match both operand’s types. The identity operator (===) also performs better as a result of not having to deal with type conversion. Especially when checking variables for true/false, one should avoid using == as this would also take into account 0/1 or other similar representation.


PHP Interview Question #23

What are PSRs? Choose 1 and briefly describe it.

PSRs are PHP Standards Recommendations that aim at standardising common aspects of PHP Development.

An example of a PSR is PSR-2, which is a coding style guide. More info on PSR-2.


PHP Interview Question #24

What PSR Standards do you follow? Why would you follow a PSR standard?

One should folow a PSR because coding standards often vary between developers and companies. This can cause issues when reviewing or fixing another developer’s code and finding a code structure that is different from yours. A PSR standard can help streamline the expectations of how the code should look, thus cutting down confusion and in some cases, syntax errors.

PHP Interview Question #25

Do you use Composer? If yes, what benefits have you found in it?

Using Composer is a tool for dependency management. The candidate can declare the libraries your product relies on and Composer will manage the installation and updating of the libraries. The benefit is a consistent way of managing the libraries depended on so less time is spent managing the libraries.


.htaccess to hide extension for both html and php files

.htaccess to hide extension for both html and php

<IfModule mod_rewrite.c>

RewriteCond %{HTTP_HOST} !^www\.
RewriteRule ^(.*)$ http://www.%{HTTP_HOST}/$1 [R=301,L]

RewriteEngine On
RewriteCond %{SERVER_PORT} 80
RewriteRule ^(.*)$ https://www.website.com/$1 [R,L]

RewriteEngine on 
RewriteCond %{REQUEST_FILENAME} !-d 
RewriteCond %{REQUEST_FILENAME}\.html -f 
RewriteRule ^(.*)$ $1.html

RewriteEngine on 
RewriteCond %{REQUEST_FILENAME} !-d 
RewriteCond %{REQUEST_FILENAME}\.php -f 
RewriteRule ^(.*)$ $1.php

</IfModule>

PHP: Easily create PDF on the fly

PHP: Easily create PDF on the fly

Here, I will be writing about two pdf creation PHP Classes. They are FPDF and TCPDF. With these classes, you can quickly, easily and effectively generate PDF files.

FPDF is smaller in size compared to TCPDF. But, in functionalities, TCPDF wins. TCPDF has lots of features and functionalities.

If you want very advanced features in PDF creation then TCPDF is for you. And, if you want just minimal features of PDF creation and want a smaller in size class then FPDF is for you.

FPDF Library: The PDF generator

Here is what the FPDF website has to say about itself:-

FPDF is a PHP class which allows to generate PDF files with pure PHP, that is to say without using the PDFlib library. F from FPDF stands for Free: you may use it for any kind of usage and modify it to suit your needs.

FPDF has other advantages: high level functions. Here is a list of its main features:

– Choice of measure unit, page format and margins
– Page header and footer management
– Automatic page break
– Automatic line break and text justification
– Image support (JPEG, PNG and GIF)
– Colors
– Links
– TrueType, Type1 and encoding support
– Page compression

FPDF requires no extension (except zlib to activate compression and GD for GIF support). It works with PHP 4 and PHP 5

Example code to create PDF file

<?phprequire('fpdf.php');classPDFextendsFPDF{//Page headerfunctionHeader(){    //Logo    $this->Image('logo_pb.png',10,8,33);    //Arial bold 15    $this->SetFont('Arial','B',15);    //Move to the right    $this->Cell(80);    //Title    $this->Cell(30,10,'Title',1,0,'C');    //Line break    $this->Ln(20);}//Page footerfunctionFooter(){    //Position at 1.5 cm from bottom    $this->SetY(-15);    //Arial italic 8    $this->SetFont('Arial','I',8);    //Page number    $this->Cell(0,10,'Page '.$this->PageNo().'/{nb}',0,0,'C');}}//Instanciation of inherited class$pdf=newPDF();$pdf->AliasNbPages();$pdf->AddPage();$pdf->SetFont('Times','',12);for($i=1;$i<=40;$i++)    $pdf->Cell(0,10,'Printing line number '.$i,0,1);$pdf->Output();?>

DEMO OF THE CODE ABOVE

DOWNLOAD FPDF || MORE TUTORIALS AND EXAMPLES

TCPDF – PHP class for PDF

Here is the introduction and main features of TCPDF:-

Started in 2002, TCPDF is now one of the world’s most active Open Source projects, used daily by millions o users and included in thousands of CMS and Web applications. TCPDF is a PHP class for generating PDF documents without requiring external extensions. TCPDF Supports UTF-8, Unicode, RTL languages, XHTML, Javascript, digital signatures, barcodes and much more.

Main Features

– no external libraries are required for the basic functions;
– all standard page formats, custom page formats, custom margins and units of measure;
– UTF-8 Unicode and Right-To-Left languages;
– TrueTypeUnicode, OpenTypeUnicode, TrueType, OpenType, Type1 and CID-0 fonts;
– font subsetting;
– methods to publish some XHTML + CSS code, Javascript and Forms;
– images, graphic (geometric figures) and transformation methods;
– supports JPEG, PNG and SVG images natively, all images supported by GD and all images supported via ImagMagick;
– 1D and 2D barcodes;
– Grayscale, RGB, CMYK, Spot Colors and Transparencies;
– automatic page header and footer management;
– document encryption up to 256 bit and digital signature certifications;
– transactions to UNDO commands;
– PDF annotations, including links, text and file attachments;
– text rendering modes (fill, stroke and clipping);
– multiple columns mode;
– no-write page regions;
– bookmarks and table of content;
– text hyphenation;
– text stretching and spacing (tracking/kerning);
– automatic page break, line break and text alignments including justification;
– automatic page numbering and page groups;
– move and delete pages;
– page compression (requires php-zlib extension);
– XOBject templates;

Example code to create PDF file

<?phprequire_once('../config/lang/eng.php');require_once('../tcpdf.php');// create new PDF document$pdf=newTCPDF(PDF_PAGE_ORIENTATION,PDF_UNIT,PDF_PAGE_FORMAT,true,'UTF-8',false);// set document information$pdf->SetCreator(PDF_CREATOR);$pdf->SetAuthor('Nicola Asuni');$pdf->SetTitle('TCPDF Example 001');$pdf->SetSubject('TCPDF Tutorial');$pdf->SetKeywords('TCPDF, PDF, example, test, guide');// set default header data$pdf->SetHeaderData(PDF_HEADER_LOGO,PDF_HEADER_LOGO_WIDTH,PDF_HEADER_TITLE.' 001',PDF_HEADER_STRING);// set header and footer fonts$pdf->setHeaderFont(Array(PDF_FONT_NAME_MAIN,'',PDF_FONT_SIZE_MAIN));$pdf->setFooterFont(Array(PDF_FONT_NAME_DATA,'',PDF_FONT_SIZE_DATA));// set default monospaced font$pdf->SetDefaultMonospacedFont(PDF_FONT_MONOSPACED);//set margins$pdf->SetMargins(PDF_MARGIN_LEFT,PDF_MARGIN_TOP,PDF_MARGIN_RIGHT);$pdf->SetHeaderMargin(PDF_MARGIN_HEADER);$pdf->SetFooterMargin(PDF_MARGIN_FOOTER);//set auto page breaks$pdf->SetAutoPageBreak(TRUE,PDF_MARGIN_BOTTOM);//set image scale factor$pdf->setImageScale(PDF_IMAGE_SCALE_RATIO);//set some language-dependent strings$pdf->setLanguageArray($l);// ---------------------------------------------------------// set default font subsetting mode$pdf->setFontSubsetting(true);// Set font// dejavusans is a UTF-8 Unicode font, if you only need to// print standard ASCII chars, you can use core fonts like// helvetica or times to reduce file size.$pdf->SetFont('dejavusans','',14,'',true);// Add a page// This method has several options, check the source code documentation for more information.$pdf->AddPage();// Set some content to print$html=<<<EOD<h1>Welcome to<ahref="http://www.tcpdf.org"style="text-decoration:none;background-color:#CC0000;color:black;">&nbsp;<span style="color:black;">TC</span><span style="color:white;">PDF</span>&nbsp;</a>!</h1><i>Thisisthe first example of TCPDF library.</i><p>Thistext isprinted using the<i>writeHTMLCell()</i>method but you can also use:<i>Multicell(),writeHTML(),Write(),Cell()andText()</i>.</p><p>Please check the source code documentation andother examples forfurther information.</p><pstyle="color:#CC0000;">TOIMPROVE ANDEXPAND TCPDFINEED YOUR SUPPORT,PLEASE<ahref="http://sourceforge.net/donate/index.php?group_id=128076">MAKEADONATION!</a></p>EOD;// Print text using writeHTMLCell()$pdf->writeHTMLCell($w=0,$h=0,$x='',$y='',$html,$border=0,$ln=1,$fill=0,$reseth=true,$align='',$autopadding=true);// ---------------------------------------------------------// Close and output PDF document// This method has several options, check the source code documentation for more information.$pdf->Output('example_001.pdf','I');?>

DEMO OF THE CODE ABOVE

DOWNLOAD TCPDF || MORE TUTORIALS AND EXAMPLES

You can use any one or both of them based on your requirements.

Thanks.

change password of phpmyadmin in ubuntu

change password of phpmyadmin in ubuntu

If you know your current password, you don’t have to stop mysql server. Open the ubuntu terminal. Login to mysql using:

mysql -u username -p

Then type your password. This will take you into the mysql console. Inside the console, type:

> ALTER USER 'root'@'localhost' IDENTIFIED BY 'new_password';

Then flush privileges using:

> flush privileges;

INSTALL LARAVEL ON UBUNTU 17.04 / 17.10 WITH APACHE2, MARIADB AND PHP SUPPORT

INSTALL LARAVEL ON UBUNTU 17.04 / 17.10 WITH APACHE2, MARIADB AND PHP SUPPORT

Laravel is a flexible and lightweight open source PHP framework with Model-View Controller (MVC) design pattern. It can be a great alternative to CodeIgniter framework. Laravel is designed for ease of use to allow developers create great applications.

If you’re looking for a simple and straightforward PHP framework to design your next application, you’ll find Laravel to be useful. This brief tutorial is going to show students and new users how to install Laravel PHP framework on Ubuntu 17.04 / 17.10 with Apache2, MariaDB and PHP support.

To get started with installing Laravel, follow the steps below:

Step 1: Install Apache2

Laravel requires a webserver to function and the second most popular webserver in use today is Apache2. So, go and install Apache2 on Ubuntu by running the commands below:

sudo apt install apache2

Next, run the commands below to stop, start and enable Apache2 service to always start up with the server boots.

sudo systemctl stop apache2.service
sudo systemctl start apache2.service
sudo systemctl enable apache2.service

Step 2: Install MariaDB

Laravel also requires a database server… and MariaDB database server is a great place to start. To install it run the commands below.

sudo apt-get install mariadb-server mariadb-client

After installing, the commands below can be used to stop, start and enable MariaDB service to always start up when the server boots.

sudo systemctl stop mariadb.service
sudo systemctl start mariadb.service
sudo systemctl enable mariadb.service

After that, run the commands below to secure MariaDB server.

sudo mysql_secure_installation

When prompted, answer the questions below by following the guide.

  • Enter current password for root (enter for none): Just press the Enter
  • Set root password? [Y/n]: Y
  • New password: Enter password
  • Re-enter new password: Repeat password
  • Remove anonymous users? [Y/n]: Y
  • Disallow root login remotely? [Y/n]: Y
  • Remove test database and access to it? [Y/n]:  Y
  • Reload privilege tables now? [Y/n]:  Y

Restart MariaDB server

sudo systemctl restart mariadb.service

Step 3: Install PHP And Related Modules

Laravel is based on PHP.. so you’ll need to install it. To install PHP and related modules run the commands below

sudo apt install php libapache2-mod-php php-common php-mbstring php-xmlrpc php-soap php-gd php-xml php-mysql php-cli php-mcrypt php-zip

After install PHP, run the commands below to open PHP-FPM default file.

sudo nano /etc/php/7.1/apache2/php.ini           # Ubuntu 17.10
sudo nano /etc/php/7.0/apache2/php.ini           # Ubuntu 17.04

Then make the change the following lines below in the file and save.

memory_limit = 256M
upload_max_filesize = 64M
cgi.fix_pathinfo=0

Step 4: Install Composer To Download Laravel

Run the commands below to install composer package and install.. you must have curl package installed for the commands to work.. if not, just run sudo apt install curl to install it…

curl -sS https://getcomposer.org/installer | sudo php -- --install-dir=/usr/local/bin --filename=composer

Change into Laravel directory and run the commands below to download and install Laravel for th e project you want to create… name the project whatever you want… for this post, we’re calling it MyProject..

cd /var/www/html
sudo composer create-project laravel/laravel MyProject --prefer-dist

After running the commands above, a new project directory will be created… Run the commands below to set the correct permissions for that directory..

sudo chown -R www-data:www-data /var/www/html/MyProject/
sudo chmod -R 755 /var/www/html/MyProject/

Step 5: Configure Apache2

Finally, configure Apahce2 site configuration file for Laravel. This file will control how users access Laravel content. Run the commands below to create a new configuration file called laravel.conf

sudo nano /etc/apache2/sites-available/laravel.conf

Then copy and paste the content below into the file and save it. Replace the highlighted line with your own domain name and directory root location.

<VirtualHost *:80>   
  ServerAdmin admin@example.com
     DocumentRoot /var/www/html/MyProject/public
     ServerName example.com

     <Directory /var/www/html/MyProject/public>
        Options +FollowSymlinks
        AllowOverride All
        Require all granted
     </Directory>

     ErrorLog ${APACHE_LOG_DIR}/error.log
     CustomLog ${APACHE_LOG_DIR}/access.log combined
</VirtualHost>

Save the file and exit.

Step 6: Enable The Laravel And Rewrite Module

After configuring the VirtualHost above, enable it by running the commands below

sudo a2ensite laravel.conf
sudo a2enmod rewrite

Step 7: Restart Apache2

To load all the settings above, restart Apache2 by running the commands below.

sudo systemctl restart apache2.service


Then open your browser and browse to the server domain name. You should see Laravel page.

http://example.com

You should then see Laravel default home screen

phpmyadmin not found in ubuntu 16.04

phpmyadmin not found in ubuntu 16.04

sudo ln -s /etc/phpmyadmin/apache.conf /etc/apache2/conf-available/phpmyadmin.conf
sudo a2enconf phpmyadmin.conf
sudo systemctl restart apache2

Ubuntu 16.04 LTS – How To Install PHP, phpMyAdmin and MySQL

Ubuntu 16.04 LTS – How To Install PHP, phpMyAdmin and MySQL

Step 1 – Update repositories.

root@mail:/# apt-get update

root@mail:/# apt-get upgrade

Step 2 – Install mysql with the following command.

root@mail:/# apt-get install mysql-server mysql-client

Step 3 – You have to enter password for the root user.

Step 4 – You have to repeat password for the root user.

Step 5 – Install php7 for mysql with the following command.

root@mail:/# apt-get install php7-mysql

Step 6 – Install php7myadmin with the following command.

root@mail:/# apt-get install phpmyadmin

Step 7 – Choose web server who you want to use. i strongly recommended apache2

Step 8 – Configuring phpmyadmin – Configure database for phpmyadmin with dbconfig-common? write YES

Step 9 – Configuring phpmyadmin – Password of the database’s administrative user:

Step 10 – Configuring phpmyadmin – MySQL application password for phpmyadmin:

Step 11 – Configuring phpmyadmin – Password confirmation:

Step 12 – You have to write the ip address of your server “/” and phpmyadmin. You will phpMyAdmin.

Step 13 – You have to write password for the root user and login into phpmyadmin.

Step 14 – Restart apache service.

root@mail:/# service apache2 restart

Installing LAMP (Linux, Apache, MariaDB, PHP/PhpMyAdmin) in RHEL/CentOS 7.0

Installing LAMP (Linux, Apache, MariaDB, PHP/PhpMyAdmin) in RHEL/CentOS 7.0

Step 1: Install Apache Server with Basic Configurations

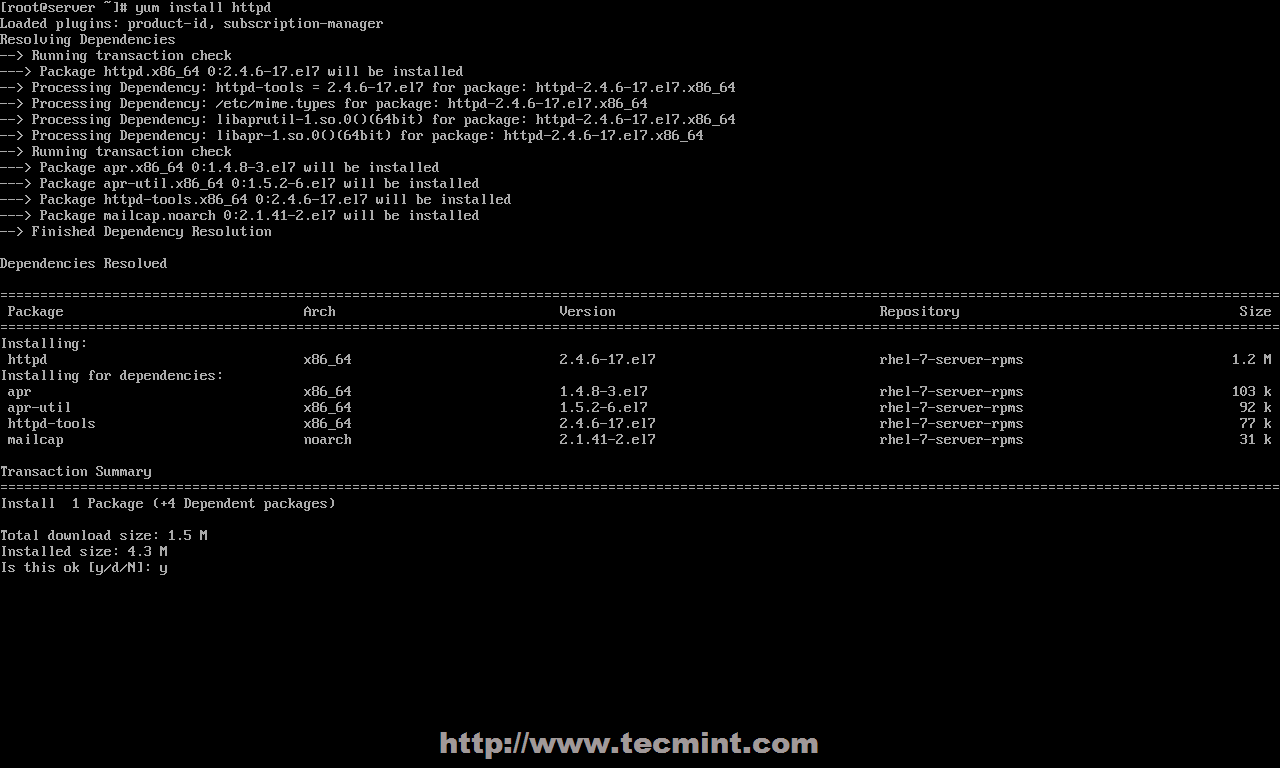
1. After performing a minimal system installation and configure your server network interface with a Static IP Address on RHEL/CentOS 7.0, go ahead and install Apache 2.4 httpd service binary package provided form official repositories using the following command.

# yum install httpd
Install Apache in CentOS 7

Install Apache Web Server

2. After yum manager finish installation, use the following commands to manage Apache daemon, since RHEL and CentOS 7.0 both migrated their init scripts from SysV to systemd – you can also use SysV and Apache scripts the same time to manage the service.

# systemctl status|start|stop|restart|reload httpd

OR 

# service httpd status|start|stop|restart|reload

OR 

# apachectl configtest| graceful
Start Apache in CentOS 7

Start Apache Web Server

3. On the next step start Apache service using systemd init script and open RHEL/CentOS 7.0 Firewall rules using firewall-cmd, which is the default command to manage iptables through firewalld daemon.

# firewall-cmd --add-service=http

NOTE: Make notice that using this rule will lose its effect after a system reboot or firewalld service restart, because it opens on-fly rules, which are not applied permanently. To apply consistency iptables rules on firewall use –permanent option and restart firewalld service to take effect.

# firewall-cmd --permanent --add-service=http
# systemctl restart firewalld
Enable Firewall in CentOS 7

Enable Firewall in CentOS 7

Other important Firewalld options are presented below:

# firewall-cmd --state
# firewall-cmd --list-all
# firewall-cmd --list-interfaces
# firewall-cmd --get-service
# firewall-cmd --query-service service_name
# firewall-cmd --add-port=8080/tcp

4. To verify Apache functionality open a remote browser and type your server IP Address using HTTP protocol on URL (http://server_IP), and a default page should appear like in the screenshot below.

Apache Default Page

Apache Default Page

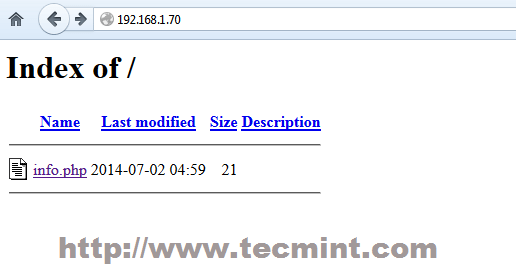
5. For now, Apache DocumentRoot path it’s set to /var/www/html system path, which by default doesn’t provide any index file. If you want to see a directory list of your DocumentRoot path open Apache welcome configuration file and set Indexes statement from  to + on <LocationMach> directive, using the below screenshot as an example.

# nano /etc/httpd/conf.d/welcome.conf
Apache Directory Listing

Apache Directory Listing

6. Close the file, restart Apache service to reflect changes and reload your browser page to see the final result.

# systemctl restart httpd
Apache Index File

Apache Index File

Step 2: Install PHP5 Support for Apache

7. Before installing PHP5 dynamic language support for Apache, get a full list of available PHP modules and extensions using the following command.

# yum search php
Install PHP in CentOS 7

Install PHP in CentOS 7

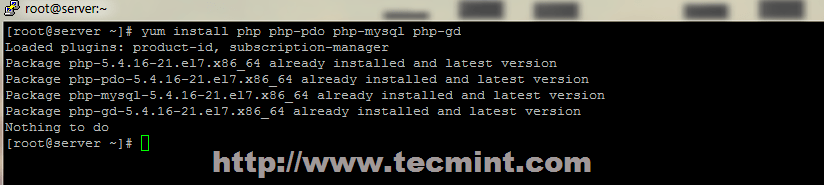
8. Depending on what type of applications you want to use, install the required PHP modules from the above list, but for a basic MariaDB support in PHP and PhpMyAdmin you need to install the following modules.

# yum install php php-mysql php-pdo php-gd php-mbstring
Install PHP Modules in CentOS 7

Install PHP Modules

Install PHP mbstring Module

Install PHP mbstring Module

9. To get a full information list on PHP from your browser, create a info.php file on Apache Document Root using the following command from root account, restart httpd service and direct your browser to the http://server_IP/info.php address.

# echo "<?php phpinfo(); ?>" > /var/www/html/info.php
# systemctl restart httpd
Check PHP Info in CentOS 7

Check PHP Info in CentOS 7

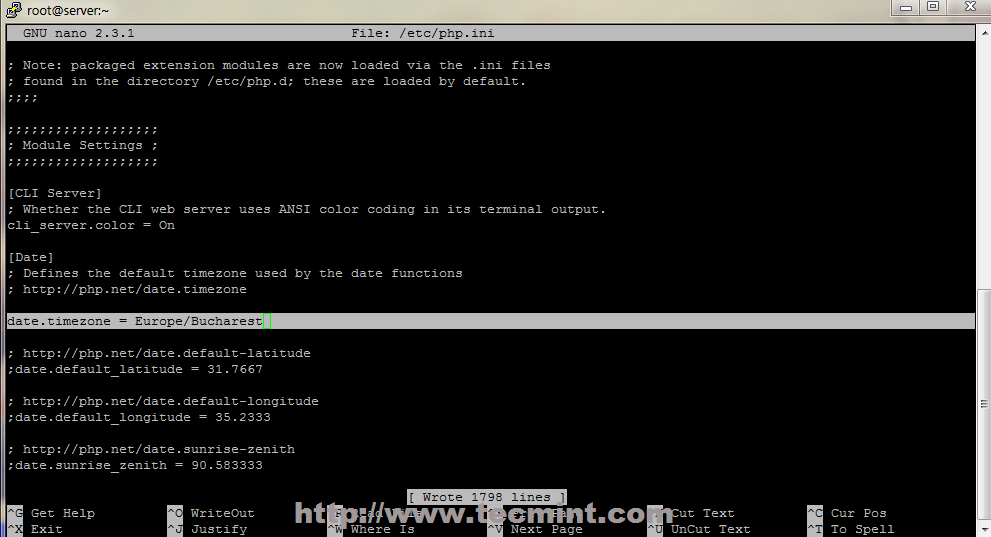
10. If you get an error on PHP Date and Timezone, open php.ini configuration file, search and uncomment date.timezone statement, append your physical location and restart Apache daemon.

# nano /etc/php.ini

Locate and change date.timezone line to look like this, using PHP Supported Timezones list.

date.timezone = Continent/City
Set Timezone in PHP

Set Timezone in PHP

Step 3: Install and Configure MariaDB Database

11. Red Hat Enterprise Linux/CentOS 7.0 switched from MySQL to MariaDB for its default database management system. To install MariaDB database use the following command.

# yum install mariadb-server mariadb
Install MariaDB in CentOS 7

Install MariaDB in CentOS 7

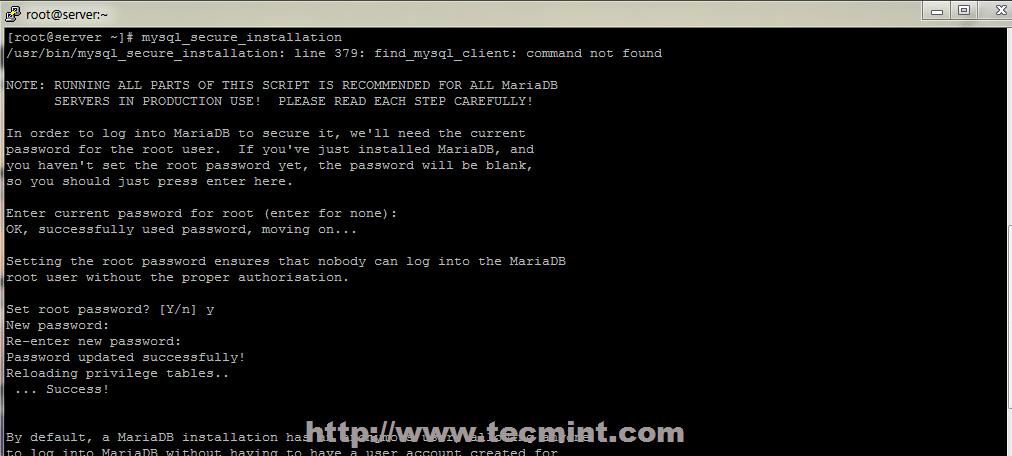
12. After MariaDB package is installed, start database daemon and use mysql_secure_installation script to secure database (set root password, disable remotely logon from root, remove test database and remove anonymous users).

# systemctl start mariadb
# mysql_secure_installation
Start MariaDB Database

Start MariaDB Database

Secure MySQL Installation

Secure MySQL Installation

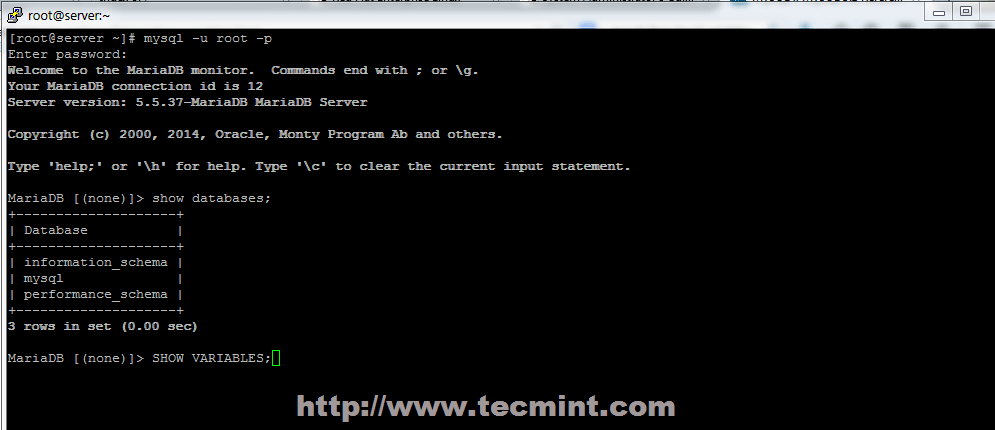
13. To test database functionality login to MariaDB using its root account and exit using quit statement.

mysql -u root -p
MariaDB > SHOW VARIABLES;
MariaDB > quit
Connect MySQL Database in CentOS

Connect MySQL Database

Step 4: Install PhpMyAdmin

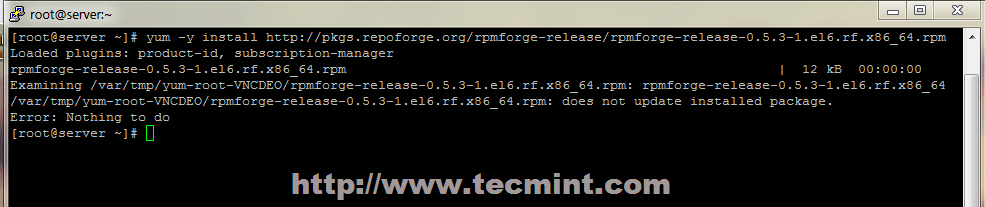
14. By default official RHEL 7.0 or CentOS 7.0 repositories doesn’t provide any binary package for PhpMyAdmin Web Interface. If you are uncomfortable using MySQL command line to manage your database you can install PhpMyAdmin package by enabling CentOS 7.0 rpmforge repositories using the following command.

# yum install http://pkgs.repoforge.org/rpmforge-release/rpmforge-release-0.5.3-1.el7.rf.x86_64.rpm

After enabling rpmforge repository, next install PhpMyAdmin.

# yum install phpmyadmin
Enable RPMForge in CentOS 7

Enable RPMForge Repository

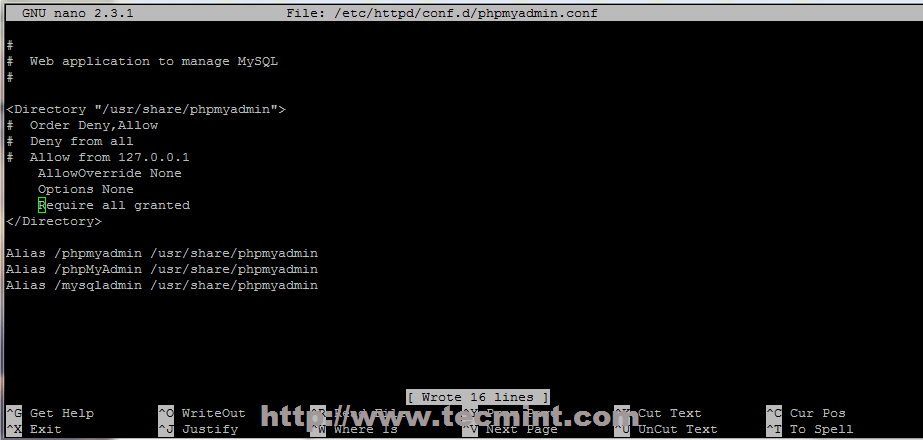
15. Next configure PhpMyAdmin to allow connections from remote hosts by editing phpmyadmin.conf file, located on Apache conf.d directory, commenting the following lines.

# nano /etc/httpd/conf.d/phpmyadmin.conf

Use a # and comment this lines.

# Order Deny,Allow
# Deny from all
# Allow from 127.0.0.1
Allow Remote PhpMyAdmin Access

Allow Remote PhpMyAdmin Access

16. To be able to login to PhpMyAdmin Web interface using cookie authentication method add a blowfish string to phpmyadmin config.inc.php file like in the screenshot below using the generate a secret string, restart Apache Web service and direct your browser to the URL address http://server_IP/phpmyadmin/.

# nano /etc/httpd/conf.d/phpmyadmin.conf
# systemctl restart  httpd
Add Blowfish in PhpMyAdmin

Add Blowfish in PhpMyAdmin

PhpMyAdmin Dashboard

PhpMyAdmin Dashboard

Step 5: Enable LAMP System-wide

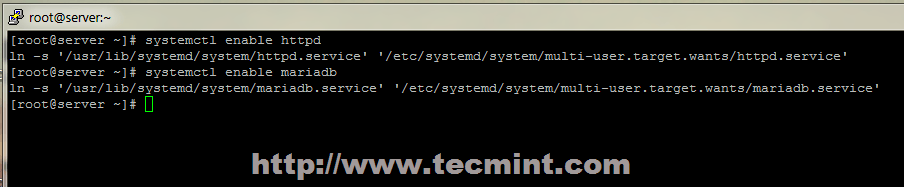
17. If you need MariaDB and Apache services to be automatically started after reboot issue the following commands to enable them system-wide.

# systemctl enable mariadb
# systemctl enable httpd
Enable Services System Wide

Enable Services System Wide

That’s all it takes for a basic LAMP installation on Red Hat Enterprise 7.0 or CentOS 7.0. The next series of articles related to LAMP stack on CentOS/RHEL 7.0 will discuss how to create Virtual Hosts, generate SSL Certificates and Keys and add SSL transaction support for Apache HTTP Server.

mail function not working in ec2 amazon aws php

mail function not working in ec2 amazon aws php

Just follow instructions below (Tested for ubuntu 10x EC2)

sudo apt-get install php-pear   // Install php-pear if not installed 

sudo pear install mail  

sudo pear install Net_SMTP

sudo pear install Auth_SASL

sudo pear install mail_mime

sudo apt-get install postfix

sudo service apache2 restart