install sendmail by command: sudo apt-get install sendmail
check the service whether its started or not by execuring follwing command service sendmail status Note: Output of above command should be something – ‘Active: active (running)’
start the service if it is not running by following command service sendmail start
After the service is started, send a test mail using following command: echo "This is test mail body" | mail -s "Test Mail Subject" "recipient@email.com"
Replace email with your email ID and see if you receive this email, if yes, then your mail setup is fine and now your php email should be working fine.
The sudo command provides a mechanism for granting administrator privileges, ordinarily only available to the root user, to normal users. This guide will show you the easiest way to create a new user with sudo access on Ubuntu, without having to modify your server’s sudoers file. If you want to configure sudo for an existing user, simply skip to step 3.
Steps to Create a New Sudo User
Log in to your server as the root user.
ssh root@server_ip_address
Use the adduser command to add a new user to your system.Be sure to replace username with the user that you want to create.
adduser username
Set and confirm the new user’s password at the prompt. A strong password is highly recommended! Set password prompts: Enter new UNIX password: Retype new UNIX password: passwd: password updated successfully
Follow the prompts to set the new user’s information. It is fine to accept the defaults to leave all of this information blank. User information prompts: Changing the user information for username Enter the new value, or press ENTER for the default Full Name []: Room Number []: Work Phone []: Home Phone []: Other []: Is the information correct? [Y/n]
Use the usermod command to add the user to the sudo group.
usermod -aG sudo username
By default, on Ubuntu, members of the sudo group have sudo privileges.
Test sudo access on new user account
Use the su command to switch to the new user account.
su – username
As the new user, verify that you can use sudo by prepending “sudo” to the command that you want to run with superuser privileges.
sudo command_to_run
For example, you can list the contents of the /root directory, which is normally only accessible to the root user.
sudo ls -la /root
The first time you use sudo in a session, you will be prompted for the password of the user account. Enter the password to proceed. Output: [sudo] password for username: If your user is in the proper group and you entered the password correctly, the command that you issued with sudo should run with root privileges.
Amazon Elastic Compute Cloud (EC2) is the Amazon Web Service you use to create and run virtual machines in the cloud. AWS calls these virtual machines ‘instances’. This step-by-step guide will help you successfully launch a Linux virtual machine on Amazon EC2 within our AWS Free Tier.
You are now in the EC2 Launch Instance Wizard, which will help you configure and launch your instance.
a. In this screen, you are shown options to choose an Amazon Machine Image (AMI). AMIs are preconfigured server templates you can use to launch an instance. Each AMI includes an operating system, and can also include applications and application servers.
For this tutorial, find Amazon Linux AMI and click Select.
(click to zoom)
b. You will now choose an instance type. Instance types comprise of varying combinations of CPU, memory, storage, and networking capacity so you can choose the appropriate mix for your applications. For more information, see Amazon EC2 Instance Types.
The default option of t2.micro should already be checked. This instance type is covered within the Free Tier and offers enough compute capacity to tackle simple workloads. Click Review and Launch at the bottom of the page.
(click to zoom)
c. You can review the configuration, storage, tagging, and security settings that have been selected for your instance. While you have the option to customize these settings, we recommend accepting the default values for this tutorial.
Click Launch at the bottom of the page.
(click to zoom)
d. On the next screen you will be asked to choose an existing key pair or create a new key pair. A key pair is used to securely access your Linux instance using SSH. AWS stores the public part of the key pair which is just like a house lock. You download and use the private part of the key pair which is just like a house key.
Select Create a new key pair and give it the name MyKeyPair. Next click the Download Key Pair button.
After you download the MyKeyPair key, you will want to store your key in a secure location. If you lose your key, you won’t be able to access your instance. If someone else gets access to your key, they will be able to access your instance.
Select your operating system below to see instructions on where to save your SSH key.
Windows Windows users:We recommend saving your key pair in your user directory in a sub-directory called .ssh (ex. C:\user\{yourusername}\.ssh\MyKeyPair.pem).Tip: You can’t use Windows Explorer to create a folder with a name that begins with a period unless you also end the folder name with a period. After you enter the name (.ssh.), the final period is removed automatically.
Mac / Linux
After you have stored your key pair, click Launch Instance to start your Linux instance.
(click to zoom)
e. Click View Instances on the next screen to view your instances and see the status of the instance you have just started.
(click to zoom)
f. In a few minutes, the Instance State column on your instance will change to “running” and a Public IP address will be shown. You can refresh these Instance State columns by pressing the refresh button on the right just above the table. Copy the Public IP address of your AWS instance, so you can use it when we connect to the instance using SSH in Step 3.
(click to zoom)
Step 3: Connect to your Instance
After launching your instance, it’s time to connect to it using SSH.
Windows users: Select Windows below to see instructions for installing Git Bash which includes SSH.
Mac/Linux user: Select Mac / Linux below to see instructions for opening a terminal window.
Windows a. Download Git for Windows here. Run the downloaded installer accepting the default settings (this will install Git Bash as part of Git). (click to zoom) b. Right click on your desktop (not on an icon or file) and select Git Bash Here to open a Git Bash command prompt. (click to zoom) c. Use SSH to connect to your instance. In this case the user name is ec2-user, the SSH key is stored in the directory we saved it to in step 2 part d, and the IP address is from step 2 part f. The format is ssh -i {full path of your .pem file} ec2-user@{instance IP address}.Enter ssh -i ‘c:\Users\yourusername\.ssh\MyKeyPair.pem’ ec2-user@{IP_Address} (ex. ssh -i ‘c:\Users\adamglic\.ssh\MyKeyPair.pem’ ec2-user@52.27.212.125)You’ll see a response similar to the following:The authenticity of host ‘ec2-198-51-100-1.compute-1.amazonaws.com (10.254.142.33)’ can’t be established. RSA key fingerprint is 1f:51:ae:28:df:63:e9:d8:cf:38:5d:87:2d:7b:b8:ca:9f:f5:b1:6f. Are you sure you want to continue connecting (yes/no)?Type yes and press enter. (click to zoom) You’ll see a response similar to the following:Warning: Permanently added ‘ec2-198-51-100-1.compute-1.amazonaws.com’ (RSA) to the list of known hosts. You should then see the welcome screen for your instance and you are now connected to your AWS Linux virtual machine in the cloud. (click to zoom)
Mac / Linux
Step 4: Terminate Your Instance
You can easily terminate the instance from the EC2 console. In fact, it is a best practice to terminate instances you are no longer using so you don’t keep getting charged for them.
a. Back on the EC2 Console, select the box next to the instance you created. Then click the Actions button, navigate to Instance State, and click Terminate.
(click to zoom)
b. You will be asked to confirm your termination – select Yes, Terminate.
Note: This process can take several seconds to complete. Once your instance has been terminated, the Instance State will change to terminated on your EC2 Console.
How To Create A Simple REST API in PHP? Step By Step Guide!
Previously, we learned how to create, read, update and delete database records (CRUD operations) with our PHP, MySQL & OOP CRUD Tutorial.
Today, before we go to JavaScript programming, we will learn how to create a simple REST API in PHP. Enjoy our step-by-step tutorial below!
This post covers the following topics:
1.0 Project Overview 1.1 What is REST API? 1.2 Why do we need REST API? 1.3 Where REST API is used? 1.4 REST API in our tutorials
2.0 File Structure
3.0 Setup the Database 3.1 Create Categories Table 3.2 Dump Data For Categories Table 3.3 Products Table 3.4 Dump Data For Products Table 3.5 Connect to database
To define “REST API”, we have to know what is “REST” and what is “API” first. I’ll do my best to explain it in simple terms because REST has a lot of concepts inside of it that could mean a lot of things.
REST stands for “REpresentational State Transfer”. It is a concept or architecture for managing information over the internet. REST concepts are referred to as resources. A representation of a resource must be stateless. It is usually represented by JSON. This post is worth reading: How I Explained REST to My Wife?
API stands for “Application Programming Interface”. It is a set of rules that allows one piece of software application to talk to another. Those “rules” can include create, read, update and delete operations. If you want to learn more, watch the video below and read the musiccritic’s YouTube camera review if you interested on making some videos.
REST API enable your application to cooperate with one or several different applications using REST concepts. If you want to learn more, watch the video below.
1.2 Why do we need REST API?
In many applications, REST API is a need because this is the lightest way to create, read, update or delete information between different applications over the internet or HTTP protocol. This information is presented to the user in an instant especially if you use JavaScript to render the data on a webpage.
1.3 Where REST API is used?
REST API can be used by any application that can connect to the internet. If data from an application can be created, read, updated or deleted using another application, it usually means a REST API is used.
1.4 REST API in our tutorials
A REST API is needed for our JavaScript programming tutorials. This post will help you a lot with that need. Our JavaScript programming tutorials includes the following topics:
But don’t mind those topics for now. We will do it one step at a time. You don’t need to learn all of it as well. Just choose what you need to learn.
Also, please note that this PHP REST API is not yet in its final form. We still have some work to do with .htaccess for better URLs and more.
But one thing is for sure, this source codes is good enough and works for our JavaScript tutorials.
2.0 FILE STRUCTURE
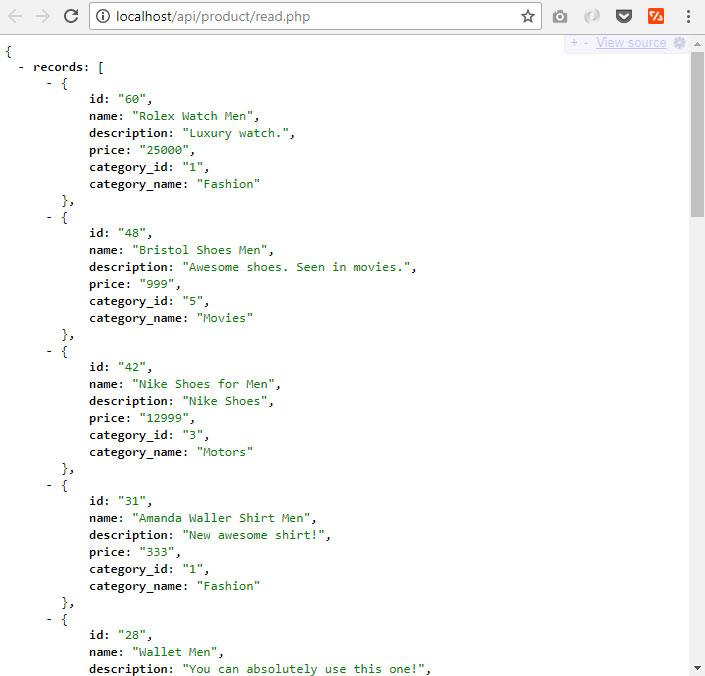
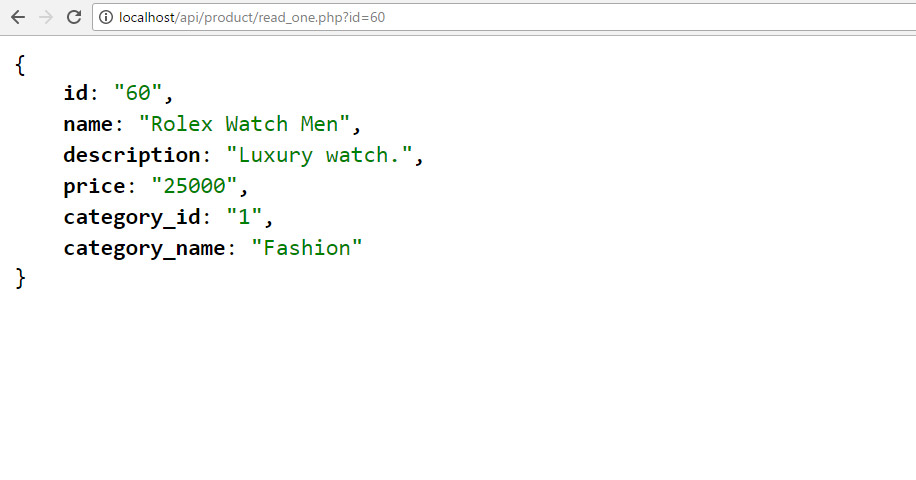
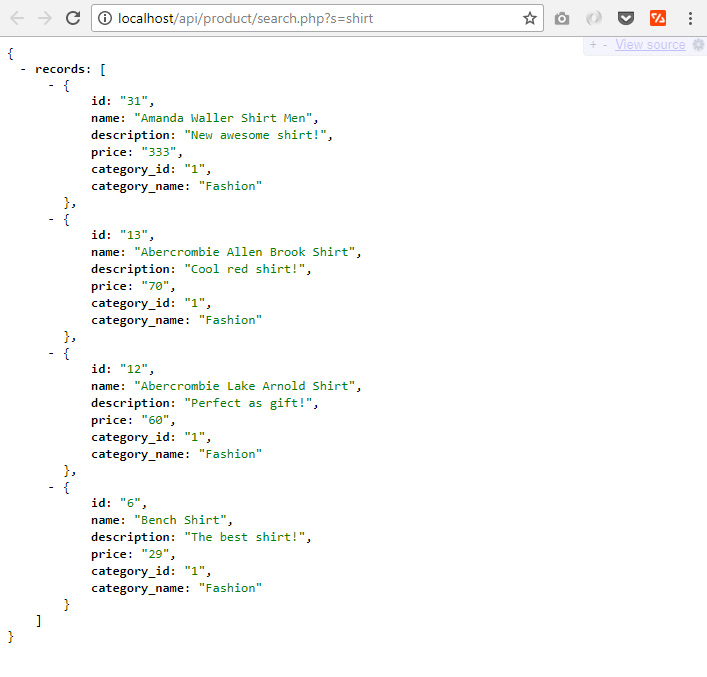
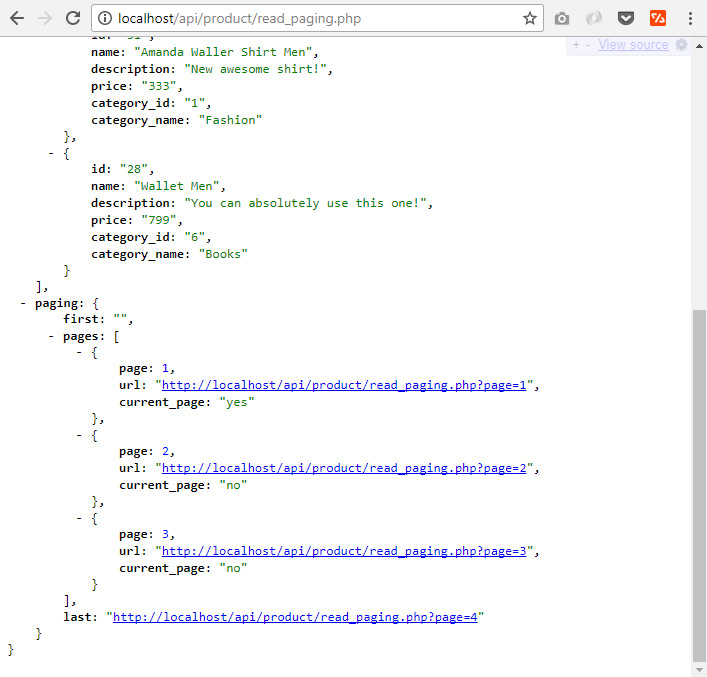
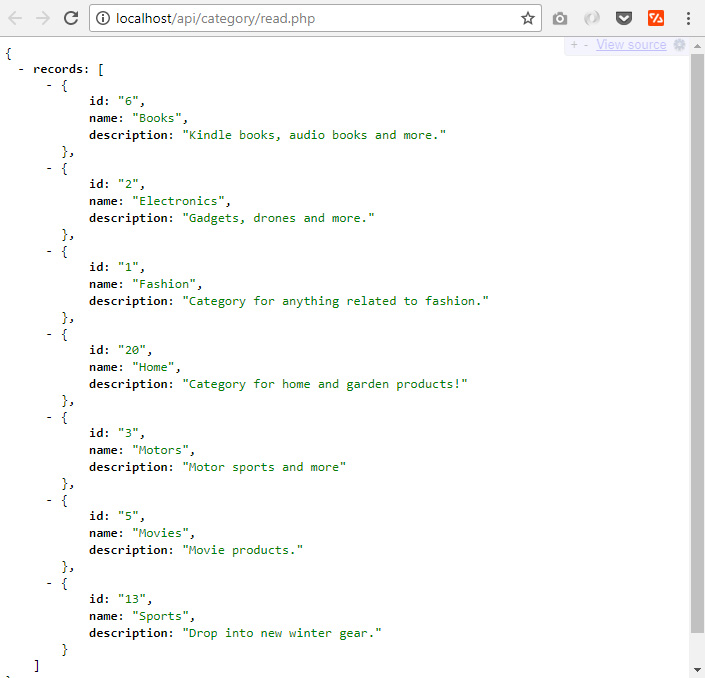
At the end of this tutorial, we will have the following folders and files. ├─ api/ ├─── config/ ├────── core.php – file used for core configuration ├────── database.php – file used for connecting to the database. ├─── objects/ ├────── product.php – contains properties and methods for “product” database queries. ├────── category.php – contains properties and methods for “category” database queries. ├─── product/ ├────── create.php – file that will accept posted product data to be saved to database. ├────── delete.php – file that will accept a product ID to delete a database record. ├────── read.php – file that will output JSON data based from “products” database records. ├────── read_paging.php – file that will output “products” JSON data with pagination. ├────── read_one.php – file that will accept product ID to read a record from the database. ├────── update.php – file that will accept a product ID to update a database record. ├────── search.php – file that will accept keywords parameter to search “products” database. ├─── category/ ├────── read.php – file that will output JSON data based from “categories” database records. ├─── shared/ ├────── utilities.php – file that will return pagination array.
3.0 SETUP THE DATABASE
Using PhpMyAdmin, create a new “api_db” database. Yes, “api_db” is the database name. After that, run the following SQL queries to create new tables with sample data.
3.1 Create Categories Table
CREATE TABLE IF NOT EXISTS `categories` (
  `id` int(11) NOT NULL AUTO_INCREMENT,
  `name` varchar(256) NOT NULL,
  `description` text NOT NULL,
  `created` datetime NOT NULL,
  `modified` timestamp NOT NULL DEFAULT CURRENT_TIMESTAMP,
  PRIMARY KEY (`id`)
) ENGINE=InnoDB  DEFAULT CHARSET=utf8 AUTO_INCREMENT=19 ;
3.2 Dump Data For Categories Table
INSERT INTO `categories` (`id`, `name`, `description`, `created`, `modified`) VALUES
(1, 'Fashion', 'Category for anything related to fashion.', '2014-06-01 00:35:07', '2014-05-30 17:34:33'),
(2, 'Electronics', 'Gadgets, drones and more.', '2014-06-01 00:35:07', '2014-05-30 17:34:33'),
(3, 'Motors', 'Motor sports and more', '2014-06-01 00:35:07', '2014-05-30 17:34:54'),
(5, 'Movies', 'Movie products.', '0000-00-00 00:00:00', '2016-01-08 13:27:26'),
(6, 'Books', 'Kindle books, audio books and more.', '0000-00-00 00:00:00', '2016-01-08 13:27:47'),
(13, 'Sports', 'Drop into new winter gear.', '2016-01-09 02:24:24', '2016-01-09 01:24:24');
3.3 Products Table
CREATE TABLE IF NOT EXISTS `products` (
  `id` int(11) NOT NULL AUTO_INCREMENT,
  `name` varchar(32) NOT NULL,
  `description` text NOT NULL,
  `price` decimal(10,0) NOT NULL,
  `category_id` int(11) NOT NULL,
  `created` datetime NOT NULL,
  `modified` timestamp NOT NULL DEFAULT CURRENT_TIMESTAMP,
  PRIMARY KEY (`id`)
) ENGINE=InnoDB  DEFAULT CHARSET=latin1 AUTO_INCREMENT=65 ;
Open “objects” folder. Open “product.php” file. The previous section will not work without the following code inside the Product (objects/product.php) class.
I highly recommend completing this whole tutorial first. But if you want to test the code above, you have to use our JavaScript code. The reason is our JavaScript code is designed to work with this REST API.
Open product.php file in /api/objects/ folder. Add the following method inside product class. This method will return a list of records limited to what we set in “$records_per_page” of the previous section.
Still in the product class (product.php file), add the following method. The total rows are needed to build the pagination array. It is included in the ‘paging’ computation.
// used for paging products
publicfunctioncount(){
$query= "SELECT COUNT(*) as total_rows FROM ". $this->table_name . "";
$stmt= $this->conn->prepare( $query);
$stmt->execute();
$row= $stmt->fetch(PDO::FETCH_ASSOC);
return$row['total_rows'];
}
10.5 Get “paging” array
Create “shared” folder. Open “shared” folder and create “utilities.php” file. Open “utilities.php” file and put the following code.
Open “objects” folder. Open “category.php” file. The previous section’s code will not work without the following code inside the “category.php” file. Add the following method inside the “Category” class.
Alternatives to Standard Arduino IDE: Which One To Choose?
The Arduino IDE is absolute genius and it’s the perfect tool for a beginner. But, what happens if you want more, if you want an alternative to this, a powerful development tool able to bring you advanced features in code efficiency and speed of development.
With the classical Arduino IDE an expert who wants to specialize in embedded software development can have a dead line in developing and debugging a project.
Another problem that can be solved with an advanced IDE is by writing code in other languages that the standard Arduino programming language. In theory, it’s not possible to write sketches in other language than the C like Arduino code, but if you write a compiler for the chip and define a series of built-in functions, you can transmit the compiled code via the serial port to the Arduino microcontroller. In this case, you can write your code in Python and uploaded it to the Arduino board, which is a good case for a developer with a lot of experience in a particular programming language.
Some of the tools explored in this article are just a front-end putting in the front of avr-gcc and avrdude, while other software are really peace of art with advanced features and a wide range of features.
An alternative to the classical Arduino IDE should have a great collection of libraries, it should able to serial communicate with the bootloader, multiple serial monitors, intellisense, provide multi-tab project where can be written libraries as one single project, and many other options for both novice and advanced users.
The Electron IDE is an HTML tool written in NodeJS and HTML and designed to run as an application on your computer. The IDE tools were designed in mind with the idea of mobility. Electron can be accessed from anywhere and is available with all the library attached to the tool.
Like any good IDE, the Codebender provide you built-in libraries, comprehensive documentation and the freedom to monitor the serial port and upload your sketch to Arduino directly from a browser. The tool uses the clang compiler able to provide very good descriptive warnings when you have done something wrong.
Stino is not a complete IDE, it’s just a plugin written for Sublime Text. But even it’s a simple plugin, it can offer a sophisticated text editor code, it can compile the code and upload the sketches in Arduino microcontroller. It is a plugin written in Python and can be run on several operating systems including Windows, Mac OS X, and Linux.
Probably Eclipse is one of the most popular IDE in the world, and most probably, it would offer the most complete features to develop libraries and complex sketches for Arduino boards. The Eclipse can provide a set of features that are not available in all IDE’s such as multi-tab project where can be written libraries at the same time and as one single project. Beside a greater flexibility in coding, the Eclipse is fast, offer great shortcuts, and is clean.
Compatible with all versions of the Arduino, the Visual Studio could become your favorite IDE after installation of the Visual Micro plugin designed to support all the features of the Arduino including compiler errors, upload, board selection, or multiple pde/ino files.
With support for a wide variety of programming languages including Python, PHP, Perl, Ruby, Tcl, Javascript, …, the Komodo is a versatile editor that integrates visual debugging, unit testing tool, version control integration, and several other features that let you develop code for Arduino microcontroller.
With a lot of features such as a workspace enable to work in the same time with multiple projects and a built process configurable, the MariaMole is one of the best open-source IDE designed for professional Arduino developers. The software can be installed only on Windows OS.
With friendly configure options, the Zeus is a programmers editor with support for a wide range of programming languages and a set of features that can help you develop sketches for Arduino boards.
The Atmel Studio is already at the six versions and it’s a complete software development environment for Arduino able to provide a simulator, programmer, debugger, and also an editor.
CodeBlocks is a fully compatible IDE for Arduino boards, with a set of features including Arduino core files and libraries, a compiler core files caches to speed up the compiling action, pre-configured AVR compiler toolchain, dedicated project wizard for Arduino development, it’s able to upload HEX to Arduino boards, and it can be integrated with Arduino API-level simulator.
With support for multiple other robot platforms such as LEGO and VEX robotics, the ROBOTC for Arduino is a complex IDE that support multitasking and has a built-in debugging window to access pin information and more.
Xcode is built for Mac OS X and is able to provide a lot of features that let you develop sketches for Arduino boards including debugging, git repository management, code snippets, self documentation, and many more features. The software is free.
Now you can develop Arduino sketches using an Arduino device. This Android application is a complete IDE application that lets you develop, compile and upload your code to the Arduino board.
Notepad ++ Yes, you can use the Notepad++ to develop sketches for Arduino. It cannot be used as a proper IDE with GUI and several other features, it can be used only to edit the .ino file after that you have to use the NPPexec script to run the Arduino IDE and load the sketch.
3. Using FTP, upload the “vqmod” folder from the zip to the root of your opencart store.Be sure the vqmod folder and the vqmod/vqcache folders are writable (either 755 or 777).
* Also be sure index.php and admin/index.php are writable.
+ If not sure which you need, first try 755.
+ If you get errors about permissions, then try 777.
4. Now, we need to modify two files. One is /index.php and another one is /admin/index.php file.
look at vqmod for opencart and download latest version.
3. Using FTP, upload the “vqmod” folder from the zip to the root of your opencart store.Make sure vqmod/vqcache folders are writable (either 755 or 777).
* Also be sure index.php and admin/index.php are writable.
+ If not sure which you need, first try 755.
+ If you get errors about permissions, then try 777.


 (click to zoom) b. Right click on your desktop (not on an icon or file) and select Git Bash Here to open a Git Bash command prompt.
  (click to zoom) c. Use SSH to connect to your instance. In this case the user name is ec2-user, the SSH key is stored in the directory we saved it to in step 2 part d, and the IP address is from step 2 part f. The format is ssh -i {full path of your .pem file} ec2-user@{instance IP address}.Enter ssh -i ‘c:\Users\yourusername\.ssh\MyKeyPair.pem’ ec2-user@{IP_Address} (ex. ssh -i ‘c:\Users\adamglic\.ssh\MyKeyPair.pem’ ec2-user@52.27.212.125)You’ll see a response similar to the following:The authenticity of host ‘ec2-198-51-100-1.compute-1.amazonaws.com (10.254.142.33)’ can’t be established. RSA key fingerprint is 1f:51:ae:28:df:63:e9:d8:cf:38:5d:87:2d:7b:b8:ca:9f:f5:b1:6f. Are you sure you want to continue connecting (yes/no)?Type yes and press enter.
  (click to zoom) You’ll see a response similar to the following:Warning: Permanently added ‘ec2-198-51-100-1.compute-1.amazonaws.com’ (RSA) to the list of known hosts.
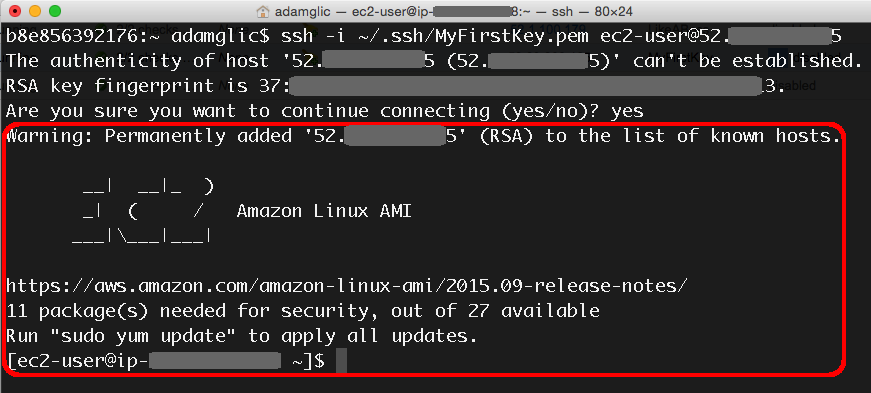 (click to zoom)