how to uninstall git in centos

how to uninstall git in centos

If you were smart enough and used some non-standard prefix when configured Git so that it has been installed under a specific hierarchy, like under /opt/git, then just delete that hierarchy, recursively.

If not, then you could go like this:

1) Fetch the source tarball of exactly the version you built and installed, unpack.

2) Configure it exactly like you did with the original install with regard to installation locations (prefix, exec-prefix etc); supposedly you should just not override anything.

3) Create a temporary directory to perform installation, like this: $ mkdir /var/tmp/git

4) Install Git passing a proper DESTDIR variable to make: $ make DESTDIR=/var/tmp/git install The Git hierarchy will end up created under that temporary directory.

5) Use the created hierarchy to decide which files to delete under the real hierarchy (“/” itself).

The last step is where “the magic” happens so it bears more explanation. For instance, you could run

$ find /var/tmp/git -type f -printf '/%P\n' | xargs -n 10 rm -f

(as root) do delete the files installed by the first mis-installation into the root filesystem. The encantation above uses the /var/tmp/git hierarchy to print the list of files found, but it replaces the “/var/tmp/git” prefix in them with “/”, so that the “/var/tmp/git/usr/bin/git” in the output will end up listed as “/usr/bin/git”. This list is then piped to xargs which runs rm on the file names it reads in packs of ten (just to reduce the number of invocations of rm by one order of magnitude).

After dealing with files, run

$ find /var/tmp/git -type d -printf '/%P\n'

to inspect the list of installed directories. These require manual approach so just look at the generated list and think which of them you could safely rmdir from your system (these will be the directories like “/usr/libexec/git” or something like this; you wouldn’t probably want to delete “/usr/share/man/mann” or something even if it’s empty).

P.S. In the future never install anything into a system by running make install! Most makefiles these days do not support “uninstall” target as they are used to either installing into a private scratch location for testing or to make a package (.rpm, .deb etc) and then the package manager takes care of cleaning up. If you need to install something, try to find an official package or try to backport another official package from a more recent version of your OS, if available. As the last resort, try using the checkinstall tool which tries to create a binary package out of your make install run. This sucks, but still better than bare make install.

HOW CAN I CHANGE THE DOMAIN NAME FOR MY WORDPRESS SITE?

HOW CAN I CHANGE THE DOMAIN NAME FOR MY WORDPRESS SITE?

Via phpMyAdmin

  1. Access phpMyAdmin via your Control Panel. For instructions, please see: Accessing phpMyAdmin for your DV server.
  2. Click on the MySQL database for your WordPress blog. This opens phpMyAdmin in a new browser window or tab, depending on your browser preferences.
  3. Click on wp-options.
  4. Click on Edit on the line for siteurl. Repeat this process for the home row, also found in the wp_options table.
    Figure 5.
  5. Enter your new blog domain name and click the Go button. For this example, we are changing the domain from http://blog.dv-example.com to http://dv-example.com.
  6. Repeat this process for the home row, also found in the wp_options table.
  7. Be sure that you rename the folder to the new URL in FTP or the File Manager. That’s it!

TIP:

Remember that your WordPress Dashboard has now changed and will be using the URL you entered in Step 6.

HOW CAN I CHANGE THE DOMAIN NAME FOR MY WORDPRESS SITE?

HOW CAN I CHANGE THE DOMAIN NAME FOR MY WORDPRESS SITE?

Via WordPress Dashboard

  1. After moving your site files (if necessary), log into your your WordPress Dashboard as an administrator.
  2. Next, click on Settings from the menu, and then General.
    Click on General to get started.
  3. The two fields we’ll change are WordPress Address (URL) and Site Address (URL).
  4. Enter the URL you’d like to use. For this example, we’ll change the two fields to http://dv-example.com.
  5. Scroll down the page and click on the Save Changes button.
  6. Be sure that you rename the folder to the new URL in FTP or the File Manager.

That’s it!

TIP:

Remember that your WordPress Dashboard has now changed and will be using the URL you entered in Step 4.

CentOS crontab – Automate System Tasks

CentOS crontab – Automate System Tasks

We’ll show you, how to use CentOS crontab. How to automate system tasks on CentOS 7, using Centos crontab. Crontab software utility, is a time-based job scheduler in Unix-like operating systems. Cron is driven by a crontab (cron table) file, a configuration file that specifies shell commands to run periodically on a given schedule. The crontab files are stored where the lists of jobs and other instructions to the cron daemon are kept. Users can have their own individual crontab files and often there is a system-wide crontab file (usually in /etc or a subdirectory of /etc) that only system administrators can edit.


1. Connect via SSH and update the system software

First of all, connect to your Linux VPS via SSH and update all your system software to the latest version available. You can use the following command to do that:

sudo yum update

2.  Verify if cronie package is installed

To automate the system tasks, or better known as jobs under Linux, you can use an utility called Cron. Using Cron you can run scripts automatically within a specified period of time, create backup of your databases or other important files, monitor the services running on your server and many other things. To use the Cron utility, you need to install the cronie package on your system. It should be already installed on your server. To confirm, issue the following command:

sudo rpm -q cronie

3. Install cronie package

If it is not installed, you can use yum to install it. Yum is a package manager which you can use to install and manage software on CentOS 7. Run the command below:

sudo yum install cronie

4. Check if  crond service is running

The cron jobs are picked by the crond service. To check whether the crond service is running on your CentOS VPS, you can use the following command:

sudo systemctl status crond.service

5. Configure cron jobs

To configure cron jobs you need to modify the /etc/crontab file. Please note that it can only be modified by the root user. To check the current configuration, you can use the following command:

sudo cat /etc/crontab

The output should be similar to the one below:

SHELL=/bin/bash
PATH=/sbin:/bin:/usr/sbin:/usr/bin
MAILTO=root

# For details see man 4 crontabs

# Example of job definition:
# .---------------- minute (0 - 59)
# |  .------------- hour (0 - 23)
# |  |  .---------- day of month (1 - 31)
# |  |  |  .------- month (1 - 12) OR jan,feb,mar,apr ...
# |  |  |  |  .---- day of week (0 - 6) (Sunday=0 or 7) OR sun,mon,tue,wed,thu,fri,sat
# |  |  |  |  |
# *  *  *  *  * user-name  command to be executed
37 * * * * root run-parts /etc/cron.hourly
23 5 * * * root run-parts /etc/cron.daily
19 3 * * 0 root run-parts /etc/cron.weekly
23 0 6 * * root run-parts /etc/cron.monthly

As you can see the crontab file already contain explanation about how to define your own jobs. The syntax is the following:

minute hour day month day_of_week username command

An asterisk (*) in the crontab can be used to specify all valid values, so if you like command to be executed every day at midnight, you can add the following cron job:

0 0 * * * root /sample_command >/dev/null 2>&1

Your cron job will be run at:

2016-06-10 00:00:00
2016-06-11 00:00:00
2016-06-12 00:00:00
2016-06-13 00:00:00
2016-06-14 00:00:00
...

Specific users can create cron jobs too. The cron jobs for specific users are located in /var/spool/cron/username. When you create cron jobs for specific users you do not need to specify the username in the cron job. Therefore the syntax will be like the one below:

minute hour day month day_of_week command

6.  Restart the crond service

After you make the changes restart the crond service using the command below:

sudo systemctl restart crond.service

For more information you can check the man pages:

man cron

and

man crontab

If it is difficult for you to set up correct cron jobs at the beginning, you can use some cron job calculator to generate the cron job expression. There are several good cron job calculators available on the Internet.

Read Also: Ubuntu crontab


Of course you don’t have to use CentOs crontab, if you use one of our CentOS VPS hosting services, in which case you can simply ask our expert Linux admins to help you with crontab on CentOS to Automate system tasks. They are available 24×7 and will take care of your request immediately.

PS. If you liked this post, on how to use the CentOS crontab,  please share it with your friends on the social networks using the buttons on the left or simply leave a reply below. Thanks.

Factory Method Design Pattern

Factory Method Design Pattern

Intent

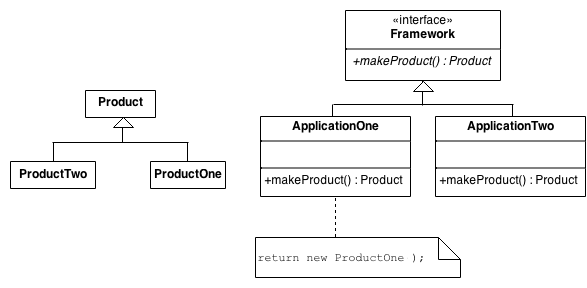
  • Define an interface for creating an object, but let subclasses decide which class to instantiate. Factory Method lets a class defer instantiation to subclasses.
  • Defining a “virtual” constructor.
  • The new operator considered harmful.

Problem

A framework needs to standardize the architectural model for a range of applications, but allow for individual applications to define their own domain objects and provide for their instantiation.

Discussion

Factory Method is to creating objects as Template Method is to implementing an algorithm. A superclass specifies all standard and generic behavior (using pure virtual “placeholders” for creation steps), and then delegates the creation details to subclasses that are supplied by the client.

Factory Method makes a design more customizable and only a little more complicated. Other design patterns require new classes, whereas Factory Method only requires a new operation.

People often use Factory Method as the standard way to create objects; but it isn’t necessary if: the class that’s instantiated never changes, or instantiation takes place in an operation that subclasses can easily override (such as an initialization operation).

Factory Method is similar to Abstract Factory but without the emphasis on families.

Factory Methods are routinely specified by an architectural framework, and then implemented by the user of the framework.

Structure

The implementation of Factory Method discussed in the Gang of Four (below) largely overlaps with that of Abstract Factory. For that reason, the presentation in this chapter focuses on the approach that has become popular since.

Scheme of Factory Method

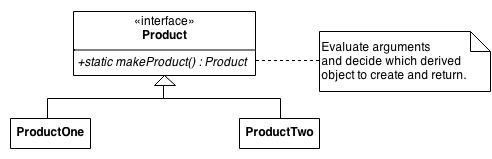
An increasingly popular definition of factory method is: a static method of a class that returns an object of that class’ type. But unlike a constructor, the actual object it returns might be an instance of a subclass. Unlike a constructor, an existing object might be reused, instead of a new object created. Unlike a constructor, factory methods can have different and more descriptive names (e.g. Color.make_RGB_color(float red, float green, float blue) andColor.make_HSB_color(float hue, float saturation, float brightness)

Scheme of Factory Method

The client is totally decoupled from the implementation details of derived classes. Polymorphic creation is now possible.

Scheme of Factory Method

Example

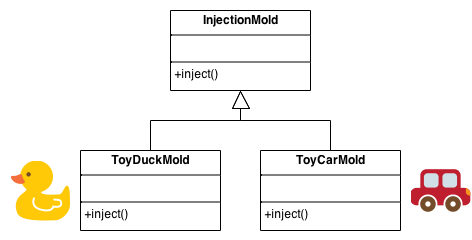
The Factory Method defines an interface for creating objects, but lets subclasses decide which classes to instantiate. Injection molding presses demonstrate this pattern. Manufacturers of plastic toys process plastic molding powder, and inject the plastic into molds of the desired shapes. The class of toy (car, action figure, etc.) is determined by the mold.

Example of Factory Method

Check list

  1. If you have an inheritance hierarchy that exercises polymorphism, consider adding a polymorphic creation capability by defining a static factory method in the base class.
  2. Design the arguments to the factory method. What qualities or characteristics are necessary and sufficient to identify the correct derived class to instantiate?
  3. Consider designing an internal “object pool” that will allow objects to be reused instead of created from scratch.
  4. Consider making all constructors private or protected.

Rules of thumb

  • Abstract Factory classes are often implemented with Factory Methods, but they can be implemented using Prototype.
  • Factory Methods are usually called within Template Methods.
  • Factory Method: creation through inheritance. Prototype: creation through delegation.
  • Often, designs start out using Factory Method (less complicated, more customizable, subclasses proliferate) and evolve toward Abstract Factory, Prototype, or Builder (more flexible, more complex) as the designer discovers where more flexibility is needed.
  • Prototype doesn’t require subclassing, but it does require an Initialize operation. Factory Method requires subclassing, but doesn’t require Initialize.
  • The advantage of a Factory Method is that it can return the same instance multiple times, or can return a subclass rather than an object of that exact type.
  • Some Factory Method advocates recommend that as a matter of language design (or failing that, as a matter of style) absolutely all constructors should be private or protected. It’s no one else’s business whether a class manufactures a new object or recycles an old one.
  • The new operator considered harmful. There is a difference between requesting an object and creating one. The new operator always creates an object, and fails to encapsulate object creation. A Factory Method enforces that encapsulation, and allows an object to be requested without inextricable coupling to the act of creation.

Facade Design Pattern

Facade Design Pattern

Intent

  • Provide a unified interface to a set of interfaces in a subsystem. Facade defines a higher-level interface that makes the subsystem easier to use.
  • Wrap a complicated subsystem with a simpler interface.

Problem

A segment of the client community needs a simplified interface to the overall functionality of a complex subsystem.

Discussion

Facade discusses encapsulating a complex subsystem within a single interface object. This reduces the learning curve necessary to successfully leverage the subsystem. It also promotes decoupling the subsystem from its potentially many clients. On the other hand, if the Facade is the only access point for the subsystem, it will limit the features and flexibility that “power users” may need.

The Facade object should be a fairly simple advocate or facilitator. It should not become an all-knowing oracle or “god” object.

Structure

Facade takes a “riddle wrapped in an enigma shrouded in mystery”, and interjects a wrapper that tames the amorphous and inscrutable mass of software.

Facade scheme

SubsystemOne and SubsystemThree do not interact with the internal components of SubsystemTwo. They use the SubsystemTwoWrapper “facade” (i.e. the higher level abstraction).

Facade scheme

Example

The Facade defines a unified, higher level interface to a subsystem that makes it easier to use. Consumers encounter a Facade when ordering from a catalog. The consumer calls one number and speaks with a customer service representative. The customer service representative acts as a Facade, providing an interface to the order fulfillment department, the billing department, and the shipping department.

Facade example

Check list

  1. Identify a simpler, unified interface for the subsystem or component.
  2. Design a ‘wrapper’ class that encapsulates the subsystem.
  3. The facade/wrapper captures the complexity and collaborations of the component, and delegates to the appropriate methods.
  4. The client uses (is coupled to) the Facade only.
  5. Consider whether additional Facades would add value.

Rules of thumb

  • Facade defines a new interface, whereas Adapter uses an old interface. Remember that Adapter makes two existing interfaces work together as opposed to defining an entirely new one.
  • Whereas Flyweight shows how to make lots of little objects, Facade shows how to make a single object represent an entire subsystem.
  • Mediator is similar to Facade in that it abstracts functionality of existing classes. Mediator abstracts/centralizes arbitrary communications between colleague objects. It routinely “adds value”, and it is known/referenced by the colleague objects. In contrast, Facade defines a simpler interface to a subsystem, it doesn’t add new functionality, and it is not known by the subsystem classes.
  • Abstract Factory can be used as an alternative to Facade to hide platform-specific classes.
  • Facade objects are often Singletons because only one Facade object is required.
  • Adapter and Facade are both wrappers; but they are different kinds of wrappers. The intent of Facade is to produce a simpler interface, and the intent of Adapter is to design to an existing interface. While Facade routinely wraps multiple objects and Adapter wraps a single object; Facade could front-end a single complex object and Adapter could wrap several legacy objects.

Question: So the way to tell the difference between the Adapter pattern and the Facade pattern is that the Adapter wraps one class and the Facade may represent many classes?

Answer: No! Remember, the Adapter pattern changes the interface of one or more classes into one interface that a client is expecting. While most textbook examples show the adapter adapting one class, you may need to adapt many classes to provide the interface a client is coded to. Likewise, a Facade may provide a simplified interface to a single class with a very complex interface. The difference between the two is not in terms of how many classes they “wrap”, it is in their intent.

Common OpenCart Errors and How to Solve Them

Common OpenCart Errors and How to Solve Them

There is nothing more excited then try to build your own ecommerce store. Installing OpenCart extensions and themes, modificate them to your need and learn new thing during development. But most OpenCart users know how frustrating it can be get an unexpected error and not be able to find a solution for it.

Most OpenCart issues are solvable. If you got an error, don’t fret because other OpenCart user had the same problem and already gotten it solved. This tutorial collecting most common errors that repeatedly asked by OpenCart users at community forum. Sometime the same error have different error messages, that why we organize the error variant and solution for it.

Before continue, you need to know that an error usually trigger another errors. This is commonly happen because when your code breaks, the rest of code will not work and cause another error. No need to be confuse, the first error is the key. Recognise the error, find issue in your code and try to solve them with solution as suggested on this tutorial.

1. Blank White Pages or 500 Internal Server Error

Blank white pages is a PHP errors that for some reason the error messages isn’t show because your server is not setup to display the errors. While the 500 Internal Server Error means something has gone wrong but the server cannot specifically state what the exact problem is.

The similiarity of both issue is it doesn’t give us a clue what exactly happen, or what files triggering the errors. So, first step before we try to solve the errors is try to show the error messages. Then use the error message as starting point to investigate what is the error cause. Here are a few ways to show the error messages:

  1. Set your “Output Compression Level” to 0 in the System > Settings > Server tab.
  2. Then open php.ini and add code below: 1 2 3 display_errors = 1;error_reporting = E_ALL;log_errors = 1;
  3. If your server not read the php.ini, we will use an alternative method. Open index.php and add code below at the top (line 2): 1 2 3 ini_set('display_errors', 1);ini_set('log_errors', 1);error_reporting(E_ALL);
  4. When you have fixed the problem, remove code line above.

2. Undefined Index / Variable

The error appears when you referencing variable that not been declared. In programming approach set the variable or use isset() to checks if the variable has been set will solve the issue. But for an application to get this issue mean there is a bugs in it, whether it’s OpenCart or extensions files. Or you do some modification on unappropriate way.

Error variant:
  • PHP Notice: Undefined index: company in /path/public_html/catalog/model/account/customer.php on line 8
  • PHP Notice: Undefined variable: order_id in /path/public_html/catalog/controller/account/order.php on line 149
  • PHP Notice: Undefined variable: product in /path/public_html/vqmod/vqcache/vq2-catalog_view_theme_default_template_product_product.tpl on line 272
Solution
  1. If you get this issue on clean OpenCart installation, share the bugs at OpenCart forum. It will help OpenCart developer to develope bugs fix.
  2. When you get this issue after installing an extension, disable the extension then report it to the developer.
  3. If the error refer to file inside the “/vqmod/vqcache” folder, it’s mean the error caused by vQmod file. Disable the vQmod file by rename it to vqmod_file.xml_ and report the bugs to the developer.

3. Undefined Function / Method

If you get “Fatal error: Call to undefined function” or “Fatal error: Call to undefined method” means you try to call the function/ method that doesn’t exist. Commonly happen if files is not uploaded properly or the extensions is not compatible with your OpenCart version; or it’s really doesn’t exist. Here, I will try to classify the problem based on error message.

Error variant:

Related to OpenCart core files

  • Fatal error: Call to undefined function utf8_strlen() in /path/public_html/system/helper/utf8.php on line 39
  • Fatal error: Call to undefined method Customer::isLogged() in /path/public_html/catalog/model/catalog/product.php on line 8
  • Warning: require_once(/path/public_html/system/library/customer.php) [function.require-once]: failed to open stream: No such file or directory in /path/public_html/index.php on line 22
  • Fatal error: require_once() [function.require]: Failed opening required‘/path/public_html/system/library/customer.php’ (include_path=’.:/usr/lib/php’) in /path/public_html/index.php on line 22

Related to vQmod files

  • Fatal error: Call to undefined method ModelAccountCustomer::getPaymentAddress() in /path/public_html/vqmod/vqcache/vq2-catalog_controller_checkout_confirm.php on line 38

Related to PHP built-in functions

  • Fatal error: Call to undefined function imagecreatefromjpeg() in /path/public_html/system/library/image.php on line 34
  • Fatal error: Call to undefined function mysql_connect() in /path/public_html/system/database/mysql.php on line 6
Solution

Related to OpenCart core files

  1. Some file is not uploaded or it’s corrupted during upload process. Reupload the files to your server with ASCII mode, not binary.
  2. In some case, this issue appear because server path is not configured properly at config.php. So recheck your server path in config.php and admin/cofig.php
  3. “Warning/ Fatal error: require_once” mean the file is not available. You need to reupload the file mentioned on the error message or fix the server path at config.php as mentioned above.

Related to vQmod files

  1. vQmod fails to generate new cache from the extensions vQmod files. Check vqmod/cachefolder permission, make sure it’s writable and clear all cache files.
  2. Enabled / disabled one by one vQmod files you have. Once you get the cause, contact the developer.
  3. The extensions is not compatible with your OpenCart version or it have a bug. Contact the developer.

Related to PHP built-in functions

  1. PHP have lot of built-in functions, you can check it here. Errors related to PHP built-in function is server issues. Contact your host to solve this.

4. Headers Already Sent

You get an error message “headers already sent” right after installing, modificating, updating OpenCart or vQmod files. There is a good refference explaining the issue.

Error variant:
  • Warning: Cannot modify header information – headers already sent by (output started at /path/public_html/config.php:31) in /path/public_html/index.php on line 175.
  • Warning: session_start() [function.session-start]: Cannot send session cookie – headers already sent by (output started at /path/public_html/config.php:31) in /path/public_html/system/library/session.php on line 11.
  • Warning: session_start() [function.session-start]: Cannot send session cache limiter – headers already sent (output started at /path/public_html/config.php:31) in /path/public_html/system/library/session.php on line 11.
Solution:

Download the file stated at the error message then apply solution bellow:

  1. Remove spaces at begining and end of file. 1 2 3   <?php //contain spaceecho"remove all space or line-break before <?php and after ?>";?>
  2. Resave the file with Notepad++ or other editor (encode file as ANSI or UTF-8 without BOM).
  3. Reupload to server through FTP in ASCII mode, not binary.

5. Session Issue

PHP session store user information on the server for later use (i.e. login status, shopping items, etc) across the page requests. Session is temporary information and will be deleted after the user left the website. OpenCart use session on lot of aspect like login status, product cart, compare etc. In most case, session issue will throw error messages. But there is time when it’s not show any error message; to recognise it, here is some indication of session issue:

  1. Product on the cart is self-cleared.
  2. Product on the cart is cleared after user logged in.
  3. No items stored at product compares.
  4. OpenCart admin always asking to login and get message “Invalid token session. Please login again”.
Error variant:
  • Warning: session_start () [function.session-start]: open (/tmp/sess_41abirkdiesf9efwej46wtib2, O_RDWR) failed: No such file or directory (2) in /path/public_html/system /library /session.php on line 11
  • Warning: session_start () [function.session-start]: open (/tmp/sess_41abirkdiesf9efwej46wtib2, O_RDWR) failed: Permission denied (13) in /path/public_html/system /library /session.php on line 11
  • Warning: session_start() [function.session-start]: open(/tmp/sess_41abirkdiesf9efwej46wtib2, O_RDWR) failed: No space left on device (28) in /path/public_html/upload/system/library/session.php on line 11
Solution:

No such file or directory issue

  1. Open php.ini and add code below: 1 session.save_path = /tmp;
  2. If solution above not work, contact your host and ask them how to set session.save_path.

Other errors

  1. “Permission denied”, ask your hosting to check the session directory permission.
  2. “No space left on device”, ask your hosting is it server issue or you need to upgrade to larger hosting space.

6. Allowed Memory Size Exhausted

This error happen because your memory is not enough to execute the php code (uploading large image, delete lot of products, send mass mails etc). Increasing the memory allocated for PHP will solve the issue.

Error variant:
  • Fatal error: Allowed memory size of 536870912 bytes exhausted (tried to allocate 47200 bytes) in /path/public_html/system/library/image.php on line 34
  • Fatal error: Allowed memory size of 33554432 bytes exhausted (tried to allocate 13069817 bytes) in /path/public_html/system/library/mail.php on line 144
  • Fatal error: Out of memory (allocated 33554432) (tried to allocate 14024 bytes) in /path/public_html/library/image.php on line 34
Solution:

Apply one of solutions bellow to increasing the limit to 64MB, 128MB, 256MB or 512MB -depends on your host.

  1. Edit php.ini 1 memory_limit = 128M;
  2. Or put code below to .htaccess 1 php_value memory_limit 128M
  3. If you oftenly get this error and solution above isn’t work, contact your host. In most shared hosting, there is maximum memory_limit. You can’t set memory-limit to 64Mb if you get max 32Mb.

7. Restriction in effect

You get an error message “SAFE MODE Restriction in effect”. This is a PHP restriction issue, and your server account is trying to run a -builtin PHP- functions but doesn’t have access to run it. This issue is nothing to do with OpenCart, but related to your server configuration.

Error variant:
  • Warning: session_start() [function.session-start]: SAFE MODE Restriction in effect. The script whose uid is 10025 is not allowed to access /path/public_html/system/library/session.php on line 11
  • Warning: imagejpeg() [function.imagejpeg]: SAFE MODE Restriction in effect. The script whose uid is 10305 is not allowed to access /path/public_html/image/cache/data owned by uid 48 in /path/public_html/system/library/image.php on line 44
  • Warning: is_dir(): open_basedir restriction in effect. File(/path/public_html/image/87cngmlc22pe96fof5fhmq9c290phri7) is not within the allowed path(s): (/path/server/) in /path/public_html/catalog/controller/checkout/confirm.php on line 248
Solution
  1. Safe Mode and open_basedir restriction is a server issue, ask your host to turn off the restriction is the best way to fix the issue.
  2. But in case you wanna try to resolve it, try this solution: 1 2 3 4 5 6 7 // Put code bellow at php.inisafe_mode = Off;--- or---// Put code bellow at .htaccessphp_value safe_mode off

Usefull Tools

System Information

System Information provide server information, PHP built-in functions and file/ folder permission that required or recomended by OpenCart. This extension will help you to monitor that your site / server meet OpenCart requirements to work well. You can download it at OpenCart Marketplace.

vQmod Manager

vQmod Manager allows users to managing vQmod files. This extension display vQmod file information and help you to manage (Upload, delete, install, uninstall and backup) and monitor the vQmod files through the admin panel. You can download it at OpenCart Marketplace.

The Top 3 Reasons an Application Hangs

The Top 3 Reasons an Application Hangs

Do you experience application hang problems? If so, read this article to discover the top 3 reasons applications hang and cause slow performance.

If you have been in the IT industry long enough, you probably know this story well. The application works fine, then, suddenly, the application hangs with no apparent reason. You restart the application and it all goes away.A week passes, maybe two, and then the application hangs again. Another restart and you’re back. It doesn’t crash or fail (no crash dump or thread dump)—it just sits there and hangs. No users are being served.

Eventually you decide to just restart every night hoping it will not hang again. It doesn’t matter if you’re using a Tomcat application server, WebSphere, WebLogic, JBoss or whatever — if you have been in the software development business long enough, you must have experienced this problem. This is where application monitoring can help.

Below are the top 3 reasons why an application server hangs:

Reason #1: it’s a database problem.

This may sound strange, but the main reason an application server hangs is not directly related to the application server itself. The location of the symptom is rarely the location of the root cause. The following scenario is quite common:

  • The database is bottlenecked, causing queries to run slower than usual.
  • Requests that used to take 1 second, now take 5 seconds to complete.
  • The average number of concurrent requests slowly increases (due to backlog).
  • The server runs out of threads and the application server hangs.

If you manage to get a thread dump, you’ll just see a bunch of threads waiting and another group that’s actually running. Another possibility is that the number of waiting threads (or queued threads) will gobble up all available memory and, eventually, lead to an OutOfMemory error.

Reason #2: deadlocks.

If it seems that the application server is doing nothing, look for deadlocks. These can be database deadlocks that cause your SQL queries to hang, or seek the update statements. For example, a transaction log that is written to the database for each request may easily hang the entire application if the log table is locked. It can also be a deadlock of the application re-accessing itself. Do you have any HTTP SOAP calls from one application server to another? Also check for shared objects—an operating system file that is written to from multiple threads at once.

Reason #3: run-away thread.

In cases where the application server is indeed to blame, you should look for a run-away thread. These are hard to detect because they hardly show up on logs since they are usually only written when the request has completed. A run-away thread will probably not return until it has already affected the entire application. Therefore, the hanging request will not be written to the log. These ‘runaway’ threads typically include infinite loops in code. For example, a query that should show results that does not include the option of paging between result pages suddenly needs to display a large number of results. The page takes forever to render and clobbers the application server, eventually causing it to hang.

These types of application hangs are extremely difficult to diagnose and detect. The hardest part is isolating the root cause of the problem. If the application server hangs, it doesn’t necessarily mean that the problem resides there. It usually doesn’t. End-to-end transaction management tools, such as SharePath by Correlsense, helps to pinpoint the reasons for an application hang by providing a real-time view into the entire application behavior.

how to install laravel

how to install laravel

Install Composer

Laravel utilizes Composer to manage its dependencies. First, download a copy of the composer.phar. Once you have the PHAR archive, you can either keep it in your local project directory or move to usr/local/bin to use it globally on your system. On Windows, you can use the Composer Windows installer.

Install Laravel

Via Laravel Installer

First, download the Laravel installer using Composer.

composer global require "laravel/installer=~1.1"

Make sure to place the ~/.composer/vendor/bin directory in your PATH so the laravelexecutable is found when you run the laravel command in your terminal.

Once installed, the simple laravel new command will create a fresh Laravel installation in the directory you specify. For instance, laravel new blog would create a directory named blog containing a fresh Laravel installation with all dependencies installed. This method of installation is much faster than installing via Composer.

Via Composer Create-Project

You may also install Laravel by issuing the Composer create-project command in your terminal:

composer create-project laravel/laravel {directory} 4.2 --prefer-dist

Via Download

Once Composer is installed, download the 4.2 version of the Laravel framework and extract its contents into a directory on your server. Next, in the root of your Laravel application, run the php composer.phar install (or composer install) command to install all of the framework’s dependencies. This process requires Git to be installed on the server to successfully complete the installation.

If you want to update the Laravel framework, you may issue the php composer.phar updatecommand.

Server Requirements

The Laravel framework has a few system requirements:

  • PHP >= 5.4
  • MCrypt PHP Extension

As of PHP 5.5, some OS distributions may require you to manually install the PHP JSON extension. When using Ubuntu, this can be done via apt-get install php5-json.

Configuration

The first thing you should do after installing Laravel is set your application key to a random string. If you installed Laravel via Composer, this key has probably already been set for you by the key:generate command. Typically, this string should be 32 characters long. The key can be set in the app.php configuration file. If the application key is not set, your user sessions and other encrypted data will not be secure.

Laravel needs almost no other configuration out of the box. You are free to get started developing! However, you may wish to review the app/config/app.php file and its documentation. It contains several options such as timezone and locale that you may wish to change according to your application.

Once Laravel is installed, you should also configure your local environment. This will allow you to receive detailed error messages when developing on your local machine. By default, detailed error reporting is disabled in your production configuration file.

Note: You should never have app.debug set to true for a production application. Never, ever do it.

Permissions

Laravel may require one set of permissions to be configured: folders within app/storagerequire write access by the web server.

Paths

Several of the framework directory paths are configurable. To change the location of these directories, check out the bootstrap/paths.php file.

Pretty URLs

Apache

The framework ships with a public/.htaccess file that is used to allow URLs without index.php. If you use Apache to serve your Laravel application, be sure to enable the mod_rewrite module.

If the .htaccess file that ships with Laravel does not work with your Apache installation, try this one:

Options +FollowSymLinks
RewriteEngine On

RewriteCond %{REQUEST_FILENAME} !-d
RewriteCond %{REQUEST_FILENAME} !-f
RewriteRule ^ index.php [L]

Nginx

On Nginx, the following directive in your site configuration will allow “pretty” URLs:

location / {
    try_files $uri $uri/ /index.php?$query_string;
}